 Placing Valves
Placing ValvesThe Valve tool places an irrigation valve with parameters from a selected manufacturer or a custom valve with parameters that can be specified after placement. Various valves provide a wide array of functions in an irrigation system. Depending on the type of valve, different parameters are available.
● Control or zone valves connect the system’s main line to the associated lateral lines and downstream outlets.
● Master valves connect the entire irrigation system to the water source near the point of connection.
● Zone kit valves consist of valve, filter, and regulator in preassembled kits.
A valve added to a pipe splits the existing pipe in two.

To place valves on the drawing:
Click the Valve tool from the Irrigation tool set. Click Valve on the Tool bar. From the Resource Selector, double-click a resource to activate it. Select from one of the manufacturer libraries, or select the custom valve from Custom.vwx and set its properties after placement.
Click once to place the valve. If placing the valve over an existing pipe or irrigation pipe network, the connecting pipe is highlighted and the valve is automatically connected to the network.
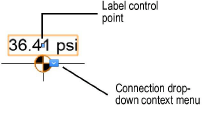
Adjust the location of the valve labels by dragging the label control point.
The valve properties can be edited from the Object Info palette. Available parameters depend on the valve type.
► Click to show/hide the parameters.
~~~~~~~~~~~~~~~~~~~~~~~~~