Creating Landscape Areas
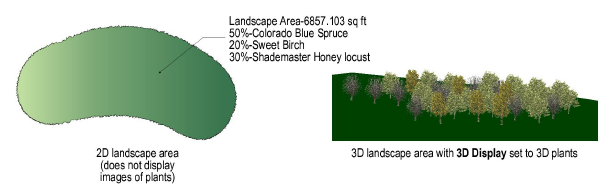
Creating Landscape AreasLandscape areas are defined regions of plant combinations. These can be useful for conceptual landscape planning and for specifying large planting or reforestation areas, when individual plant symbols do not need to be drawn. Plant information from a landscape area is based on plant symbol data, and is included in plant list worksheets. If a site model is present, the landscape area is calculated based on the site model and displays in the Landscape Area Settings dialog box.
A landscape area can also be created without plant information specified, for use as a general ground cover or mulch area with a label showing the total area required.
Landscape areas are created with the Landscape Area tool, which offers several modes for defining the areas. Landscape area objects can also be created by drawing a polyline and then selecting the Create Objects from Shapes command (see Creating Objects from Shapes).
► Click here for a video tip about this topic (internet access required).

Mode |
Description |
Insertion |
Draws a landscape area using the selected polyline creation options and the current preference settings |
Pickup |
Picks up the settings and attributes of an existing landscape area and makes those the default preference settings for subsequently created objects. The landscape area’s Name parameter is given a suffix with sequential numbers for new landscape areas. |
Bucket |
Converts an existing polyline, polygon, rectangle, circle, or arc to a landscape area and applies the current preference settings |
Landscape Area |
Opens the Resource Selector to select a resource for placement; double-click a resource to activate it |
Polyline creation options |
Selects the method for drawing the polyline upon which the object is based; see Creating Polylines |
Preferences |
Opens the Landscape Area Settings dialog box to set the default preferences for landscape areas |

To create a landscape area:
Click the Landscape Area tool from the Site Planning tool set.
Do one of the following:
● To use an existing landscape area from the resource libraries, click Landscape Area on the Tool bar. From the Resource Selector, double-click a resource to activate it.
● To create a custom landscape area, click Preferences from the Tool bar. From the Landscape Area Settings dialog box, set the default properties and click OK. The properties can be edited from the Object Info palette.
To apply the settings from an existing landscape area in the drawing, click Pickup mode from the tool bar and then click on the landscape area from which to pick up settings. Create the new landscape area either by drawing it using the Insertion mode and appropriate polyline creation options or by clicking Bucket mode from the Tool bar and then selecting an existing polyline, polygon, rectangle, circle, or arc to convert into a landscape area. The picked up settings are automatically applied to the new landscape area.
► Click to show/hide the parameters.
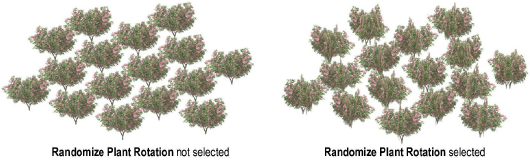
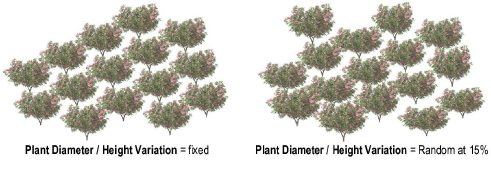
Click Add or select a plant from the Plant list and click Edit to open the Edit Plant Information dialog box and specify the plants included in the landscape area, as well as their frequency.
► Click to show/hide the parameters.
Click OK, and then click OK again to close the Landscape Area Settings dialog box.
Click the appropriate mode in the Tool bar to select the boundary creation method of the landscape area.
For more information on the Polyline tool modes, see Creating Polylines.
Click to set the landscape area’s start point.
Click to set the end of the segment and the beginning of the next. Continue drawing segments in this manner until the landscape area object is complete.
To save the landscape area settings as a resource for future landscape areas, click Save Landscape Area on the Object Info palette and enter a name for the landscape area resource.
The appearance of the landscape area is controlled by several methods.
● Change the landscape area parameters from the Object Info palette, including specifying a general unit price (for indicating the price per square unit in worksheets), price code (such as a SKU number) and vertex parameters; click Landscape Area Settings from the Object Info palette to change landscape area information and other preference parameters
● Change the landscape area 2D attributes from the Attributes palette
● Change the landscape area tag appearance by editing its parameters from the Object Info palette, editing the tag class properties, and/or moving tag control points (similar to a plant tag; see Plant Tag Appearance)
● To align landscape area tags for improved readability, use the Align/Distribute Leader Lines command (see Aligning and Distributing Leader Lines)
● Reshape the landscape area by double-clicking on it; the Reshape tool is automatically activated, to reshape the object directly in the drawing
● Right-click on the landscape area object and select Edit from the context menu. The Edit Landscape Area dialog box opens. Either edit the settings of the selected landscape area, or edit the shape of the object path with the Reshape tool.
~~~~~~~~~~~~~~~~~~~~~~~~~