 Creating Roof Components
 Creating Roof Components
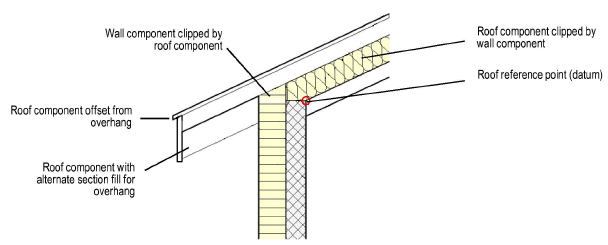
Roof components define the sections that make up a roof. For example, to indicate that a roof is made up of gypsum board ceiling, wood framing, insulation, and asphalt shingles, define a component for each of these items to illustrate their location. Roof components can be offset from the edges of the walls (automatically bounded roofs) or the edge of the roof (manual roofs). Their appearance can be specified for cross-section views, especially where they intersect with walls. They can be textured, creating realistic section views and rendered views, as well as accurate roof material estimates. The area and volume of roof components (minus any holes cut) can be calculated in worksheets; see Worksheet Functions). The overall thickness of a roof is equal to the sum of its components; therefore, for a styled roof, the Thickness parameter is not available.
Component fill and pen style are only displayed in section viewports.


To define roof components prior to drawing the roof or roof face:
Select Roof Preferences from the Style list in the Create Roof or Create Roof Face dialog box.
The Roof Preferences dialog box opens.
From the Definition tab, click New.
The Roof Component Settings dialog box opens. Specify the component name, thickness, edge offset, and appearance in section views and rendered views.
► Click to show/hide the parameters.
Click OK to create the component and return to the Roof Preferences dialog box.
The roof’s Overall Thickness value changes to be determined by its components. As components are defined, they display in the preview. Click and drag a component in the # column to change its order. Determine which component is the datum component by clicking in the Datum column. Set the datum to the top or bottom of the component.
To save the component settings with the roof settings as a roof style, click Save Preferences as Roof Style.
Click OK.
Once created, the components of a selected roof can be edited by clicking Components from the Object Info palette.
To define or edit roof components for an existing, unstyled roof or roof face:
Select the roof.
From the Object Info palette, click Components.
Since the components are part of a roof style’s definition, if the roof is styled, its components cannot be edited unless Edit Style or Convert To Unstyled Roof is first selected from the Style list.
The Roof Components dialog box opens.
► Click to show/hide the parameters.
Click New or Edit, and define or edit the components as described in Defining Components Prior to Creating the Roof.
Click OK to return to the Roof Components dialog box.
Click OK. The new component definition is applied to the selected roof.
~~~~~~~~~~~~~~~~~~~~~~~~~