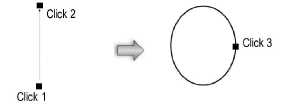
The Oval tool has three modes available. The Push/Pull mode is available in 3D views for instantly extruding the oval after creation.

Mode |
Description |
|
Box |
Defines the dimensions of the box containing the oval |
|
Height and Width |
Defines the height and width distances to create the oval |
|
Center |
Defines the center, then the major and minor radii to create the oval |
|
Push/Pull (3D views only) |
Instantly extrudes the oval after creation; available in 3D views |

To create an oval by box:
Click the Oval tool from the Basic palette, and click the Box mode.
Click to set the first point of the box containing the oval and then click again to set.
To create a true circle, press the Shift key while creating the oval.


To create an oval by width and height:
Click the Oval tool from the Basic palette, and click the Height and Width mode.
Click to set the first point of the oval height, and then move the cursor to define the height.
Move the cursor, and then click to define the oval width.


To create an oval by center:
Click the Oval tool from the Basic palette, and click the Center mode.
Click to set the center point of the oval, and then move the cursor and click to define one of the radii.
Move the cursor and then click to define the other radius.

A planar oval that has been created in a 3D view can be extruded immediately after creation.

To extrude a created oval:
Enable the Push/Pull mode in the Tool bar for the Oval tool.
Create an oval using any of the modes in the Tool bar.
With the oval still selected, click, move the cursor, and then click to create the extrude.

An oval can be extruded at any time with the Push/Pull tool. See Direct Modeling with the Push/Pull Tool.
The extrude height can be changed with the Reshape tool (see Reshaping Extruded Objects and Solid Primitives), or modified from the Object Info palette.