
The Rotated mode of the Text tool creates text at an angle. Text objects can also be rotated after they are created; see Rotating Objects for details.
To create rotated text:
Click the Text tool from the Basic palette, and click Rotated from the Tool bar.
From the Tool bar, enable the Tight Fill mode and set the Text Style.
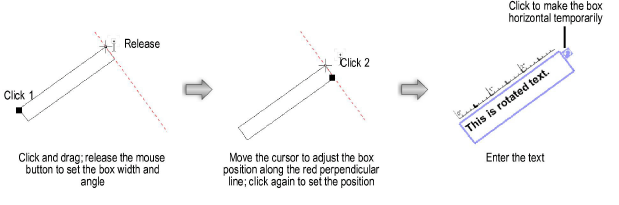
Click and drag the mouse to specify the angle and width of the text box, and release the mouse button to set. If needed, move the cursor to adjust the text box position along a line perpendicular to the text box. Click again to set the position.
When drawing in rotated plan view (Vectorworks Design Series required), set angle snapping to snap to the plan rotation angle (see Angle Snapping) and display the Rotated Plan cue. If the text is created to the same angle as the plan, when the plan is unrotated, the text will align with the world coordinate system.
A text editing box with a blinking cursor displays.
To always create and edit rotated text in a horizontal text box, select Edit text horizontally by default on the Edit tab of the Vectorworks preferences (see Vectorworks Preferences: Edit Tab).
Enter the text. The text automatically wraps to the next line when it reaches the edge of a text box. To end the current paragraph and start a new one in the current text block, press Enter.
When the text block is complete, press the Esc key.
~~~~~~~~~~~~~~~~~~~~~~~~~