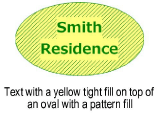
The Tight Fill mode of the Text tool modifies the fill applied to a text object so that the fill displays only behind the text on any given line. Blank lines have no fill.

To create text with a tight fill:
Click the Text tool from the Basic palette, and click Tight Fill from the Tool bar.
From the Tool bar, click either the Horizontal or Rotated mode, and set the Text Style.
From the Attributes palette, select the fill for the text object (unless the selected text style has a background fill).
Click and drag to create a text box of the approximate width needed.
A text editing box with a blinking cursor displays. The position of the text cursor indicates the horizontal alignment of the text to be placed.
Enter the text. The text automatically wraps to the next line when it reaches the edge of a text box. To end the current paragraph and start a new one in the current text block, press Enter.
When the text block is complete, press the Esc key.

~~~~~~~~~~~~~~~~~~~~~~~~~