Click here for a video tip about this topic (internet access required).
The Rectangle tool has four drawing modes available. The Push/Pull mode is available in 3D views for instantly extruding the rectangle after creation.
|
|
Click here for a video tip about this topic (internet access required). |

|
Mode |
Description |
|
Corner to Corner |
Defines the rectangle by clicking two diagonal points |
|
Center to Corner |
Defines the rectangle by the distance from the center to one corner |
|
Midpoint to Corner |
Defines the rectangle by the distance from the midpoint of one side to an opposite corner |
|
Three Point Rotated |
Creates a rectangle that is rotated by a specified angle |
|
Push/Pull (3D views only) |
Instantly extrudes the rectangle after creation; available in 3D views |
To create a square (1:1 rectangle), press and hold the Shift key while drawing. To create a rectangle with golden ratio proportions (approximately 1:1.618), press and hold Ctrl+Shift (Windows) or Cmd+Shift (Mac) while drawing.
The Ratio field in the Object Info palette displays square, golden, or the ratio of the sides of an unconstrained rectangle.
|
Mode |
Tool |
Tool set |
|
Corner to Corner
|
Rectangle
|
Basic |
To create a rectangle by corner to corner:
Click the tool and mode.
Click at the rectangle’s start point; this point becomes one corner of the rectangle. Move the cursor to the opposite corner until the desired size is previewed.
Click to set a corner point on the rectangle.

|
Mode |
Tool |
Tool set |
|
Center to Corner
|
Rectangle
|
Basic |
To create a rectangle by center to corner:
Click the tool and mode.
Click at the rectangle’s start point; this point becomes the center of the rectangle. Move the cursor to a corner until the desired size is previewed.
Click to set a corner point on the rectangle.

|
Mode |
Tool |
Tool set |
|
Midpoint to Corner
|
Rectangle
|
Basic |
To create a rectangle by midpoint to corner:
Click the tool and mode.
Click at the rectangle’s start point; this point becomes the center of one of the rectangle’s sides. Move the cursor to an opposite corner until the desired size is previewed.
Press the Alt key (Windows) or Option key (Mac) to orient the rectangle vertically.
Click to set a corner point on the rectangle.

|
Mode |
Tool |
Tool set |
|
Three Point Rotated
|
Rectangle
|
Basic |
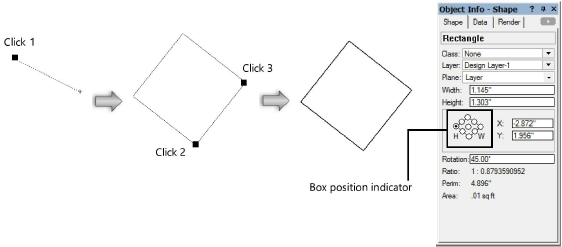
Rotated rectangles are rectangles that are rotated at a specified angle.
To create a three point rotated rectangle:
Click the tool and mode.
Click to set the start of the rectangle. Move the cursor to set the rotated angle.
Click to set the rotation angle. Move the cursor until the desired size is previewed.
Click to create the three point rotated rectangle; the bounding box position indicator in the Object Info palette matches the rotation of the rotated rectangle. (If multiple rotated rectangles are selected, the box position indicator matches the rotation of one rectangle.)

|
Mode |
Tool |
Tool set |
|
Push/Pull
|
Rectangle
|
Basic |
To extrude a created rectangle:
In a 3D view, click the tool and mode.
Create a rectangle using any of the modes described in the previous sections.
With the rectangle still selected, click, move the cursor, and then click to create the extrude.

A planar rectangle can be extruded at any time with the Push/Pull tool. See Direct Modeling with the Push/Pull Tool.
The extrude height can be changed with the Reshape tool (see Reshaping Extruded Objects and Solid Primitives), or modified in the Object Info palette.
~~~~~~~~~~~~~~~~~~~~~~~~~