Inserting doorsInserting doors
Mode |
Tool |
Tool set |
Shortcut |
Modes for The Symbol Insertion tool |
Door
|
Building Shell |
● Alt+Shift+D (Windows) ● Option+Shift+D (Mac) |
To insert a door:
1. Click the tool and appropriate mode.
Alternatively, if placing a curtain wall door into a curtain wall, select a panel with the Edit Curtain Wall tool, and then right-click on the panel and select Insert Door from the context menu. The door is automatically inserted as a curtain wall door.
2. Do one of the following:
● To use an existing door resource, click Active Def on the Tool bar. From the Resource Selector, locate the desired resource, and double-click to activate it.
Individual manufacturer catalog items cannot be selected using the Resource Manager; see Concept: Plug-in object styles and catalog items.
● To create a custom door, click Preferences. The Door Preferences dialog box opens. The settings are grouped into several panes of related parameters, which are listed on the left side of the dialog box. Select each pane and specify the door parameters. These parameters can be edited for placed doors from the Object Info palette in the Door Settings dialog box. Additional parameters are available from the Object Info palette itself, as described in Door properties.
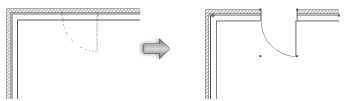
3. Click in the drawing area or in a wall to set the insertion point of the door, and click again to set the rotation. The direction of a door inserted in a wall can be changed later by clicking Flip from the Object Info palette or from the context menu.
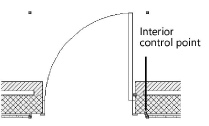
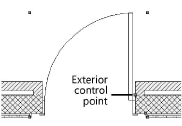
Several features of the door are described as “interior” or “exterior.” These include trim and wall-wrap parts. These elements are determined based on the internal and external faces of the wall. The left side of the wall (as viewed along the wall direction) is always “exterior,” and the right side is “interior” (see Wall direction). Flipping the door does not flip these elements.
|
Click here for a video tip about this topic (internet access required). |
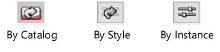
Creating plug-in object styles allows you to create plug-in objects with a combination of parameters that are determined by the manufacturer’s catalog item, by style or by instance. Catalog parameters have a fixed value established by the manufacturer and cannot be edited by the user. Style parameters have a fixed value established by the style; instance parameters can be set independently for each instance of the object in the drawing (see Concept: Plug-in object styles).
![]() Click
to show/hide the parameters.
Click
to show/hide the parameters.
![]() Click
to show/hide the parameters.
Click
to show/hide the parameters.
![]() Click
to show/hide the parameters.
Click
to show/hide the parameters.
3D Visualization options are not enabled for the Opening Configuration.
![]() Click
to show/hide the parameters.
Click
to show/hide the parameters.
![]() Click
to show/hide the parameters.
Click
to show/hide the parameters.
Barn Door options are enabled only for the Barn and Barn Bypass Configuration.
![]() Click
to show/hide the parameters.
Click
to show/hide the parameters.
Jamb options are not enabled for the Opening Configuration or for curtain wall doors.
![]() Click
to show/hide the parameters.
Click
to show/hide the parameters.
Leaf options are not enabled for the Opening Configuration.
![]() Click
to show/hide the parameters.
Click
to show/hide the parameters.
Second door leaf options are enabled only for doors with a two-leaf Configuration and leaves of unequal widths; the narrower pane is considered the second leaf.
![]() Click
to show/hide the parameters.
Click
to show/hide the parameters.
Lights options are not enabled for the Opening Configuration or for curtain wall doors.
![]() Click
to show/hide the parameters.
Click
to show/hide the parameters.
Threshold options are not enabled for the Opening Configuration.
![]() Click
to show/hide the parameters.
Click
to show/hide the parameters.
Louvers can be applied to doors with all Configurations except Opening and Cased Opening.
![]() Click
to show/hide the parameters.
Click
to show/hide the parameters.
Transom options are not enabled for the Opening Configuration or for curtain wall doors.
![]() Click
to show/hide the parameters.
Click
to show/hide the parameters.
Trim options are not enabled for the Opening Configuration or for curtain wall doors.
![]() Click
to show/hide the parameters.
Click
to show/hide the parameters.
Lintel options are not enabled for the Opening Configuration or for curtain wall doors.
![]() Click
to show/hide the parameters.
Click
to show/hide the parameters.
Hardware options are not enabled for the Opening Configuration.
![]() Click
to show/hide the parameters.
Click
to show/hide the parameters.
Kick Plates options are not enabled for the Opening Configuration or for curtain wall doors.
![]() Click
to show/hide the parameters.
Click
to show/hide the parameters.
Centerline markers options are not enabled for curtain wall doors.
![]() Click
to show/hide the parameters.
Click
to show/hide the parameters.
Interior wall detail options are not enabled for curtain wall doors.
![]() Click
to show/hide the parameters.
Click
to show/hide the parameters.
Exterior wall detail options are not enabled for curtain wall doors.
![]() Click
to show/hide the parameters.
Click
to show/hide the parameters.
The visibility of the overall 3D door is controlled by the Class setting from the Object Info palette; part settings are controlled from the Door Settings dialog box.
![]() Click
to show/hide the parameters.
Click
to show/hide the parameters.
 Door
settings: Energos pane
Door
settings: Energos paneDoors play a critical role in energy analysis calculations. Energy is lost through any door glass, and when the door is opened, but energy is also gained by solar radiation through the door glass. Accurately determining the R-Value/U-Value and the shading factor is essential for the overall energy analysis.
Vectorworks Architect is required to conduct an energy analysis; however, energy-related parameters can be specified here for informational purposes.
![]() Click
to show/hide the parameters.
Click
to show/hide the parameters.
Certain data fields represent calculated values and cannot be edited; as a result, the Field Name and Field Value are grayed for those data fields.
![]() Click
to show/hide the parameters.
Click
to show/hide the parameters.
~~~~~~~~~~~~~~~~~~~~~~~~~