 Placing lighting
pipe objectsPlacing lighting
pipe objects
Placing lighting
pipe objectsPlacing lighting
pipe objectsTool |
Tool set |
Lighting Pipe
|
Rigging |
Insert and configure a lighting pipe object with the Lighting Pipe tool. Lighting pipe objects function as rigging objects, so lighting devices and other loads can attach directly to the lighting pipe. Lighting pipes support full 3D rotation, and they can be used to create schematic views.
In addition to individual objects created using the Lighting Pipe tool, it you can access a variety of standard lighting pipe resources and custom styles (see Concept: Plug-in object styles).

Mode |
Description |
Point Insertion |
Inserts the pipe with two clicks, to place and set the rotation |
Line Insertion |
Inserts the pipe as a line to define the length |
Polyline Insertion |
Inserts the pipe using the polyline creation options |
Pipe Length |
For Point Insertion mode, sets the length of the pipe |
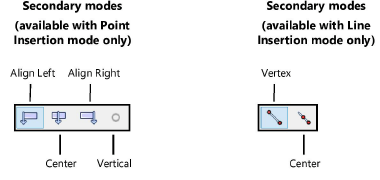
Align Left (Point Insertion mode only) |
Inserts the pipe with a left-aligned insertion point |
Center (Point Insertion mode only) |
Inserts the pipe with a center insertion point |
Align Right (Point Insertion mode only) |
Inserts the pipe with a right-aligned insertion point |
Vertical (Point Insertion mode only) |
Inserts a vertical pipe |
Vertex (Line Insertion mode only) |
Inserts a pipe from its start point to its end point |
Center (Line Insertion mode only) |
Inserts a line from its center point |
Polyline creation options (Polyline Insertion mode only) |
For Polyline Insertion mode, selects the method for drawing the polyline upon which the object is based; see Creating polylines. |
Preferences |
Opens the object properties dialog box to set the default preferences for lighting pipes |
Lighting Pipe Style list |
Opens the Resource Selector to select a symbol for placement; double-click a resource to activate it |
To insert a lighting pipe object:
1. Click the tool.
2. Do one of the following:
● To use an existing lighting pipe style from the resource libraries, click Style from the Tool bar. From the Resource Selector, double-click a resource to activate it. Alternatively, to draw an unstyled lighting pipe, leave the <Unstyled> setting as is.
● To create a custom lighting pipe, click Preferences. From the object properties dialog box, set the default properties. The properties can be edited from the Object Info palette.
3. Do one of the following:
● Click Point Insertion mode and the needed insertion point alignment submode. Set the pipe Length.
● Click Line Insertion mode and either click Vertex submode to place the pipe from start to end points, or Center submode to place it from the center to an end.
● Click Polyline Insertion mode and use the polyline creation modes to insert the pipe.
Alternatively, create a polyline and then select the Create Objects from Shapes command (see Creating objects from shapes).
4. Click in the drawing area to draw the lighting pipe according to the modes selected.
5. Optionally, after placement you can create a plug-in object style, which combines style parameters (with a fixed value established by the style) and instance parameters (which can be set independently for each instance of the styled object in the drawing). See Creating plug-in object styles.
![]() Click
to show/hide the parameters.
Click
to show/hide the parameters.
~~~~~~~~~~~~~~~~~~~~~~~~~

