Decide on a naming scheme before you create classes. If there are a large number of classes, organize them by naming each class with a compound name consisting of up to four parts, separated by a dash. Each name part represents a different level in the class naming structure. For example, a drawing of a building might have a class structure that includes main groups for architecture, plumbing, and electrical objects. Within the architecture group, there might be door, floor, and wall groups. Those groups in turn have subgroups—for example, the wall subgroup might have interior and exterior designations. A class is named according to its position in the class structure, as in Arch-Wall-Ext, Elec-Lite-Ceiling, or Plum-Equip-New.
Class names impact hierarchical display on pop-up menus (including from the Object Info palette, the View bar, and dialog boxes) and in the Organization dialog box and (for Vectorworks Design Series products) the Navigation palette. To enable or disable hierarchical display, see Displaying classes in hierarchical order.
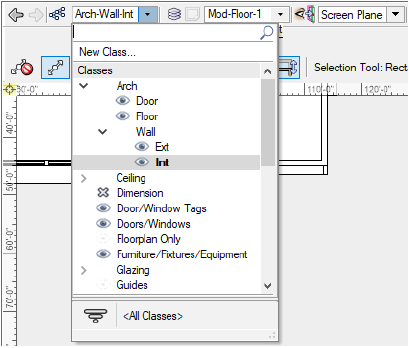
In the following example, the Arch group has a Wall subgroup, with Ext and Int options. This type of organization makes it easy to assign classes as objects are created.
Classes can be created as new, or imported from other current version Vectorworks files or standard files.
To create a new class:
1. For convenience, a new class can be added from multiple locations in the software.
● New button on the Classes tab of the Organization dialog box (Tools > Organization)
● Classes button on the View bar to open the Organization dialog box
● New Class option from the Classes drop-down list on the View bar
● Class field on the Shape tab of the Object Info palette
● New context menu on the Classes tab of the Navigation palette (Vectorworks Design Series required)
2. From the New Class dialog box, create a new class, or import a class and its properties from standard or existing Vectorworks files.
|
Class Type |
Action |
|
Create New Class |
Creates a class based on current Attributes palette settings; enter a class Name |
|
Import Classes |
Imports classes and their attributes from standard files or existing files. Files located in the Standards folder, as well as existing files selected previously, are displayed in the list. Select a file; the available classes and descriptions are listed beneath the file name. Select the desired class(es). To select multiple classes from the import list, hold the Ctrl (Windows) or Command (Mac) key while you click. |
|
Show only classes that are not in the current document |
If a class name in the current file matches a class in the import file, normally that class is not included on the list as an import option. To display all the classes to be imported, deselect this option. The existing classes in the file are replaced by any imported classes with the same name, changing the existing class definitions (and any associated objects) to those of the imported classes. |
|
Choose |
Click Choose to select a file for class import. Files must be in the current version. |
|
Creation Options |
|
|
Saved View Visibility |
Sets the visibility of the new class in saved views (when saved views exist in the drawing) |
|
Viewport Visibility |
Sets the visibility of the new class in viewports (when viewports exist in the drawing) |
|
Edit Properties After Creation |
Immediately after creation, opens the Edit Class(es) dialog box to set the properties of the new class(es) |
The classes display in the Classes list on the Organization dialog box, View bar, Object Info palette, and (for Vectorworks Design Series) the Navigation palette. When a new class is created, it does not automatically become the active class.
~~~~~~~~~~~~~~~~~~~~~~~~~