Tool
Tool set
Shortcut
Smart Edge

Snapping palette
F (2D only)
Tool |
Tool set |
Shortcut |
Smart Edge
|
Snapping palette |
F (2D only) |
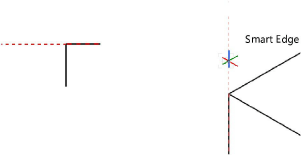
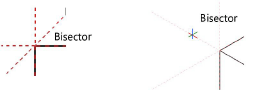
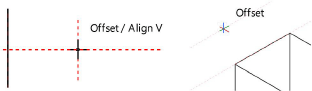
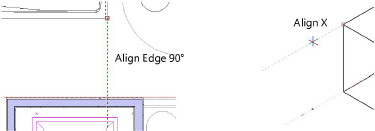
When smart edge snapping is on, the SmartCursor finds points on, or at a certain distance away from, a specified edge. The edges of linear 2D geometry, arc and polyline curve segments, and 3D segments and curves, can be acquired as smart edges. Once a smart edge has been defined, you can align to it horizontally, vertically, or at a specific angle using extension lines and SmartCursor cues. A smart edge also provides snapping to a point on an edge without having to activate Nearest Point on Edge object snapping.
To set a smart edge, slowly move the cursor over a 2D object edge for the set number of seconds, or press the T key while over an edge. Dotted extension lines indicate that the smart edge has been set.
Up to two smart edges can be set, and then the oldest edges are replaced. A smart edge can be released by moving the cursor slowly over the edge or pressing the T key over the edge again.
To activate smart edge snapping:
1. Click the tool.
2.To change settings, if needed, double-click the tool, or select Tools > SmartCursor Settings.
The SmartCursor Settings dialog box opens. From the Smart Edge tab, specify the smart edge snap settings.
![]() Click
to show/hide the parameters.
Click
to show/hide the parameters.
The appearance of the smart edge can be changed; see Configuring interactive display. The shortcut key assigned to the smart edge can be customized; see Modifying special shortcuts.
~~~~~~~~~~~~~~~~~~~~~~~~~