 Creating an instrument summaryCreating an instrument summary
Mode |
Tool |
Tool set |
Tools for The Symbol Insertion tool |
Instrument Summary
|
Lighting |
Multi-cell lighting devices must be set up in a specific way to function correctly in the instrument summary. Use a single master symbol that contains all the component parts nested within the main symbol. Add the master symbol to the Lighting symbol maintenance list. For multi-cell lighting devices to be counted properly in the instrument summary, the data such as instrument types and wattages associated with the nested symbols must match the components of the multi-cell lighting device.
Alternatively, you can create a dedicated symbol for use only in the summary if, for instance, the symbol used in the file is too long to fit neatly within the summary. This dedicated symbol must also be added to the Lighting Symbol Maintenance list and its data must match the components used in the lighting device for correct reporting. This symbol can be accessed in the Unused Instrument Symbols selection of the Build Summary list described in this section.
To create an instrument summary:
1. Click the tool and mode.
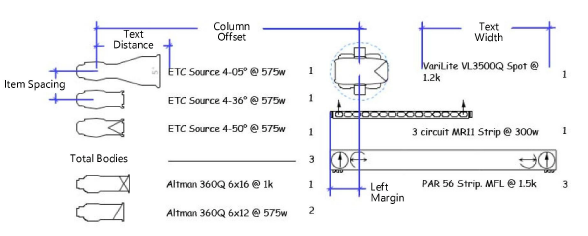
2.Click Preferences to open the Instrument Summary Settings dialog box. Default parameter settings made here, both for global instrument summaries and hanging position summaries, apply to instrument summaries placed later in the file. These default sets are saved separately and are in effect depending on how the summary is inserted. Taking the time to establish the defaults makes it much easier to insert summaries for hanging positions or for the entire drawing with the desired defaults already specified.
![]() Click
to show/hide the parameters.
Click
to show/hide the parameters.
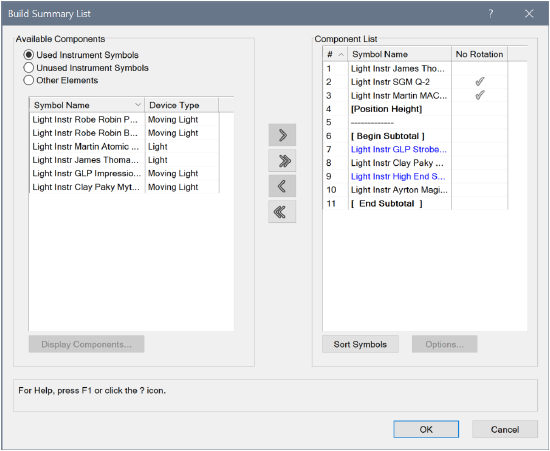
3.Click Build List to select the elements to be included in the summary.
The Build Summary List dialog box opens, to specify what is listed in the summary. You can add lighting device symbols in use, lighting device symbols present in the file (but not currently in the drawing), and formatting elements such as column headers, notes, and circuit summaries.
Click each type of component and move the desired elements to the Component List. To change the order, click in the first column and drag the item to the desired position in the list, or click Sort Symbols to sort them alphabetically.
![]() Click
to show/hide the parameters.
Click
to show/hide the parameters.
4.If you have included other elements that require formatting, select each one from the Component List and click Options.
● For headers, position height headers, or notes, enter the header or note text.
● For typical symbol, select the symbol to indicate labels (usually a label legend symbol, located within the Label Legend symbol folder)
● For circuit summaries, the Circuit Summary Options dialog box opens to specify the circuit information to include in a hanging position summary. Specify the types of devices to count and how to count them, and enter the device amperage rating/voltage to obtain a report indicating the circuit type you will need for those devices.
![]() Click
to show/hide the parameters.
Click
to show/hide the parameters.
5.Click OK to return to the Build Summary List; continue specifying summary list options.
6.Click OK to close the Build Summary List dialog box and return to the Instrument Summary Settings dialog box.
7.Click OK.
8.Click in the drawing to place the instrument summary. Click again to set the rotation.
The instrument summary parameters can be edited from the Object Info palette. However, the Summary Defaults for option is not available since the summary already exists for lighting devices or hanging positions.
Filtering and refreshing are options that are available from the Object Info palette after an instrument summary has been added to the drawing.
![]() Click
to show/hide the parameters.
Click
to show/hide the parameters.
~~~~~~~~~~~~~~~~~~~~~~~~~
