 Creating landscape areasCreating landscape areas
|
Tool |
Tool set |
|
Landscape Area
|
Site Planning |
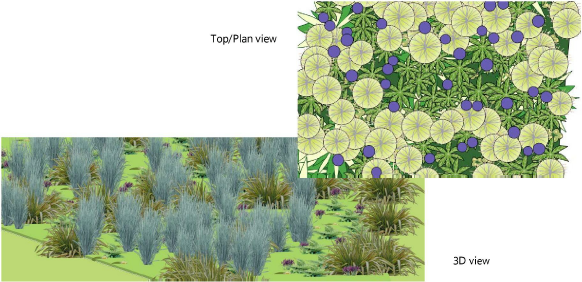
Landscape areas are defined regions of plant combinations. These can be useful for conceptual landscape planning and for specifying large planting or reforestation areas with plant symbols drawn in a representative way according to spacing or percentage values. Plant information from a landscape area is based on plant symbol data, and can be included in plant list worksheets. The landscape area can consist of components which display in section views and can modify the site model. Components can be created using material resources for an efficient BIM for landscape workflow.
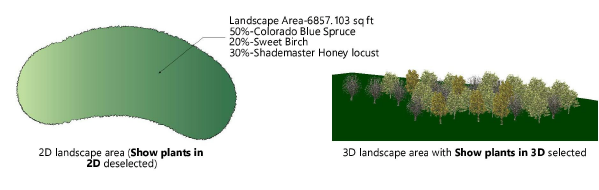
A landscape area can also be created without plant information specified, for use as a general ground cover or mulch area with a label showing the total area required.
Landscape areas are created with the Landscape Area tool. Landscape area objects can also be created by drawing a polyline and then selecting the Create Objects from Shapes command (see Creating objects from shapes).
|
|
Click here and here and here for video tips about this topic (internet access required). |

|
Mode |
Description |
|
Insertion |
Draws a landscape area using the selected polyline creation options and the current preference settings |
|
Pickup |
Picks up the settings and attributes of an existing landscape area and makes those the default preference settings for subsequently created objects. The landscape area’s Name parameter is given a suffix with sequential numbering for new landscape areas. |
|
Bucket |
Converts an existing polyline, polygon, rectangle, circle, or arc to a landscape area and applies the current preference settings |
|
Landscape Area |
Opens the Resource Selector to select a landscape area resource for placement; double-click a resource to activate it |
|
Polyline creation options |
Selects the method for drawing the polyline upon which the object is based; see Creating polylines |
|
Preferences |
Opens the Landscape Area Preferences dialog box to set the default preferences for landscape areas |
To create a landscape area:
1. Click the tool.
2.Do one of the following:
● Click Landscape Area on the Tool bar to select a resource from the Resource Selector, or click Preferences to open the Landscape Area Preferences dialog box and specify the tool’s default parameters. See Landscape area preferences. Continue with Step 3.
It is helpful to begin with a style resource and customize it. Alternatively, leave the default selection of an unstyled landscape area to set all of the parameters from scratch; see Concept: Plug-in object styles. If you do not select a landscape area style, the Landscape Area Preferences dialog box opens automatically to set the parameters.
● Create the new landscape area using the current preferences or style by clicking Bucket mode from the Tool bar and then selecting an existing polyline, polygon, rectangle, circle, or arc to convert into a landscape area. The settings are automatically applied to the new landscape area.
● To apply the settings from an existing landscape area, click Pickup mode from the tool bar and then click on the landscape area that is the source of the settings. Create the new landscape area either by drawing it using the Insertion mode and appropriate polyline creation options or by clicking Bucket mode from the Tool bar and then selecting an existing polyline, polygon, rectangle, circle, or arc to convert into a landscape area. The picked up settings are automatically applied to the new landscape area.
3.If editing an unstyled set of preferences, click the Plant Information pane in the Landscape Area preferences to specify the plants to include in the landscape area and their distribution. Click Add Plant, or select a plant from the list and click Edit, to open the Edit Plant Information dialog box. Alternatively, double-click an existing row of plants to edit it.
4.Click Insertion mode and click the appropriate mode in the Tool bar to select the boundary creation method of the landscape area.
For more information on the Polyline tool modes, see Creating polylines.
5.Click to set the landscape area’s start point.
6.Click to set the end of the segment and the beginning of the next. Continue drawing segments in this manner until the landscape area object is complete.
To save the landscape area preferences as a style, select New Plug-in Style from Unstyled Plug-in from the Style list on the Object Info palette.
~~~~~~~~~~~~~~~~~~~~~~~~~

