 Reshaping roof objects
 Reshaping roof objects
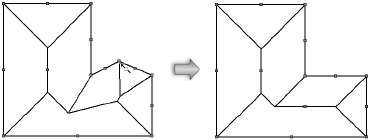
A roof object can be reshaped in a 2D or 3D view with the Reshape tool. The roof edge, roof ridge, and roof slope can be changed.
The Reshape tool can be used in any view for basic roof shape editing; see 2D reshape modes. However, the Reshape tool should be used in a 3D view to edit the roof edge and roof ridge location.
Five modes are available when both the Reshape tool and a roof object are selected in a 3D view.

|
Mode |
Description |
|
Move Vertex |
Adjusts the position of a selected roof vertex, constrained horizontally or vertically in combination with the Z-axis Constrain and XY Plane Constrain modes |
|
Add Vertex |
Adds a peak (vertex) to a roof |
|
Delete Vertex |
Deletes a roof peak (vertex) |
|
XY Plane Constrain |
In 3D Reshape mode, reshapes the roof object horizontally, constrained along the X and/or Y axes |
|
Z-axis Constrain |
In 3D Reshape mode, reshapes the roof object along the Z axis to change the height of a roof ridge or eave |
|
Mode |
Tool |
Tool set |
Shortcut |
|
XY Plane Constrain
|
Reshape
|
Basic |
- (hyphen) |
To reshape the roof horizontally:
1. In a 3D view, select the roof object.
2.Click the tool and mode.
3.Position the cursor over a roof handle.
When the cursor is over a handle, the standard arrow cursor changes into an unfilled, four-way arrow.
4.Click-drag the handle to change the roof handle location, or enter specific X and Y distance values in the Data bar.

The roof edge, ridge, or eave handle location can be changed. The handle movement is constrained along the X or Y axis (the active layer plane); the height of the roof element cannot be changed in this mode.
Change the slope of a roof face by moving the ridge handle. If the reshape results in a roof slope that approaches or exceeds 90 degrees, you are prompted to create a gable wall if desired.

5.Click when the handle is at the desired location.
|
Mode |
Tool |
Tool set |
Shortcut |
|
Z-axis Constrain
|
Reshape
|
Basic |
- (hyphen) |
To change the height of a roof ridge or eave:
1. In a 3D view, select the roof object.
2.Click the tool and mode.
3.Position the cursor over a roof ridge or eave handle.
When the cursor is over a handle, the standard arrow cursor changes into two-way hollow arrow.
4.Click-drag the handle to change the roof handle location, or enter the specific Z axis distance in the Data bar.

The roof ridge or eave handle location can be changed. The handle movement is constrained along the Z axis (vertically); only the height of the roof element can be changed in this mode.
5.Click when the handle is at the desired location.
|
Mode |
Tool |
Tool set |
Shortcut |
|
Add Vertex
|
Reshape
|
Basic |
- (hyphen) |
To add a vertex to a roof:
1. In a 3D view, select the roof for adding the vertex.
2.Click the tool and mode.
3.Position the cursor over one of the edge or eave handles.
The standard arrow cursor changes into a single-headed, filled arrow with shaded boxes on either side of the shaft.
4.Click-drag the cursor to add a vertex to the roof edge or eave.
5.Click when the vertex is at the desired location.
The roof is automatically reshaped to accommodate the new vertex.

|
Mode |
Tool |
Tool set |
Shortcut |
|
Delete Vertex
|
Reshape
|
Basic |
- (hyphen) |
To delete a vertex from a roof:
1. In a 3D view, select the roof with the vertex to be deleted.
2.Click the tool and mode.
3.Position the cursor over the eave vertex to delete.
The standard arrow cursor changes into a single-headed, filled arrow with a hollow diamond in the shaft.
4.Click the vertex.
The vertex is removed and the roof is reshaped to the remaining vertices.

~~~~~~~~~~~~~~~~~~~~~~~~~