Tool
Tool set
Text

Basic
Documentation
|
Tool |
Tool set |
|
Text
|
Basic |
Use the Text tool to create both single lines and blocks of text in your drawings. Once created, text objects can be moved, duplicated, duplicated in an array, and rotated. The text bounding box can be resized to adjust a block’s height or width. Text is placed relative to the specified alignment point, not the bounding box.
|
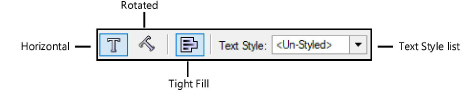
Mode |
Description |
|
Horizontal |
Creates horizontal text lines and text blocks |
|
Rotated |
Creates text blocks at an angle |
|
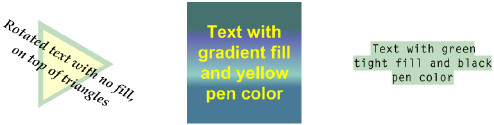
Tight Fill |
If a fill is applied to the text object, the fill displays only behind the text on any given line; blank lines have no fill |
|
Text Style list |
Applies a stored set of attributes to text as it is created, including the font, size, spacing, font style, alignment, and color. Select one of the built-in styles, or select New to create your own. |
The default text attributes are applied to all text as it is added in the current drawing or any other. A text style applies a saved group of attribute settings. Select a text style as the default, or leave the text un-styled and set the default text attributes individually.
Text styles can also be assigned to classes, to make it easier to create a consistent look for text that is embedded in dimensions, callouts, and other annotation objects.
To set the default text attributes:
1. Ensure that no objects or text are selected in the drawing.
2.Click the Text tool, and do one of the following:
● From the Tool bar, select any Text Style other than <Un-Styled>.
● From the Tool bar, select the <Un-Styled> Text Style. Then from the Text menu, either select Format Text to set several attributes from one dialog box, or select individual options. See Formatting text for descriptions of the available options.
|
Mode |
Tool |
Tool set |
|
Horizontal
|
Text
|
Basic |
To create a line or block of horizontal text:
1. Click the tool and mode.
2.From the Tool bar, set the Tight Fill mode and Text Style as desired.
3.Do one of the following:
● To create a line of text, click to designate the text insertion point, and enter the text. Text wrapping is off by default, so the text box automatically expands as you type.
● To create a block of text, click and drag to create a text box of the approximate width needed, and enter the text. Text wrapping is on by default, so the text automatically wraps to the next line when it reaches the edge of the text box. To end the current paragraph and start a new one in the current text block, press Enter.
4.When the text is complete, press the Esc key.
|
Mode |
Tool |
Tool set |
|
Rotated
|
Text
|
Basic |
You can also rotate text objects after they are created; see Rotating objects.
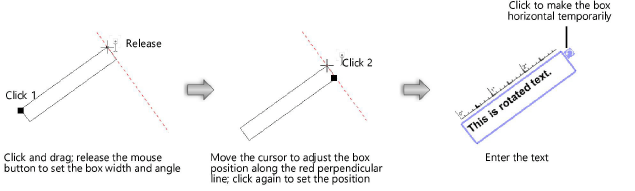
To create rotated text:
1. Click the tool and mode.
2.From the Tool bar, set the Tight Fill mode and Text Style as desired.
3.Click and drag the mouse to specify the angle and width of the text box, and release the mouse button to set. If needed, move the cursor to adjust the text box position along a line perpendicular to the text box. Click again to set the position.
When drawing in rotated plan view (Vectorworks Design Series required), set angle snapping to snap to the plan rotation angle (see Angle snapping) and display the Rotated Plan cue. If the text is created to the same angle as the plan, when the plan is unrotated, the text will align with the world coordinate system.
To always create and edit rotated text in a horizontal text box, select Edit text horizontally by default on the Edit pane of the Vectorworks preferences (see Vectorworks preferences: Edit pane).
4.Enter the text. The text automatically wraps to the next line when it reaches the edge of the text box. To end the current paragraph and start a new one in the current text block, press Enter.
5.When the text is complete, press the Esc key.
|
Mode |
Tool |
Tool set |
|
Tight Fill
|
Text
|
Basic |
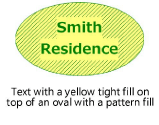
The Tight Fill mode of the Text tool modifies the fill applied to a text object so that the fill displays only behind the text on any given line. Blank lines have no fill.
To create text with a tight fill:
1. Click the tool and mode.
2.From the Tool bar, click either the Horizontal or Rotated mode, and set the Text Style.
3.From the Attributes palette, select the fill for the text object (unless the selected text style has a background fill).
4.Click and drag to create a text box of the approximate width needed, and enter the text. The text automatically wraps to the next line when it reaches the edge of a text box. To end the current paragraph and start a new one in the current text block, press Enter.
5.When the text is complete, press the Esc key.
Left-aligned tabs can be inserted into text during creation and editing.
To add tabs to text:
1. While editing text, press the Tab key to place tabs where needed.
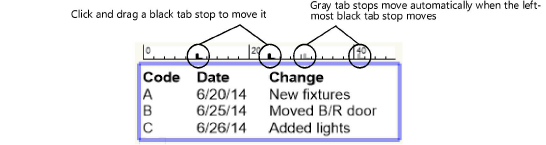
2.On the text box ruler, by default one tab stop is defined and displays with a black marker (at 0.5 inch for Imperial, or at 12.5 mm for Metric documents). Additional gray tab stops display at regular intervals to the right of the black tab stop. Adjust the tab stops as follows:
● Click and drag a black tab stop to adjust its location.
● The spacing between the gray tab stops adjusts automatically as you move the left-most black tab stop. The gray tab stops display to the right of the right-most black tab stop.
● To have more control over the spacing between tab stops, click anywhere on the ruler to create one or more new black tab stops. Black tab stops can be moved independently.
● To remove a black tab stop, drag it off the ruler. If there is only one black tab stop, it cannot be deleted.
To move text between Vectorworks files, select Edit > Copy, and then Edit > Paste. Text is added exactly as copied, including any formatting. If you define a text block before pasting, the text pasted into the block is wrapped to fit within the text block. If the scale of the original layer and the new layer are different, the text size changes accordingly; for example, if you copy 16 point text from a 1:1 layer and paste it to a 4:1 layer, the text changes to 4 points. This also means that any styled text you paste to a different layer scale becomes un-styled; reapply the text style to restore the proper text size.
When you paste text from a different program, click the drawing using the Text tool first. If you paste text without first establishing an insertion point, each line of text is brought in as an individual text block. Embedded graphics are not supported and are removed when the text block is pasted into the Vectorworks file. In addition, multi-aligned text is converted to the current default alignment.
~~~~~~~~~~~~~~~~~~~~~~~~~


