Defining and editing tiles
A tile is a set of 2D geometric elements that repeats in all directions from a center point. The geometric elements can have color or fill (but not a tile fill), and the tile can also have a background color.
Changes to a tile definition affect all instances of that tile in the drawing file.
To create or edit a tile definition:
Do one of the following:
To create a new tile definition, from the Resource Manager, click New Resource, select Tile, and then click Create. Alternatively, from the Resource Manager, select Tiles from the list of resource types on the tool bar, and click New Tile.
To create a new tile definition based on an existing tile, from the Resource Manager, right-click on the resource, and select Duplicate from the context menu; name the new tile definition in the Assign Name dialog box. From the Resource Manager, right-click on the new resource, and select Edit from the context menu.
To edit an existing tile definition, from the Resource Manager, right-click on the resource, and select Edit from the context menu. The Edit Tile dialog box opens; select whether to edit the Geometry or Settings. If you edit the settings, the Edit Tile Settings dialog box opens next. If you edit the geometry, the tile editing window opens next to allow editing of the tile components; skip to step 3.
Alternatively, to create a new tile from a locally mapped tile, see Creating a new resource from a locally mapped hatch or tile.
The New/Edit Tile dialog box opens.
Click to show/hide the parameters.Click to show/hide the parameters.
|
Parameter |
Description |
|
Name |
Specifies a name for the tile resource |
|
Units |
Specifies the units for the tile when it is used in a drawing: Page sets the tile size according to the page dimensions. When applied, the tile automatically scales relative to the page environment. This is useful for annotation objects that should always remain the same size on the “page,” regardless of the layer scale. World sets the tile size according to world dimensions; its size varies depending on the layer scale. |
|
Rotate |
Rotates the tile fill according to the axis of any wall or symbol to which it is applied |
|
In Wall |
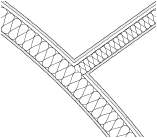
Matches the tile rotation to the wall axis; select Fit to Wall to scale the tile fill to match the thickness of a wall, wall component, or slab component. Enable the Fit to Wall option for insulation fills in walls, and wall or slab components.
|
|
In Symbol |
Matches the tile rotation to the symbol axis |
|
Background Fill |
To have a background fill behind the tile geometry, select the Background Fill option and also specify a color. |
Click OK to open a tile editing window.
Draw the tile geometry with the desired colors and fills. When you create an object, eight partially transparent repetitions of the object display around it. You can add multiple objects to the pattern.
To adjust the tile pattern and spacing, click one of the repetitions and drag it; click again to set the new position. To hide the tile repetitions during editing, right-click on an empty area of the editing window, and deselect the Display Tile Repetitions option from the context menu.
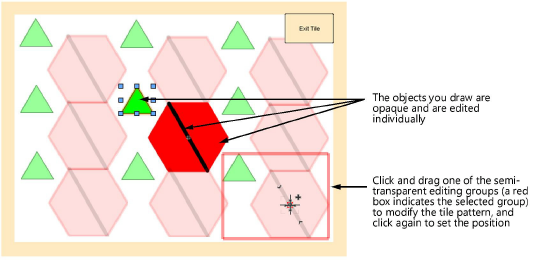
When you’re done drawing the tile, click Exit Tile. The tile resource is saved with the specified name.
Tiles are saved in Vectorworks drawing files. If the file is not saved and the tile is not default content, the tile is lost when you exit the program.

