Mapping hatch and tile fills
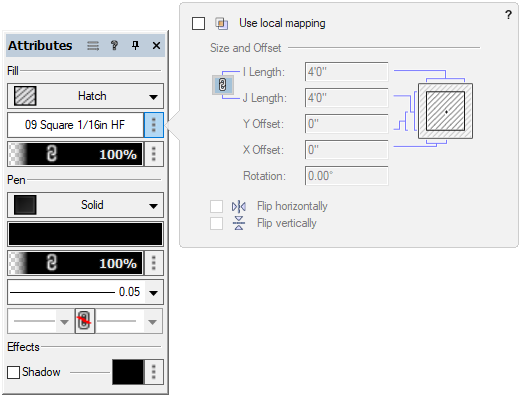
Once an associative hatch or tile fill is applied to an object, the fill can be locally mapped for that object without affecting the underlying resource. This local mapping can be done using either the Fill Settings popover on the Attributes palette or the Attribute Mapping tool. If an object’s fill is edited with the Attribute Mapping tool, the changes are reflected on the settings popover on the Attributes palette. Conversely, edits made on the Attributes palette are reflected in the position, size, and rotation of the mapping tool’s editing object. When local mapping is applied to an object's hatch/tile using either method, a local mapping icon displays in the Attributes palette's Fill Selector.
![]()
This locally mapped hatch/tile can be saved as a new resource; see Creating a new resource from a locally mapped hatch or tile.
In addition to the associative hatch fill styles available from the Attributes palette, there is also a method to add non-associative hatches, which are placed onto an object but do not interact with the object in the same way as the associative hatches. See Applying non-associative hatches.
Mapping hatch and tile fills on the Attributes palette
To customize the hatch's or tile's mapping for a selected object:
Select one or more objects containing the same tile or associative hatch fill.
Click Fill Hatch/Tile Settings on the Attributes palette.
The popover opens.

Click to show/hide the parameters.Click to show/hide the parameters.
|
Parameter |
Description |
|
Use local mapping |
Enables entry in the mapping fields, to customize the fill for this object; deselect to return to the default fill mapping. By default, a hatch/tile fill does not rotate with the filled object; select this option to keep the fill’s orientation relative to the object. |
|
Size and Offset |
|
|
I/J Length |
Specifies the distance in the I/J direction for a single instance of the fill (in the file’s current units). To maintain the aspect ratio of the fill when one length is changed, select the link button; the other length value changes automatically. |
|
X/Y Offset |
Indicates the fill starting point coordinates relative to the center of the selection bounding box (in the file’s current units) |
|
Rotation |
Specifies the angle of the fill |
|
Flip horizontally/Flip vertically |
Flips the fill orientation horizontally, vertically, or both |
Changes to the local mapping display in the selected object as you adjust the parameters.
After setting the parameters, click anywhere outside the popover to accept the settings.
Mapping hatch and tile fills with the Attribute Mapping tool
|
Tool |
Tool set |
Shortcut |
|
Attribute Mapping
|
Basic Visualization |
Shift+A (Windows) Option+A (Mac) |
To customize the hatch's or tile's mapping for a selected object:
Click the tool.
Click an object containing a tile or associative hatch fill. Only one object at a time can be edited.
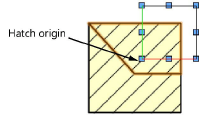
An editing object with eight handles is placed over the fill. The fill origin is at the lower left corner of the editing object, where the red and green lines meet.

Use the editing object to set the fill location, scale, and rotation angle. The fill can also be nudged.
|
Action |
Description |
|
Edit the fill location |
Click on the editing object (anywhere except on a selection handle) and drag it to the desired location. Click to set. To precisely locate the origin, click close to the lower left handle, and move the editing object.
|
|
Edit the fill size |
Click one of the corner selection handles, and drag to set the editing object to a new size (or press the Tab key and enter a Scale value (for hatches) or Height/Width (for tiles) in the Data bar). Click to set.
|
|
Edit the fill rotation |
Click one of the middle selection handles, and drag to rotate the editing object to the desired angle (or press the Tab key and enter a Rotation value in the Data bar); click to set the rotation. By default, the editing object rotates about the handle opposite the handle that is clicked on. To rotate about the fill origin, press the Shift key while rotating. To rotate about the center of the editing object, press the Ctrl key (Windows) or Command key (Mac) while rotating.
|


