Setting the working plane with three points
|
Mode |
Tool |
Tool set |
Shortcut |
|
Three Point
|
Set Working Plane
|
3D Modeling |
Shift+1 |

The Set Working Plane tool and Align Plane tool share the same position on the tool set. Click and hold the mouse on the visible tool to open the Pop-out tools list and select the desired tool.
When you use the Three Point mode of the Set Working Plane tool, two methods are available for defining the working plane location. With the first method, you set the position and angle of the working plane by defining the origin and axes of the new working plane location. With the second method, you set the position and angle of the working plane according to a rendered object’s surface.
Setting the working plane
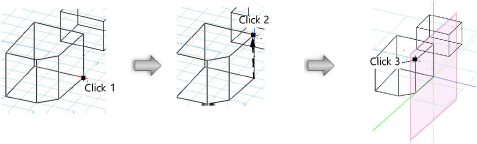
To set the working plane with three points:
In a 3D view, click the tool and mode.
Click to set the first point.
This becomes the origin of the working plane.
Click to set the second point.
This sets the working plane X’ axis.
Select the third point.
This sets the Y’ axis for the working plane. Once the third point is defined, the working plane location is set.
Setting the working plane to a rendered object’s surface
The working plane can be defined according to the surface of a rendered object.
To set the working plane to a rendered object’s surface:
In a 3D view, select a rendering mode of Unshaded Polygon, Shaded Polygon, Shaded Polygon No Lines, or Final Shaded Polygon.
Click the tool and mode.
The cursor changes to a pointing hand when over the surface of a rendered object.
Click the surface that defines the working plane location.
The working plane location is set to the selected surface.

