Snapping to a smart point
|
Tool |
Location |
|
Smart Points
|
Status bar |

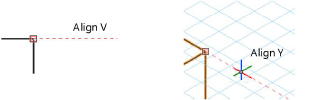
When smart points snapping is on, you can temporarily remember a point where the cursor paused for a set length of time, or where a special shortcut key was pressed. Once a smart point has been defined, you can align to it horizontally, vertically, or at a specific angle using extension lines and SmartCursor cues.
To set a smart point, pause the cursor over a location or an object for the set number of seconds, or press the T key. A small box displays when the smart point has been set. The T key works regardless of whether smart points snapping is on in the Status bar.
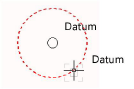
A special smart point, called a datum, can be set to temporarily create a new origin for snapping and measuring purposes. The datum does not need to be set over an object, but can be placed anywhere. When a datum is set, all measurements along the X and Y axis are taken from that point, rather than the drawing’s origin, until the datum is moved or deactivated. When a datum is created, the Data bar displays coordinates relative to the datum, using the datum point as the origin. If a datum is set before moving an object with the Selection tool, the object’s location and angle are measured relative to the datum.
To set a datum point, pause the cursor for the set number of seconds, or press the G key. The datum displays as a small circle around the chosen point. See Data bar and edit group options to activate the floating Data bar automatically after a datum is set.
The SmartCursor remembers up to three smart points, and then the oldest points are replaced. A smart point or datum can be released by pausing the cursor or pressing the shortcut key over the point again.
Press the Esc key to clear all smart points.
A current snap is needed to acquire smart points, so enabling Snap to Object, at a minimum, is recommended.
To activate smart point snapping:
Click the tool.
To change settings, if needed, double-click, right-click, or click and hold the tool to open the Smart Point Snap Settings popover and set the parameters.
Click to show/hide the parameters.Click to show/hide the parameters.
|
Parameter |
Description |
|
Draw horizontal/vertical extensions |
Displays an extension line when the cursor aligns horizontally, vertically, or in the X, Y, or Z direction with a smart point or datum
|
|
Draw extension lines |
Creates an extension line from a smart point when drawing at a snap angle and the SmartCursor is aligned perpendicular to the smart point
|
|
Snap to line between smart points |
Snaps to the extension line between smart points
|
|
Allow extensions from nearby smart points |
Creates extension lines from smart points located near the cursor. When deselected, prevents extension lines generated by smart points located close to the cursor, so that alignment does not occur to unintentionally acquired smart points in cluttered drawings. |
|
Acquire smart point if mouse stops for _ sec. |
Sets a smart point at the cursor location when the cursor pauses for the indicated number of seconds. (Experienced users may wish to reduce the pause time to 0.1 or 0.2 seconds.) Alternatively, press the T key to set or release a smart point at the cursor location, even if this option is disabled.
|
|
Set datum if mouse stops for _ sec. |
Sets a floating datum to define a temporary data origin by pausing the cursor for the indicated number of seconds (normally, set this time interval to be longer than the smart point acquisition time). Alternatively, press the G key to set or release a datum at the cursor location, even if this option is disabled.
|
|
Use datum offset |
Sets an offset from the temporary datum origin that is indicated by an additional marker along the extension line; enter the offset value
|
|
Reset to Defaults |
Resets the smart points snap settings to the defaults |


The appearance of the smart points can be changed; see Configuring interactive display. The shortcut key assigned to smart points and the datum can be customized; see Modifying special shortcuts.
