 Editing seating sections
|
Command |
Path |
|
Edit Boundary |
Context menu |
To change the boundary of the seating section:
Select the command.
The Object editing mode opens.
Edit the boundary vertices directly, and use other tools and commands including the Clip tool, the Trim tool, and the commands for Editing 2D object surfaces.
When you exit the object editing mode, select whether to refill the seating section when the boundary changes are made, or discard the changes.
Alternatively, use the Reshape tool to reshape the boundary (see Reshaping objects).
Some, but not all, parameters can be edited from both the Seating Section Settings dialog box and the Object Info palette for ease of access. The fields in the Object Info palette are named similarly (but not always identically) to those in the Seating Section Settings dialog box, and roughly reflect the order in which settings are entered in the dialog box. The seating section parameters are described in Creating seating sections. Only the parameters that are different are described here.
Some parameter changes require the seating section to refill, removing any custom seating edits. An alert displays to confirm the parameter change.
Click to show/hide the parameters.Click to show/hide the parameters.
|
Parameter |
Description |
|
Seating Type |
Static display of the selected seating type; this parameter can be changed in the Seating Section Settings dialog box (see Seating section settings) |
|
Always Redraw Section |
Redraws the seating section for each change made in the Object Info palette; selecting this option may use significant computer resources and slow down operations. If this option is not selected, you can click Update to redraw the section as desired. |
|
Display Boundary |
Displays the seating section’s bounding box |
|
Display Section Info |
Select for a static display of the number of chairs/tables, the maximum/minimum tables/chairs per row, and the maximum number of rows; if deselected, the data do not show |
|
Display Focus Line |
Display the seating section’s focus line with three control points that make it easier to visualize and control the seating orientation, the angle/radius. The end point with no arrow controls the angle of straight seats or the radius of curved seats. The end point with an arrow controls the focus point of the seats. The center point is used to move the line. |
|
Update |
If Always Redraw Section is not selected, click to redraw the seating section |
|
Settings |
Opens the Seating Section Settings dialog box to edit and redraw the seating section (see Creating seating sections) |
|
Edit Seating |
Click for Custom editing individual seats |
|
Classes |
Opens the Seating section settings: Classes pane to edit the class assignments for the seating section elements; other panes of the dialog box are not available and the entire seating section is not redrawn |
|
Vertex parameters |
Edits the vertices of the path object that the seating section is based upon; see Editing vertex-based objects |
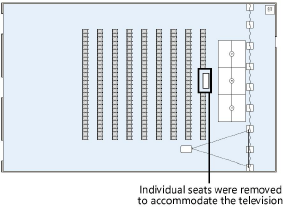
Custom editing individual seats
|
Command |
Path |
|
Edit Seating |
Context menu |
To make final custom edits to individual seats or sets of seats:
Right-click on the seating section and select the command.
Alternatively, double-click on the seating section object, or click Edit Seating from the Object Info palette.
The Object editing mode opens. You can add or delete seats, change the angle of individual seats, or change the size of the floor.
When you exit the object editing mode, select whether to modify the boundary when the seating changes are made, or discard the changes.
Custom renumbering selected seats
|
Command |
Path |
|
Number Seats |
Context menu |
To custom renumber only selected seats within the seating section:
Right-click on the seating section and select the command.
The Number Seats dialog box opens.
Specify the new seat and row number parameters.
Object editing mode opens.
Select individual seats in the order you wish to number them, and then click in an empty part of the drawing to end numbering.
