 Inserting accessories in accessory edit mode
The Lighting Accessory tool has special functionality in accessory edit mode. It allows you to place accessories in default or custom positions. You can also use arrow buttons on the Tool bar to view the individual lighting devices within a multiple selection, for ease of editing the accessories.
![]()
|
Mode |
Description |
|
Default Insertion
|
Inserts an accessory in the default position. See Default accessory positions for a list of the default insertion points for various accessory types. |
|
Custom Position
|
Inserts an accessory in a custom position |
|
Accessory symbol |
Opens a Resource Selector to select an accessory for placement; double-click a resource to activate it |
|
Previous Lighting Device in Selection
(multiple selection only) |
Navigates to the previous lighting device in the selection |
|
Next Lighting Device in Selection
(multiple selection only) |
Navigates to the next lighting device in the selection |


Inserting accessories in the default position
|
Mode |
Tool |
Tool set |
|
Default Insertion
|
Lighting Accessory
|
Device Accessories |

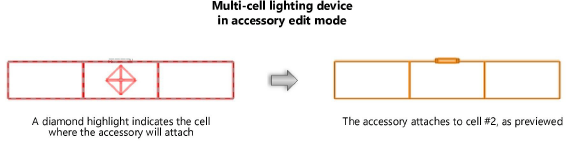
The Lighting Accessory tool inserts an accessory in the default position on the lighting device (or on the highlighted cell in a multi-cell device).
For a multiple selection of lighting devices, the accessory is added to each lighting device in the same position, relative to the bounding box of each lighting device symbol.
To insert an accessory in the default position:
Click the tool and mode.
Click Accessory symbol to select an accessory from the Resource Selector.
For a multiple selection of lighting devices, click Previous/Next Selected Lighting Device to scroll through the selection and view the desired lighting device.
Click anywhere in the edit window to insert the accessory on the lighting device(s) in the default position. On a multi-cell lighting device, a diamond highlight indicates the cell where the accessory will be inserted. A preview shows where the accessory will be placed. You cannot use boomerang selection by pressing the Alt key while placing accessories.
The accessory position and parameter data can be edited from the Object Info palette; see Adjusting accessories.
Inserting accessories in a custom position
|
Mode |
Tool |
Tool set |
|
Custom Position
|
Lighting Accessory
|
Device Accessories |
The Lighting Accessory tool inserts a lighting accessory in a custom position. For a multiple selection of lighting devices, the accessory is placed in the same position, relative to the bounding box of each lighting device symbol.
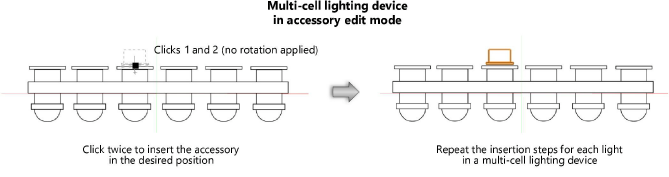
For multi-cell lighting devices that require an accessory for each light, use Custom Position mode to insert the accessory on each cell individually.
To insert an accessory in a custom position:
Click the tool and mode.
Click Accessory symbol to select an accessory from the Resource Selector.
For a multiple selection of lighting devices, click Previous/Next Selected Lighting Device to scroll through the selection and view the desired lighting device.
Click to insert the accessory at the desired location on the lighting device. A preview shows where the accessory will be placed. You cannot use boomerang selection by pressing the Alt key while placing accessories.
Click again to set the accessory rotation.
The accessory position and parameter data can be edited from the Object Info palette; see Adjusting accessories.
