Direct texture mapping
|
Tool |
Tool set |
Shortcut |
|
Attribute Mapping
|
Basic Visualization |
Shift+A |

The Attribute Mapping tool edits texture mapping parameters directly in the drawing window. This tool also modifies textures created with wrapped color shaders or mask transparency shaders. The texture mapping type must be sphere, cylinder, plane, or surface UV (edit textures with other types of mapping through the Object Info palette). The tool cannot be used on an object with an attribute override from a data visualization view.
Textures can also be mapped onto selected objects on the Render tab of the Object Info palette; see Managing object textures from the Object Info palette.
This tool also modifies decal textures; see Editing decal textures.

|
Mode |
Description |
|
Non-Repeating
|
For repeating textures, displays a single repetition of the texture for easier texture editing |
|
Original Repeat
|
For repeating textures, restores the repeating pattern of the texture |
|
Scale/Rotate by Corner
|
For resizing or rotating textures with the handles on the texture frame; the texture frame scales from or rotates about the handle opposite to the handle that is clicked on |
|
Scale/Rotate by Center
|
For resizing or rotating textures with the handles on the texture frame; the texture frame scales from or rotates about its center |
|
Part |
For textured objects with more than one textureable part, such as walls, slabs, hardscapes, and roofs, allows a different part of the object to be selected for texture editing |
|
Decals |
Select a decal for mapping adjustments |


The Attribute Mapping tool also edits hatch, tile, gradient, and image fills. See Mapping fills with the Attribute Mapping tool.
To edit texture mapping directly in the drawing window:
Select a textured 3D object or a textured face of an object.
Click the tool. Alternatively, click the tool first and then click the object or a face of the object.
If the selected object or face has an unsupported texture (with an auto-align plane, perimeter, or roof mapping type), an alert displays. Select another map type and click Yes to continue.
For objects with parts, which may have different textures and mapping types applied to different portions of the object, select the part to edit from the Part list on the Tool bar. To edit decals, see Editing decal textures.
If the selected part has an unsupported texture (with an auto-align plane, perimeter, or roof mapping type), an alert displays. Select another map type and click Yes to continue.
For easier direct mapping of a repeating texture, click Non-Repeating mode to see a single repetition of the texture. (After you edit the texture mapping, click Original Repeat mode to return to the original pattern and see the effect.)
If applicable, select how to scale or rotate the texture. To adjust the texture about a corner of the editing frame, click Scale/Rotate by Corner mode; to adjust the texture about the center of the editing frame, click Scale/Rotate by Center mode.
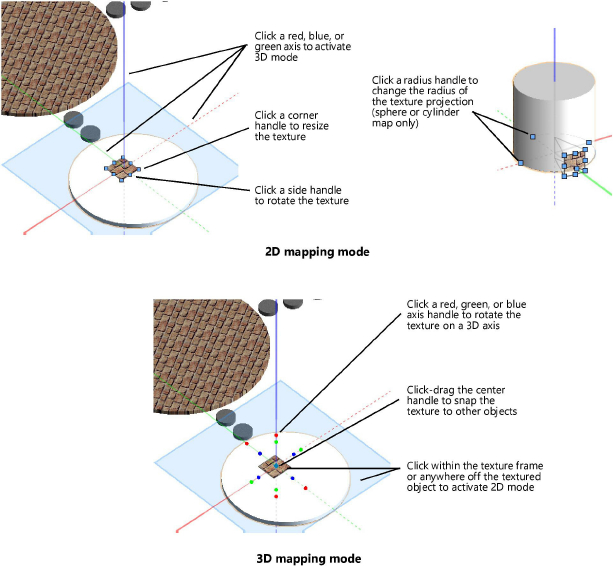
A colored texture plane with an editing frame is placed over the first repetition of the texture in 2D mapping mode. The texture origin is positioned at the origin of the axes. The Object Info palette only displays the parameters that can be edited while the Attribute Mapping tool is active.
To switch to 3D mapping mode, click one of the three texture space axes (the red, blue, and green lines).
To switch back to 2D mapping mode, click within the texture frame or anywhere off the textured object.
The editing frame provides object snaps for precise texture placement. Either use the editing frame handles to adjust the mapping, or use the Data bar to enter precise values (see Using the Data bar).
|
Action |
Description |
|
To move the texture |
2D mapping mode: Click inside the editing frame and drag the texture to the desired location on the object surface 3D mapping mode: Click the center diamond-shaped handle at the origin, and drag the texture to the desired location on the object surface. The texture plane moves with the image, allowing you to snap the image to a snap point on the object. |
|
To resize the texture (2D mapping only) |
Click a corner handle of the editing frame (the resize cursor displays), and drag to set the editing object to a new scale. Click to set. |
|
To rotate the texture |
2D mapping mode: Click a side handle of the editing frame (the rotate cursor displays) and drag the handle to the new rotation angle. Click to set. 3D mapping mode: Click one of the handles along the axis to rotate about. The rotate cursor displays, and a dashed preview indicates the rotation space. Move the cursor to rotate the texture, and click to set it. |
|
To set the texture to a face (plane map type only) |
Click the hand cursor to set the texture mapping to the surface of the indicated face. The texture plane is positioned tangent to the surface at the click point, with the origin of the texture plane at the click point. |
|
To change the radius of the texture projection (sphere and cylinder map types, 2D mapping only) |
Click one of the four radius control handles around the edge of the circle that represents the mapping surface, and drag the handle to the new radius length. Click to set. |
To edit the mapping of another part of a textured object, select the next part to edit from the Part list and repeat the process.