Editing decal textures
Similar to other textures, decal textures can be edited from the Object Info palette Render tab. Depending on map type, decal textures can also be positioned and adjusted with the Attribute Mapping tool. Because decals are texture resources, the texture definition can be edited from the Resource Manager.
When a decal has been applied to an object or its face or part, the decal texture displays in the Object Info palette Texture browser, nested under the list item it is applied to. To edit the decal texture's parameters, select it from the list and edit it as described in Managing object textures from the Object Info palette. Fewer parameters are available for decal textures than for the base texture, because the base texture determines the mapping type for the object.
Multiple decals can be applied to an entity; all are nested under the list item in the Texture browser. To change the stacking order of the decals, click and drag the decal textures in the list.
Multilayered textures and mapping parameters can be transferred between objects with the Eyedropper tool fill attributes (Texture). See Transferring attributes.
Decals must be rendered in a Renderworks mode.
Direct decal texture mapping
|
Tool |
Tool set |
Shortcut |
|
Attribute Mapping
|
Basic Visualization |
Shift+A |

Decals can be moved, scaled, and rotated with the Attribute Mapping tool. Decal mapping is performed on one decal at a time, separately from the base texture mapping described in Direct texture mapping.
The map type of the underlying texture determines the decal map type. The underlying texture must have planar, spherical, cylindrical, or surface UV mapping for the decal to be edited with the Attribute Mapping tool.
To adjust the mapping of the decal texture with the Attribute Mapping tool:
Select a textured, 3D object with one or more decals.
From the Texture browser on the Object Info palette Render tab, select the decal to adjust.
Click the tool.
If the selected part has an unsupported texture underlying the decal (with an auto-align plane, perimeter, or roof mapping type), an alert displays. Select another map type and click Yes to continue.
If applicable, select how to scale or rotate the texture from the Tool bar. To adjust the texture about a corner of the editing frame, click Scale/Rotate by Corner mode; to adjust the texture about the center of the editing frame, click Scale/Rotate by Center mode.
An editing frame in 2D mapping mode is placed over the decal texture. Set the decal position and rotate or resize the decal as needed.
|
Action |
Description |
|
To move the decal |
Click inside of the editing frame and drag the texture to the desired location on the base texture |
|
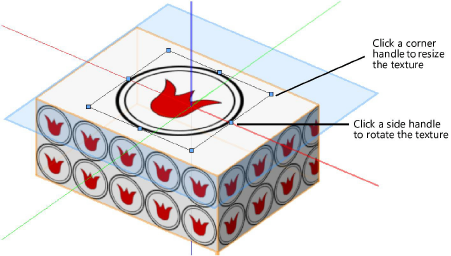
To resize the decal |
Click a corner handle of the editing frame; the resize cursor displays. Drag to set the editing object to a new scale. Click to set. |
|
To rotate the decal |
Click a side handle of the editing frame (the rotate cursor displays) and drag the handle to the new rotation angle. Click to set. |
Editing the decal texture definition
Decals, like other textures, are saved as resources and can be edited from the Object Info palette or the Resource Manager. Decals are masked image-based textures with transparency, but shaders can be added and shader parameters can be changed. For example, you may wish to apply a bump shader (based on the color image shader) to letters in a sign to give them a 3D appearance. By default, the reflectivity of a decal is matte, but this can also be changed. Adjust masking parameters and add vertical and/or horizontal repetitions of the texture if the default single repetition needs to be changed.
Select the desired editing command from the Texture menu on the Render tab, and see Editing textures and shaders of selected objects and Editing textures and shaders from the Resource Manager for information on editing the decal texture and its shaders.
