Concept: Texture projection and orientation
Map types
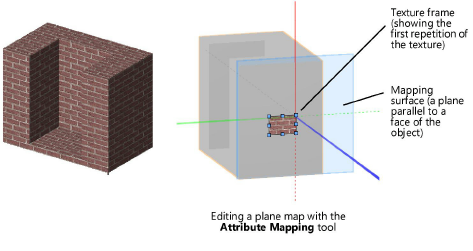
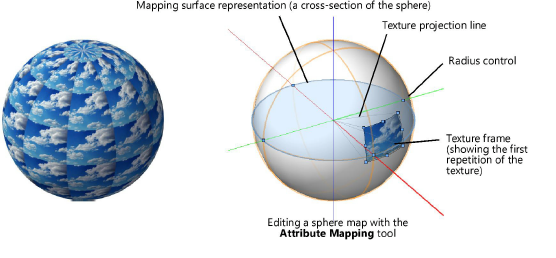
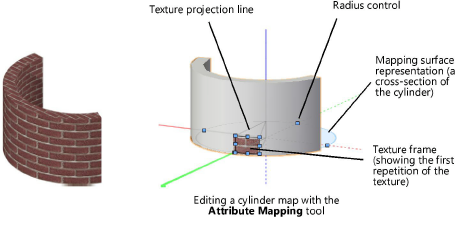
A map type controls how a texture is projected onto different types of objects in a general way. Plane, auto-align plane, sphere, cylinder, perimeter, surface UV, roof, and imported mapping types are available. To further adjust the mapping, the projected texture can be rotated, moved, and scaled using the Render tab of the Object Info palette. For plane, sphere, cylinder, and surface UV mapping types, the Attribute Mapping tool adjusts the mapping directly on the object.
Surface hatches observe the scaling, rotation, and offset applied to the defining texture.
Surface hatches associated with a texture support plane, auto-align plane, cylinder, and surface UV texture map types. Sphere, perimeter, and toof texture map types are rendered as auto-align plane for surface hatches. Surface hatches on some curved surfaces do not stretch in the way that textures do, so the results vary slightly.
Select the map type from the Object Info palette; see Managing object textures from the Object Info palette.
|
Map Type |
Description |
|
Plane |
Projects the texture onto a plane
|
|
Auto-Align Plane |
Projects the texture perpendicularly to each face of a polygonal object; mapping is handled automatically. This type of mapping is useful for wall sculpting, and for imported 3ds (Vectorworks Design Suite required) or DXF/DWG content. Do not use this map type for decals (Attribute Mapping tool not supported).
|
|
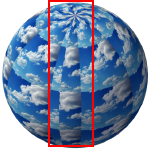
Sphere |
Projects the texture to the surface of a sphere
|
|
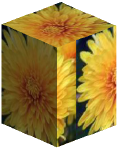
Cylinder |
Projects the texture to the surface of a cylinder
|
|
Sphere and Cylinder maps have seams that are more apparent with wrapped and image-based shaders
|
|
|
Perimeter |
Wraps the texture around the perimeter of the object (Attribute Mapping tool not supported); this map type is available only for the side faces of an object. For extrudes and sweeps, all side faces must have the same texture for this map type to be applied.
To apply this map type to the side faces of an extrude or sweep, all side faces must have the same texture applied. |
|
Surface UV |
Projects the texture onto the geometric definitions of each surface/face of an object
|
|
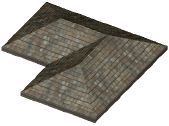
Roof |
Wraps the texture across the perimeter of the roof object (Attribute Mapping tool not supported)
|
|
Imported |
Preserves the texture mapping from the original SketchUp or 3ds model; all other mapping controls, including the Attribute Mapping tool, are disabled. The map type for individual parts of an imported mesh object can be changed to other supported Vectorworks map types; it is possible to combine imported mapping and custom mapping on the same imported mesh object. The Attribute Mapping tool can be used for mesh parts that are set to Plane, Sphere, or Cylinder map types. |
The available map types vary based on the object type being mapped.
|
Object type |
Map types available |
|
Extrudes |
Plane, auto-align plane, sphere, cylinder, perimeter, surface UV |
|
Meshes |
Plane, auto-align plane, sphere, cylinder, surface UV, imported |
|
Roofs |
Roof |
|
Slabs (Floors) |
Plane, auto-align plane, sphere, cylinder |
|
Solid Primitives (Sphere, Hemisphere, Cone) |
Plane, auto-align plane, sphere, cylinder, surface UV |
|
CSG Solids, Extrude Along Path, and Tapered Extrude |
Plane, auto-align plane, sphere, cylinder, perimeter, surface UV |
|
Sweeps |
Plane, auto-align plane, sphere, cylinder, perimeter, surface UV |
|
Walls |
Plane, auto-align plane, sphere, cylinder, surface UV |
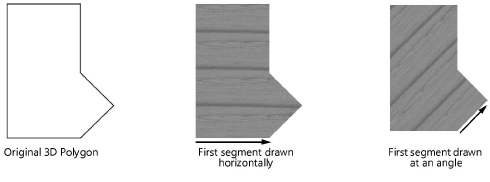
Textures and drawing direction
Textures are applied to 3D polygons and walls based on the direction the object was drawn. For 3D polygons, the texture is applied parallel to the first segment.
Wall texture orientation
The starting point and direction the wall is drawn affect how a texture is applied. When textures are applied By Object, rather than By Component, textures are applied to a wall’s left side, right side, and center (and, optionally, to its top, bottom, holes, and start and end cap). The center of a wall is always the same; the left and right sides are based on the drawing direction. When you draw a wall in a clockwise direction, which is the recommended method, the left side is the exterior side. See Wall direction.
While existing walls can be textured in all Vectorworks products, a Design Suite product is required to create wall objects.
A texture applied to the center of the wall is visible at the ends of the wall.
If the texture is incorrectly applied to a wall, with the wall selected, click Reverse Sides on the Shape tab of the Object Info palette. This flips the direction of the wall, switching the texture to the opposite side.
