Marker attributes
Marker attributes apply to the pen style of an object. You can apply line startpoint markers and line endpoint markers to open objects, including lines, arcs, polylines, 2D polygons, and freehand lines. You can also apply line end markers to the leader lines on callout and dimension objects. Dimensions have other default markers assigned as part of the dimension standard setup, but these cannot be applied or removed through the Attributes palette.
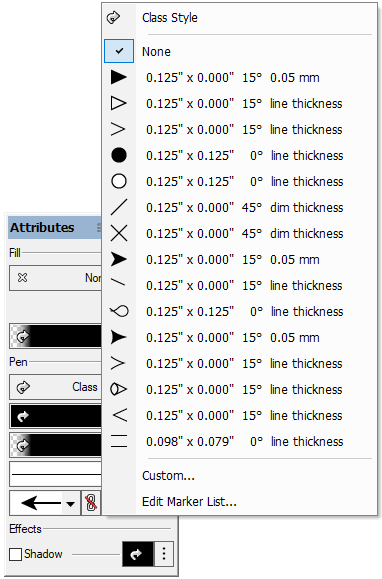
From the Attributes palette, click Line Startpoint Style, Line Endpoint Style, or both to specify the end(s) to receive the displayed marker. To always use the same style for both ends of the object, also click the Marker Link Toggle button; whenever the marker style of one end is changed, the other end’s marker style automatically changes to match.
To create a new marker style or to edit an existing style in the marker list, click Edit Marker List; see Editing the marker list for more information.
To set a custom marker for a selected object without changing the marker list, click Custom. The Edit Marker dialog box opens; see step 2 in Editing the marker list.
Select Class Style to use the marker attributes set by the object’s class (See Setting class attributes). If Use at Creation is enabled for the object’s class, the object’s marker style is automatically set by the class.
Editing the marker list
|
Command |
Path |
|
Edit Marker List |
Tools > Options |
You can customize the set of markers available from the Line Startpoint Style and Line Endpoint Style settings on the Attributes palette. The edited markers are saved with your user preferences, so they are available from one Vectorworks session to the next.
To edit the marker list:
Select the command. The Edit Marker List dialog box opens; edit the list.
Alternatively, select Edit Marker List in the marker list in the Attributes palette.
Click to show/hide the parameters.Click to show/hide the parameters.
|
Parameter |
Description |
|
Current Marker Types |
Lists the marker types that are available for selection when drawing; change the list order by clicking and dragging in the # column |
|
New |
Creates a new marker type |
|
Edit |
Edits the currently selected marker type |
|
Delete |
Deletes the currently selected marker type |
From the Edit Marker List dialog box, click New to create a new marker type, or click Edit to change the currently selected marker type.
The Edit Marker dialog box opens.
Click to show/hide the parameters.Click to show/hide the parameters.
|
Parameter |
Description |
|
Preview |
Displays a preview of the marker’s appearance |
|
General Options |
Specifies the marker’s shape and style |
|
Root Type |
Specifies the general shape of the marker |
|
Fill |
For closed root types, specifies the type of fill |
|
Base |
For triangular root types, specifies the shape of the base |
|
Angle |
For triangular and hexagonal root types, indicates the angle of the root |
|
Length |
Indicates the length of the marker, from base to tip |
|
Width |
Specifies the marker width, for marker types that have a width |
|
Half Tick |
For marker types except cone and lasso, displays half the marker on the indicated side |
|
Tail |
For markers which can be reversed, flips the marker direction to create a tail marker |
|
Thickness Options |
Specifies the marker pen thickness |
|
Use Line Thickness |
Uses the same thickness as that of the associated line, adjusting automatically along with any line thickness changes |
|
Use Dimension Slash Thickness |
Uses the same thickness as the dimension slash, set on the Dimensions tab of the document preferences (see Document preferences: Dimensions tab) |
|
Use Custom Thickness |
Specifies a custom marker thickness and unit (mils, points, or millimeters) |
The new marker is listed at the top of the marker types list.
Alternatively, click Delete to delete the selected marker from the list.
