 Creating barriers with the Rope and Stanchion tool
|
Mode |
Tool |
Tool set |
|
Modes for the Polyline tool |
Rope and Stanchion
|
Event Design |

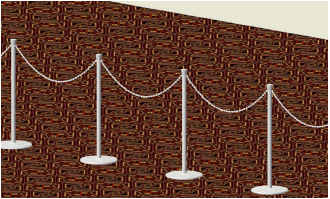
The Rope and Stanchion tool creates various types of barricades or roped-off areas for crowd control or for decorative purposes.
To insert a rope and stanchion barrier:
Click the tool and the creation mode.
Click to set the object’s start point.
Click to set the end of the segment and the beginning of the next. Continue drawing segments in this manner until the rope and stanchion object is complete, and then double-click.
The first time you use the tool in a file, a properties dialog box opens. Set the default parameters. The parameters can be edited later from the Object Info palette.
Reshape the rope and stanchion polyline with the Reshape tool.
Click to show/hide the parameters.Click to show/hide the parameters.
|
Parameter |
Description |
|
Adjustable Length/ Total Length |
Specifies the length from the first stanchion to the end stanchion; this can be changed from the Object Info palette or from the drawing. The parameter name depends on whether the object is straight or has several vertices. |
|
Stanchions |
|
|
Post Height/Post Diameter |
Specifies the height and diameter of the post portion of each stanchion |
|
Post Top Type |
Select a style for the top of the post; the Simple style varies in appearance, depending on whether belt is selected for the Stringer Type |
|
Post Color |
Displays the texture or color selected in the 3D options |
|
Base Type |
Select a round or square base |
|
Base Height/Base Width |
Sets the height of the base, and the width for square base or diameter for a round base |
|
Base Color |
Displays the texture or color selected in the 3D options |
|
Stringers |
|
|
Stringer Type |
Select belt, rope, or chain for the type of stringer |
|
Belt Length |
For belt stringers, enter the distance between stanchions |
|
Belt Color/ Belt Clip Color |
For belt stringers, displays the texture or color selected in the 3D options |
|
Rope Length |
For rope stringers, enter the distance between stanchions |
|
Rope Diameter |
For rope stringers, specify the diameter of the rope |
|
Rope Color/Rope Cap Color |
For rope stringers, displays the texture or color selected in the 3D options |
|
Chain Length |
For chain stringers, enter the distance between stanchions |
|
Single Link Length |
For chain stringers, specify the size of the chain links by entering the length of a single link |
|
Chain Color |
For chain stringers, displays the texture or color selected in the 3D options |
|
Spacing and Counts |
|
|
Ideal Spacing |
Specifies the maximum distance between stanchions (as limited by the belt, rope, or chain length) |
|
Actual Spacing |
Displays the actual distance between the stanchions |
|
End Stanchions |
Select whether to display the stanchions at the beginning, end, both, or none |
|
Total Stanchions |
Displays the total number of stanchions for the selected object |
|
Total Belts/Total Ropes/Total Chains |
Displays the total number of belts, ropes, or chains for the selected object |
|
Specifies the appearance of applicable rope and stanchion elements in 3D views. The 3D Options dialog box opens. For each available portion of the rope and stanchion, either select the color from the Color list, or select Custom Texture and then select the texture from the Texture list. The Object Info palette displays the color or texture selections in the relevant section. |
|
|
Location/Cart ID |
Enter information about the stage which can be placed on the drawing with Text Options (does not affect the stage appearance) |
|
Note |
Adds a note, which can be placed on the drawing with the Text Options |
|
Text Options |
Opens the Text Options dialog box, to enable the display and format the text of labels |
|
Default Text Positions |
Restores text labels to their default positions |
|
Opens the Classes dialog box, to specify class naming for the various portions of the rope and stanchion object. This allows portions of the object to be set to visible, grayed, or invisible. Use the standard class, select a class from the list of classes present in the drawing, or create a new class. Select <Rope and Stanchion Class> to place the rope and stanchion element in the same class as the soft goods object. Class Prefix: Specifies an optional default root class naming standard for all rope and stanchion parts; click Assign Default Classes With Prefix to begin all rope and stanchion class names with the prefix, so that they are sorted together. Assign Default Classes With Prefix: Sets the class names for all rope and stanchion elements to the standard, using the Class Prefix if there is one. Soft goods elements: For each portion of the rope and stanchion object, specifies the class name standard; the class names shown here are applied to the elements. |
|
|
Update |
Updates the object when changes have been made to the Object Info palette parameters |
|
Vertex Parameters |
Edits the vertices of the path object that the object is based upon; see Editing vertex-based objects |
