Light source properties
Light source parameters can be viewed and edited on the Object Info palette. The parameters available depend on the type of light source.
Access the light source properties for a selected lighting device by selecting Edit Light from the context menu. In the Light Properties dialog box, some of the parameters are disabled because they are controlled by the lighting device object instead.
Click to show/hide the parameters.Click to show/hide the parameters.
|
Parameter |
Description |
|
Shape tab |
|
|
Kind |
Indicates the type of light source; change to a different type by selecting a different kind from the displayed list |
|
On/Off |
Shows or hides the light produced by the light source. This setting can also be accessed from the light context menu: right-click on the light, and select Turn On or Turn Off. |
|
Auto Update |
Automatically renders the drawing when rendering-related parameters change |
|
Update |
When Auto Update is deselected, click to render the drawing when rendering-related parameters change |
|
Cast Shadows |
Creates shadows |
|
Soft Shadows |
Creates more realistic shadows by decreasing hard edges; rendering is slower when this option is enabled |
|
Lit Fog |
Creates a special volumetric lighting effect for point lights and spot lights when used in combination with the Lit Fog Renderworks background weather effect (see Creating Renderworks backgrounds) |
|
Use Emitter |
For accuracy, specifies the light’s actual brightness and color temperature; leave deselected to use the light as a simple light source. Required for a custom, area, or line light. The emitter brightness of all light objects in a scene with Use Emitter selected can be controlled in Lighting Options; see Setting lighting options. |
|
Brightness |
Specifies the light source brightness; enter a percentage or drag the slider bar. A value over 100% can be entered. This parameter is not available for custom, area, and line lights, or if Use Emitter is selected. |
|
Brightness From |
Specifies the location of the light intensity data for a custom light (either user input or distribution file); the distribution file can be specified by clicking Load Distribution |
|
Brightness Value |
Specifies the brightness as an accurate number (as opposed to the more arbitrary percentage specified in Brightness) |
|
Brightness Unit |
Select Lux, Lumens, Footcandles, or Candelas for the unit of Brightness; the available units depend on the light type |
|
Dimmer |
Dims the light source brightness (intensity) for lights with Use Emitter selected; enter a percentage or drag the slider bar. Only the brightness of the light source is affected; the color temperature is not changed. |
|
Light Rotation Angle |
Specifies the rotation angle of a custom light source around an axis connecting the light location to the light target; this angle defines the plane for the intensity distribution curve, and is displayed in red on the custom light object |
|
Use Distribution File |
Specifies whether to use the attached emission profile data file for the custom light |
|
Distribution File |
For a custom light, displays the distribution file name when a valid distribution file has been selected, or “None” if a valid distribution file has not been designated (click Load Distribution to specify a file) |
|
Load Distribution |
For a custom light, loads light emission profile data from a standard file. The brightness value is obtained using the integral of the raw emission data provided with the file. The file must be a text file with industry standard intensity distribution data in .ies format. |
|
Color Temperature |
Specifies the light color temperature in Kelvin. This refers to an ideal black body emitter, glowing “red hot” or “white hot.” A lower temperature generates an orange color; the hotter the temperature, the closer to white the color of the light is. Specifying this parameter is optional. If not specified, the default temperature is 0, meaning that the final emission color for the light is entirely controlled by the selection in Color. When the temperature is specified, Color cannot be changed. The final emission color is set by the Color Temperature. Color temperature settings can be white-balanced on a per-layer basis; see Setting lighting options. |
|
Color |
Specifies a color associated with the light source; click the color box to select the color. This parameter is not available if Use Emitter is selected and a Color Temperature is specified. |
|
Distance Falloff |
Indicates the distance falloff function for a point, spot, custom, area, or line light (specifies the rate of intensity change while moving along the beam away from the light source) |
|
Quality |
For area and line lights, specifies the sampling quality of the light; select From Render Mode to use the settings specified for Soft Shadows quality in the rendering options |
|
Render Geometry |
For area and line lights, renders the light object geometry |
|
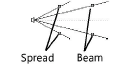
Spread/Beam diagram |
Drag the handles on the diagram to set the spot light Spread and Beam angles, or enter the values in the fields below the diagram
|
|
Spread |
Specifies the spread angle of the spot light (the light cone’s maximum angle) |
|
Beam |
Specifies the beam angle of the spot light (the cone of light that does not change intensity up to the spread angle) |
|
X/Y/Z or X’/Y’/Z’ |
Specifies the location of the light source in relation to the active layer plane or working plane |
|
Look To Height |
For spot lights, sets the Z height above the active layer plane of the spot light target handle |
|
Azimuth |
Indicates the azimuth for a directional light (South at zero degrees); enter new values or drag the slider bar to set |
|
Elevation |
Indicates the elevation (degrees above the horizon) for a directional light; enter new values or drag the slider bar to set |
|
Pan/Tilt |
Click the top button to display the spot light or custom light beam pan and tilt angles; enter new values or drag the slider bar to set |
|
±X/±Y/±Z |
Click the bottom button to display the light beam direction in terms of its X, Y, and Z components |
|
Sets the orientation of the directional, spot, or custom light to that of the current view. This setting can also be accessed from the light context menu: right-click on the light, and select Set Light to View.
|
|
|
Sets the orientation of the current view to that of the directional, spot, or custom light. This setting can also be accessed from the light context menu: right-click on the light, and select Set View to Light.
|
|
|
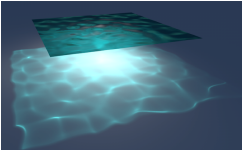
Caustic Photons |
For point, spot, or custom light objects, select how intensely light patterns should be focused by reflective and transparent refractive substances such as water and glass.
Reflective and/or transparent refractive surfaces must be present to generate caustics. Higher caustic photons settings require more render time. When Caustic Photons are set to a value other than None, the specified effects are always shown in Final Quality Renderworks render mode, and are user-controlled for Custom Renderworks render mode (see Custom Renderworks options) and for Renderworks styles (Creating Renderworks styles). Regardless of the setting, caustic effects are not shown in Fast Renderworks render mode.
|
|
Show Caustics Only |
When Caustic Photons is set to a value other than None, turns off the diffuse, specular, and global illumination features of the light, which may wash out the caustic effects. The light brightness can make the caustics brighter. A point, spot, or custom light object with Show Caustics Only selected can be used alongside a similarly located light with this option deselected to achieve a realistic lighting effect. |
|
Name |
Displays the name of the light (as shown on the Visualization palette). The default name of a lighting device (Spotlight required) is determined by its channel + purpose + instrument type (or symbol name) + NNA. This name updates as the parameters that compose it change. You can edit the name and prevent it from updating by removing NNA. |
|
Render tab |
|
|
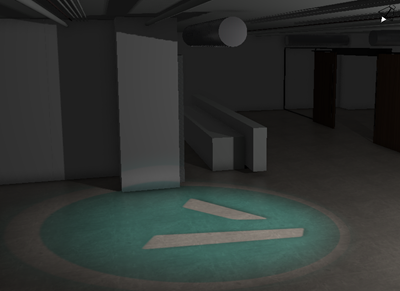
Projected Texture (Spot lights only) |
Spot lights can project the color and mask transparency properties of a specified Renderworks texture; see Projecting a texture in a spot light beam |

A symbol that contains a light object can be copied to reproduce identical lights. Change the light intensity for each symbol in the Object Info palette.
Once a light has been placed on the drawing, the Selection tool can be used to change its location and, depending on the light type, beam parameters.
|
Light type |
Beam parameter |
Description |
|
Point, Spot, Directional |
Light location |
Click the light with the move cursor and drag it to its new location.
The spot light target handle is not locked to its target. The target handle location may need re-adjusting after moving the spot light. |
|
Spot, Directional |
Orientation and view |
Select the light; in the Object Info palette, click Set Light to View to set the light orientation to the current view orientation, or click Set View to Light to set the orientation of the view to that of the light |
|
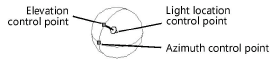
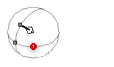
Directional |
Azimuth and elevation direction |
Click the azimuth or elevation control points to change the directional light parameters. Move the handles with the mouse, or enter the azimuth and elevation values in the Data bar.
|
|
Spot |
Target direction |
Click the handle with the Selection tool to change the spot light target direction; drag to the new target and click to set
|
|
Directional |
Beam direction |
Click and drag with the hand cursor to change the beam direction
|
|
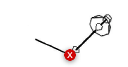
Custom |
Target and axis |
The black vector points to the target location; its axis line (the light axis) connects the light source location to the target. The red vector starts at the light source location, pointing to a reference point on the “equator” of the polar intensity distribution. Also known as the “zero angle line,” it represents the origin for measuring the intensity on the light curve.
|


Projecting a texture in a spot light beam
Spot lights can project the color and mask transparency properties of a specified Renderworks texture.
Reflectivity and bump shader texture effects are ignored for the projection.
To project a texture in a spot light beam:
Select a light object with Kind set to Spot, and the light turned On.
Click the Render tab from the Object Info palette and set Projected Texture to Texture.
Click to select a texture from the Resource Selector; a thumbnail view of the selected texture displays.
The spot light beam projects the selected texture onto 3D geometry.