Managing lights and cameras with the Visualization palette
|
Command |
Path |
Shortcut |
|
Visualization |
Windows > Palettes |
Ctrl+Shift+Alt+V (Windows) Cmd+Shift+Option+V (Mac) |
The Visualization palette provides fast and easy access to all lights and cameras in a Vectorworks file, including animation path objects. Lights and cameras can be selected, edited, duplicated, created, and deleted. The palette also controls lighting overrides for selected sheet layer viewports, without modifying the lighting on the design layer or in another viewport.
Tasks that can be performed from the Visualization palette include:
Quickly locating any light or camera in the file
Turning lights on and off
Editing any light or lights in the file, even lights that are inside a container object or on a different layer
Creating lighting overrides for sheet layer viewports
Managing light and camera objects, including creating, editing, deleting, duplicating, and sorting
Quickly activating/deactivating a camera or changing the view of a non-active camera
Turning heliodon objects on or off to conduct sun studies (Vectorworks Design Suite product required)
To use the Visualization palette:
Select the command.
The Visualization palette opens. The Visualization palette can remain open while you work in the drawing.
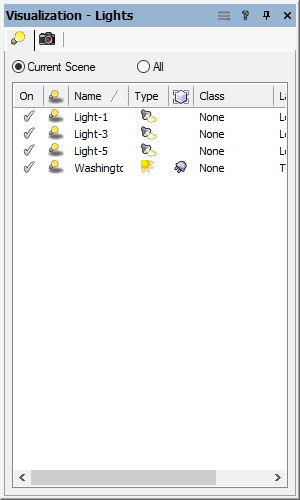
The Visualization palette contains two tabs: the Lights tab accesses lights, and the Cameras tab accesses cameras. The lights and cameras can be sorted by clicking in the header of any column.
The Lights tab functions in two different modes depending on whether you are on a design layer or sheet layer.
On a design layer, the palette lists either all the lights in the file, or just the lights that affect the current view.
On a sheet layer, the palette lists either all the lights in the file, or just the lights of selected viewports; edits to the selected viewports affect the viewport lighting, creating an override, but this does not affect the associated design layer lighting.
Click the Utility menu on the palette's title bar to access creation and management commands for each tab of the palette, and to control the palette’s display. Depending on what action is being performed, different options are available in both the Utility menu and the context menu.
To manage drawing elements listed on a Visualization palette tab, select a list item and then select the desired command from the Utility menu, or right-click a list item and then select the desired command from the context menu.
Click to show/hide the parameters.Click to show/hide the parameters.
|
Parameter |
Description |
|
Lights tab |
The Lights tab accesses the parameters of sheet layer viewports or all lights in the file |
|
Current Scene |
Displays only the lights which affect the current view (lights from the current layer and in visible classes) |
|
Selected Viewport(s) |
Displays only the lights which affect the currently selected sheet layer viewports; in this mode, lights can be edited to override the lighting of the selected viewports only. (Other Visualization palette light management commands are not available.) Select Revert Override to return the viewport to its original lighting. |
|
All |
Lists all the lights in the file |
|
On |
Click to toggle the light on or off; a check mark indicates that the light is on |
|
(Cast Shadows)
|
Click to toggle the ability of the lights to cast shadows on or off; a red “x” indicates that shadows are off |
|
(Override State)
|
For lights in selected viewports, indicates whether the light has an override.
|
|
Name |
Displays the name of the light (as shown on the Shape tab of the Object Info palette). The default name of a lighting device (Spotlight required) is determined by its channel + purpose + instrument type (or symbol name) + NNA. This name updates as the parameters that compose it change. You can edit the name and prevent it from updating by removing NNA from the Name field in the Light source properties. |
|
Type |
Indicates the type of light:
|
|
(Light Parent)
|
Indicates whether the light is within a container object; if blank, the light is not part of another object.
|
|
Class/Layer |
Displays the light’s class and layer |
|
Menu commands |
The menu commands, available on the Utility menu and context menu, manage and select light objects; different commands are available on design layers and sheet layers |
|
New |
Opens the Create Light dialog box, to create a directional, point, spot, or custom light on the current design layer; see Adding light sources |
|
Edit |
Opens the Properties dialog box, to edit the parameters of the currently selected light; when more than one light is selected, only common properties can be edited |
|
Revert Override |
Restores the original light parameters for the viewports, when the lights in selected sheet layer viewports have been edited |
|
Duplicate |
Copies the currently selected light(s), placing the copy or copies on the same design layer and in the same class as the original(s). Lights in symbols or plug-in objects cannot be duplicated. |
|
Delete |
Deletes the currently selected light from the design layer. Lights in symbols or plug-in objects cannot be deleted. |
|
Select On Document |
Selects the current light on the design layer, and automatically centers the view on the light, or its container (alternatively, double-click a light in the Visualization palette, if the light is in the active class or layer.) The light properties can then be edited in the Object Info palette or by clicking Visualization > Edit. The selection and editing of multiple lights at once is supported. If the light is not in the active class or layer, use the Force Select command instead. The Vectorworks Display preference must be set to show lights. |
|
Force Select |
If the light is in a different class or layer, activates the layer or class, and automatically centers the view on the light, or its container group or symbol. The light properties can then be edited in the Object Info palette or by clicking Visualization > Edit. Multiple lights cannot be selected by this method. |
|
Cameras tab |
The Cameras tab lists the camera objects and animation paths in the drawing for selection, activation, and editing |
|
(Activated Camera)
|
Click in the column to Activate/Deactivate a camera. The camera can also be activated from the Visualization palette context menu, by double-clicking the camera in the Visualization palette, double-clicking the camera object in the drawing space with the Selection tool, and from the Object Info palette. |
|
Name |
Displays the name of the camera (as shown on the Data tab of the Object Info palette) |
|
Class/Layer |
Displays the camera’s class and layer |
|
Menu commands |
The menu commands, available on the Utility menu and context menu, manage and select camera objects |
|
New (Renderworks camera only) |
Activates the Renderworks Camera tool; click to place a camera object |
|
Edit (camera only) |
Opens the Properties dialog box, to edit the parameters of the currently selected camera |
|
Duplicate |
Copies the currently selected camera(s), placing the copy or copies on the same layer and in the same class as the original(s) |
|
Delete |
Deletes the currently selected camera |
|
Activate Camera (appears when no camera/animation is activated) |
For camera objects: Changes the document view to the camera view and displays the active camera viewfinder indicator, links the camera to the current document view so that viewing tools (such as the Flyover and Walkthrough tools) affect the camera, and enables the Renderworks camera effects when rendering in Final Quality Renderworks or Custom Renderworks render modes. For animation paths: Selects the animation path and displays the active camera view. The camera can also be activated by clicking in the Activated Camera column, double-clicking the camera in the Visualization palette, double-clicking the camera object in the drawing space with the Selection tool, and from the Object Info palette. |
|
Deactivate Camera (appears when a camera/animation is activated) |
For cameras: Unlinks the camera from the current view so that viewing tools do not affect the camera view, removes the active camera viewfinder indicator, and disables the Renderworks camera effects when rendering in Final Quality Renderworks or Custom Renderworks render modes. The camera can also be deactivated by changing the view so the camera is no longer active (for example by switching to Top/Plan view or changing layer visibilities so that the camera’s layer is no longer active), or by clicking in the Activated Camera column, double-clicking the camera in the Visualization palette, or from the Object Info palette. For animation paths: Unlinks the camera from the current view so that viewing tools do not affect the camera view and removes the active camera viewfinder indicator. Any navigation actions other than editing the keyframes or the settings in the Object Info palette automatically deactivate the live camera view. The same custom 3D view displays, but the link to the animation path object is no longer active. |
|
Match Current View (Renderworks camera only) |
With a deactivated Renderworks camera selected, click to reposition the camera so that its view is the current 3D view. Alternatively, click Match Current View from the Object Info palette. The camera’s location and orientation change to match the current view, but other camera parameters remain unchanged. |
|
Select On Document |
Selects the current camera, and automatically centers the view on the camera. The camera properties can then be edited in the Object Info palette or by clicking Visualization > Edit. The selection and editing of multiple cameras at once is supported. |
|
Tab visibility commands (available on Utility menu only) |
Toggle the visibility of individual tabs on and off; see Controlling the visibility of palettes and tabs. The visibility toggles for detached tabs is available on their individual palettes, not the home palette. |
|
Dock [tab name] here/Dock all Tabs here (available on Utility menu only) |
Returns the selected detached tab, or all detached tabs, to the palette; see Detaching and returning palette tabs |
