Resource Manager: Resource viewer pane
Resource type
The resource viewer pane displays resources in the file selected in the file browser pane. Select a specific type of resource from the tool bar to filter the display, or select the option to show all resources. Folders always display at the top of the pane. To change the sort order, right-click and select Sort By from the context menu. You can always sort by name, in ascending or descending order; when all resources are displayed, you can also sort the resources by type.
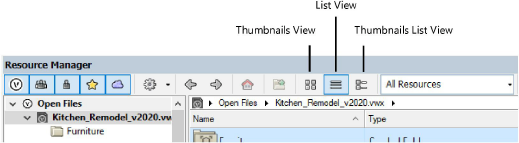
Resource views
Three buttons on the palette tool bar control the display of resources in the resource viewer pane.
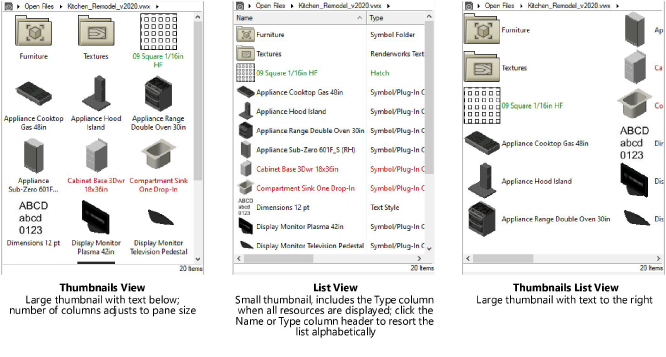
All views show the name of the resource and a preview image or representational icon for each resource. Symbol definitions display in the color associated with their type (see Concept: Vectorworks symbols). Page-based hatches, tiles, and line types also display in green.
Resources which have various levels of detail always display the preview using the medium level of detail setting. Therefore, if a resource only has a high or low level of detail representation, its preview appears blank.
For plug-in objects with associated manufacturer catalogs, individual catalog items cannot be selected using the Resource Manager; see Concept: Plug-in object styles and catalog items.
To change the view, click a view button on the palette tool bar. Alternatively, right-click anywhere in the resource viewer pane, and select View As from the context menu.
Resource viewer menus
The context menus in the resource viewer pane provide commands to work with the folders and resources that display in the pane. Right-click on the desired folder or resource; the context menu lists commands that apply to that item.
Available commands are determined by the type of resource selected, as well as what file the resource is in. For example, commands that modify the resource (such as Edit and Rename) are only available in the active file.
Click to show/hide the commands.Click to show/hide the commands.
|
Command |
Description |
Shortcut key equivalent |
|
Opens the Add a Tag dialog box; enter a tag to help you locate the resource with the search function. See Adding and editing resource tags. |
None |
|
|
Apply |
Applies the selected resource to the selected drawing object |
Double-click |
|
Attach Record |
Opens the Attach Record dialog box, to attach a record to the selected plug-in object, or to the symbol definition (changing all symbol instances, existing and future). See Attaching record formats to a symbol definition. |
Not applicable |
|
Break Reference |
When a referenced resource is selected, breaks the link between the current file and the master file; the resource remains in the current file but is no longer referenced |
None |
|
Create Texture from Hatch |
Creates an associated texture from an existing hatch; see Creating a texture from a hatch |
Ctrl-double-click (Windows) Option-double-click (Mac) |
|
Delete |
Deletes the selected resource from the file. When a folder is selected, deletes the folder and all resources in the folder. See Deleting or replacing resources. |
Delete key |
|
Duplicate |
Opens the Assign Name dialog box; enter a name to create a duplicate of the selected resource |
None |
|
Edit |
Opens an edit dialog box for the selected resource. If the resource is referenced, an alert prompts you to verify that you want to edit the resource before the edit dialog box opens. Edits made in the current file are also saved automatically to the source file, which may affect references to this resource in other files. |
Ctrl-double-click (Windows) Option-double-click (Mac) |
|
Edit 2D Components |
Edits the 2D component of the symbol definition; see Creating 2D components for symbol definitions and plug-in objects |
Ctrl-double-click (Windows) Option-double-click (Mac) |
|
Edit 3D Component |
Edits the 3D component of the symbol definition; see Editing symbol definitions |
Ctrl-double-click (Windows) Option-double-click (Mac) |
|
Edit 3D Wall Hole Component |
Edits the 3D wall hole component of the symbol definition; see Adding a 3D wall hole component to a symbol definition |
Ctrl-double-click (Windows) Option-double-click (Mac) |
|
Edit Definition (Landmark required) |
Edits the definition of the plant symbol as described in Creating plant styles |
Ctrl-double-click (Windows) Option-double-click (Mac) |
|
Edit Image Attributes |
Opens the Image Attributes dialog box, to edit the attributes of the imported image as described in Mapping image fills |
None |
|
Edit Image Effects |
Opens the Image Effects dialog box, to apply Image effects to the imported image |
|
|
Edit Symbol Options |
Opens the Symbol Options dialog box, to edit symbol definition parameters; see Editing symbol definitions |
Ctrl-double-click (Windows) Option-double-click (Mac) |
|
Edit Tags |
Opens the Edit Tags dialog box to add, edit, or delete tags associated with the resource; see Adding and editing resource tags |
None |
|
Enter |
Opens the selected symbol folder or script palette to display the symbols or scripts inside |
Double-click |
|
Export (Design Suite product required) |
Opens the Export Resource dialog box to export the selected resource to another file. When a folder is selected, exports the folder and all resources in the folder. See Exporting resources. |
None |
|
Extract Image(s) |
Opens the Select Folder (Mac) or Export Image File (Windows) dialog box to save a .png file extracted from the selected image-based resource. To extract images from all image-based resources in the current file execute this command with no resources selected. Select a resource folder to extract images from all image-based resources in the folder. |
None |
|
IFC Data (Design Suite product required) |
Attaches IFC data to the selected symbol definition, changing all symbol instances, existing and future. See Assigning IFC data to objects. |
None |
|
Import |
When a resource from a different file is selected, imports the resource into the active file |
None |
|
Make Active |
Makes the selected symbol or plug-in active, and activates the Symbol Insertion tool so that the symbol or plug-in can be inserted into the drawing |
Double-click |
|
Move |
Opens the Move [resource] dialog box to move the selected resource to another folder |
Not applicable |
|
New [resource type] in Active Document |
Opens a dialog box to create a new resource in the active file, of the same type as the resource selected; see Creating resources |
None |
|
New [resource type] in [selected file] |
Opens a dialog box to create a new resource in the selected file, of the same type as the resource selected; see Creating resources |
None |
|
New Folder in Active Document |
When viewing a specific resource type, creates a new resource folder, of the type being viewed, in the active file |
None |
|
New Folder in [selected file] |
When viewing a specific resource type, creates a new resource folder, of the type being viewed, in the selected file |
None |
|
Open |
When a worksheet is selected, opens the worksheet on screen for edits; when a script palette is selected, opens the palette |
Ctrl-double-click (Windows) Option-double-click (Mac) |
|
Reference |
When a resource from a different file is selected, creates a reference to it in the active file; see Referencing resources |
None |
|
Rename |
Opens the Assign Name dialog box; enter a name to rename the selected resource. If the resource is referenced, an alert prompts you to verify that you want to rename the resource before the Assign Name dialog box opens. The name change made in the current file is also saved automatically to the source file, which may break references to this resource in other files. Referenced symbols, gradients, record formats, hatches, tiles, Renderworks backgrounds, textures, sketch styles, wall styles, text styles, slab styles, plants, and image resources can be renamed. |
Ctrl-double-click (Windows) Option-double-click (Mac) (Image fills only) |
|
Run |
Runs the selected script. Text documents that contain scripts must be run using the Tools > Plug-ins > Run Script command. |
Double-click |
|
Select Resource Location |
After a search, selects the file that contains the selected resource in the file browser pane |
None |
|
Set Thumbnail View |
For the thumbnail preview, adjusts the view of the selected symbol(s)/plug-in object style(s). If a folder is selected, the view is applied to all symbols/styles within the folder. |
None |
|
Set Thumbnail Component |
For the thumbnail preview, adjusts the component view of the selected symbol(s)/plug-in object style(s); the options available depend on the thumbnail view selection. If a folder is selected, the view is applied to all symbols/styles within the folder. |
None |
|
Set Thumbnail Render Mode |
For the thumbnail preview, adjusts the render mode of the selected symbol(s)/plug-in object style(s). If a folder is selected, the view is applied to all symbols/styles within the folder. |
None |
|
Set High-Res Preview View |
In the preview pane, adjusts the view of the selected symbol(s)/plug-in object style(s). If a folder is selected, the view is applied to all symbols/styles within the folder. |
None |
|
Set High-Res Preview Component |
In the preview pane, adjusts the component view of the selected symbol(s)/plug-in object style(s); the options available depend on the preview view selection. If a folder is selected, the view is applied to all symbols/styles within the folder. |
None |
|
Set High-Res Preview Render Mode |
In the preview pane, adjusts the render mode of the selected symbol(s)/plug-in object style(s). If a folder is selected, the view is applied to all symbols/styles within the folder. |
None |
|
Sort By |
Sorts the resources by name (when all resources are displayed) or type, in ascending or descending order |
None |
|
View As |
Changes the view mode in the resource viewer pane; see Resource views |
None |
|
Worksheet On Drawing |
Places the selected worksheet on the drawing for display and printing |
Double-click |
