Inserting a heliodon object
|
Tool |
Tool set |
|
Heliodon
|
Visualization |

To insert a heliodon:
Click the tool.
Click to place the object, and click again to set the rotation. The first time you use the tool in a file, a properties dialog box opens. Set the default parameters. The parameters can be edited later from the Object Info palette.
Click to show/hide the parameters.Click to show/hide the parameters.
|
Parameter |
Description |
|
Time Display |
Select the method of time display; Samples shows the time as it is currently formatted |
|
12/24 Hour |
Select whether to display the time in 12-hour or 24-hour time format; in 12-hour format, the date automatically displays as Month/Day, and in 24-hour format, the date automatically displays as Day/Month |
|
Colon/Dot |
Sets the time to display with a colon or dot between the hour and minute |
|
2D Graphic |
Select a heliodon symbol from a library; a selected symbol is automatically imported into the current file and displays in the Resource Manager |
|
Location |
Locations are derived from text files that can be found in the heliodon cities folder in the Vectorworks application folder [Vectorworks]\Libraries\Defaults\Heliodon\Cities (see Concept: Resource libraries) or from georeferenced information (Architect or Landmark required). Region text files with city, longitude, and latitude information can be added to the current set of files, or the information can be edited from this dialog box. Once a region has been selected, the corresponding text file is saved to the user folder; see Vectorworks preferences: User Folders pane. |
|
Determine the location using the Document/Layer Georeferencing (Architect or Landmark required) |
If document georeferencing is enabled for the file or the layer, sets the heliodon location to the georeferenced location; the remaining heliodon settings update automatically to reflect the geolocation. See Specifying document georeferencing. |
|
Region |
Select the region from among the major regions of the world, or click Add New Region from the bottom of the Region list, to create a new region. If you add a new region, name the region in the Add New Region dialog box, then click Edit City to enter location information. |
|
City |
Select a major city from within the specified region |
|
Edit City |
If you have different information for the currently selected city, its information can be edited; new cities can also be added to the current region. Any edits are saved to the user folder. |
|
City |
If updating the currently selected city, do not edit the city name; if adding a city, enter the new city name |
|
Latitude/Longitude |
Specifies the city’s global coordinates |
|
North/South/East/West |
Sets the latitude (North/South) and longitude (East/West) hemispheres |
|
Time Zone |
Select the city’s time zone based on Greenwich Mean Time (GMT) |
|
Add |
Adds the new city to the selected region; the new city must have a unique name |
|
Update |
Updates the information of the selected city |
|
Delete |
Deletes the city from the selected region |
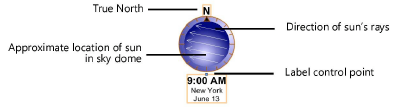
The heliodon graphic displays true North at the top of the heliodon. Normally, the drawing is oriented to page North (true North, not magnetic North), and true North matches the top of the page, with no compensation required for proper sun position. If the drawing was not created with this orientation, use the Object Info palette to specify a Rotation in degrees from page North. North set here should match true North in the drawing.
The white arrows represent the sunlight direction at the current time of day and the designated location. The gradient highlight shows the approximate position of the sun in the sky dome.
Once placed, a heliodon symbol is added to the drawing file and is listed in the Resource Manager in the Heliodon Symbols folder. Edit the 2D component of the symbol as described in Editing symbol definitions to change the appearance or the font style or size.
Heliodon objects display in, and can be controlled from, the Visualization palette. They can be identified by their location and time data.
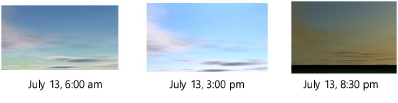
Place several heliodon objects in the drawing, set to different times of day, to conduct a solar study. Turn the heliodon objects on and off in the Visualization palette to study the effects of the sun’s light and shadows cast at different times of day.
Click to show/hide the parameters.Click to show/hide the parameters.
|
Parameter |
Description |
|
Settings |
Opens the Settings dialog box, to specify the heliodon parameters |
|
Heliodon data |
Displays the location, position, and time zone set for the heliodon |
|
Show Solar Data |
Displays solar information for the heliodon in the Object Info palette; select a Text Display option which includes “Data” to include the solar data in the heliodon text label |
|
Daylight Savings |
Select if Daylight Saving Time is in effect |
|
Use Solar Time |
Overrides the local time zone and daylight savings settings, using apparent solar time instead of mean solar time. When solar time is used, Daylight Saving Time cannot also be in effect. |
|
Time/Day/Month |
Specify the time of day, the day of the month, and the month, or select a winter or summer solstice or spring or autumn equinox from the Month list. The Time can also be specified as sunrise, dawn, midday, noon, dusk, sunset, or midnight. |
|
Sun Brightness |
Sets the brightness of the directional light representing the sun |
|
Renderworks Only |
A Renderworks render mode or background is required for the four next parameters |
|
Soft Shadows |
Creates soft shadows when rendering shadows with a Renderworks mode. Select this setting to display shadows in a rendering, but deselect it to conduct a shadow analysis. |
|
Physical Sun |
Creates a physical sun with color and brightness that is controlled by the heliodon settings (when rendering with a Renderworks mode); deselect the option to use a white directional light, set to 100% brightness |
|
Physical Sky |
Allows the heliodon settings, such as date, time, and use of warm colors, to control a physical sky Renderworks background, when one is applied (see Creating physical sky backgrounds). This creates more realistic solar animations, because the sky reflects the time of day and month of the year as the animation proceeds.
Deselect this option to view the physical sky with bright, midday settings. |
|
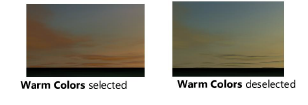
Warm Colors |
Adds a rosier, richer appearance to physical sun and sky colors
|
|
Show Shadow Angle Calculator |
Displays additional options for calculating shadow angles for selected walls |
|
Object Display |
Select how to display the heliodon object in 2D and 3D views; the heliodon symbol is a 2D graphic. 2D Graphic + 3D Light: Displays as a 2D graphic in Top/Plan view and as a light in 3D views 2D Graphic Only: Displays as a planar graphic in all views 3D Light Only: Displays as a light object; does not use a 2D graphic. |
|
Text Display |
Select the information to include in the heliodon’s text label; move the label control point to adjust the label position. None: Does not display a text label Time + Location + Date: Displays the time, city, and date Time + Location + Date + Data: Displays the time, city, date, and solar data including solar time Time + Date Only: Displays the time and date Time + Date + Data: Displays the time, date, and solar data Data Only: Displays the solar data |
|
Solar Animation |
Opens the Solar Animation dialog box; see Creating solar animations |