Setting Vectorworks preferences
|
Command |
Path |
|
Vectorworks Preferences |
Tools > Options Quick Preferences |
Vectorworks preferences are options that apply to every file you open, every time you run the program.
To change the Vectorworks preference settings:
Select the command.
The Vectorworks Preferences dialog box opens.
Click each pane to set the Vectorworks preferences for that pane.
Vectorworks preferences: Edit pane
Click the Edit pane to set preferences that control various edit functions in the program.
Click to show/hide the parameters.Click to show/hide the parameters.
|
Parameter |
Description |
|
Enable click-drag drawing |
Lets you draw objects with the click-drag method rather than the default click-click method. Click once with the mouse button and do not release; drag the cursor to a desired location and then release. See Click-click drawing. |
|
Display eight reshape handles |
Shows eight handles (four corner and four center) on most objects; deselect the option to display only four corner handles |
|
Offset duplications |
When you use the Duplicate command, places the duplicate object so that it is offset from the original object; deselect the option to place duplicates directly over the original |
|
Auto-join walls |
When you use the Wall tool, automatically joins walls at corners and intersections; when walls are separated, their ends automatically heal; when walls have core components, components also automatically join (see Automatically joining walls) |
|
Separate sheet views |
Saves the view origin and zoom factor for each sheet layer; deselect the option to use the same view for all design layers and sheet layers |
|
Enable mouse wheel zooms |
Sets the default behavior of the mouse wheel and the scroll ball. When selected, the wheel zooms by default; when deselected, the wheel scrolls by default. See Zooming with the mouse wheel and Scrolling with the mouse wheel for details. |
|
Allow Ctrl+click/Option+click in-place duplication |
When selected, allows a Ctrl-click (Windows) or Option-click (Mac) with the Selection tool to create a duplicate copy of a selected object in place. Since it is simple to inadvertently create duplicate objects that cannot be easily detected, leaving this option deselected is recommended; it is deselected by default. Regardless of the setting made here, duplicates can be created with a Ctrl-click/drag or Option-click/drag. |
|
Duplicate linked tags with objects |
When you use the Duplicate command on a tagged object, a new tag will be associated with the duplicate object; deselect the option to duplicate objects with no tags |
|
Edit text horizontally by default |
Always displays the text editing box in a horizontal position, even when the text is rotated (see Creating rotated text) |
|
2D Conversion Resolution |
Sets the number of segments that will be used to represent polylines and circles when you draw and edit objects |
|
Default Compression |
Specifies the default image compression to apply to images in a viewport cache and to images created by the Render Bitmap tool. PNG compression provides the best image quality but produces larger files, while JPEG creates smaller files, but with possible loss of detail. PNG is selected by default. |
|
Allow Interactive 2D Symbol Scaling |
Specifies whether the Selection tool, in an interactive scaling mode, is allowed to resize symbol instances; if allowed, a warning can be displayed to avoid inadvertently scaling a symbol. If Never is selected, symbols can still be resized from the Object Info palette; see Scaling symbols from the Object Info palette. |
|
Arrow Keys |
Select an arrow and modifier key combination as a shortcut for four common operations; each key combination can be assigned to only one operation. Alternatively, disable the ability to use arrow key combinations to perform any of these functions. |
|
Switch Active Layer/Class |
Select the key combination that switches the active layer (up and down arrows) and the active class (left and right arrows) |
|
Pan Drawing |
Select the key combination that pans the drawing by half of the area currently in view |
|
Switch Saved View |
Select the key combination that advances to the next saved view. When a Design Suite product is installed, the saved views advance in the order they are listed in the Navigation palette's Saved Views tab. For Fundamentals users, the saved views are advanced in alphabetical order. |
|
Nudge Objects |
Select the key combination that nudges objects by one pixel, and select whether to display an alert on the Status bar when nudging items to avoid accidentally moving objects |
|
Move Objects |
Select the key combination that moves objects, and select whether to move objects by the snap grid distance or by the specified custom distance |
Vectorworks preferences: Display pane
Click the Display pane to set the display preferences.
Click to show/hide the parameters.Click to show/hide the parameters.
|
Parameter |
Description |
|
Show rulers |
Shows the rulers, when possible. Rulers do not show in any perspective view. Rulers always show in Top and Bottom view, and they show in other orthogonal views when the working plane is screen-aligned. |
|
Show internal origin marker
|
Displays the drawing’s internal origin in Top/Plan view. The marker does not print. |
|
Show colored axes in Top/Plan view |
Displays X (red) and Y (green) axes in 2D Top/Plan view |
|
Show scroll bars |
Shows the scroll bars |
|
Use dark background |
Uses a dark drawing background instead of the default light settings, and inverts the black and white elements of the drawing area |
|
Zoom line thickness (slow) |
Lines in the drawing appear thicker when you zoom in (2D views or Hidden Line/Polygon render modes only); the screens redraw slower on Mac or on Windows if Use GDI+ imaging is enabled |
|
Create text without fill |
When you create text objects, dimension objects, and some plug-in objects that contain text, the text block has no fill, even if the default attributes are set to add a fill to new objects. This prevents objects beneath the text from being obscured. |
|
Show parametric constraints |
Displays parametric constraints |
|
Show other objects while in editing modes |
When certain complex objects are edited, an Edit window displays in the drawing area. When you edit solids, groups, symbols (in the drawing only), or viewports in the Edit window, select this option to make the other objects from the drawing visible and snappable during editing; deselect the option to show only the object being edited. (See Object editing mode for more information.) This option does not apply to other types of objects that are edited from the Edit window, including extrudes, multiple extrudes, tapered extrudes, sweeps, meshes, floors, and roof faces. For symbols, the option applies only when you edit a symbol definition by clicking on a symbol instance in a design layer. |
|
Gray other objects |
If Show other objects while in editing modes is selected, select this option to gray the objects in the drawing that are not being edited |
|
Use VectorCaching for faster drawing |
Caches vector information for complex document entities, such as polylines and hatches; while this makes screen redraws faster, it also can potentially increase RAM requirements by up to 50 percent |
|
Center on objects after view change |
When switching standard views (such as Top or Left Isometric), centers the view to display either selected objects, or if nothing is selected, all objects on the layer or in the drawing. Centers the view on all objects in a layer if there are no objects in view after switching between layers. This helps you feel oriented when switching views or changing layers. |
|
Use GDI+ imaging (Windows only) |
Draws lines of equal thickness with round end caps; also provides these features: Fills in 3D planar objects Variable object opacity Images with alpha channels Layer transparency Anti-aliasing Object transparency in X-ray Select mode Display text and markers in hidden line Disable this option if you need to use OpenType fonts. |
|
Enable anti-aliasing |
Blends the edges of fills and lines for a smoother appearance; on Windows, this option is available only when Use GDI+ imaging is enabled |
|
Accelerate graphics |
Enables accelerated panning, zooming, selection highlighting, sheet layer drawing, multi-threaded final graphics, and view transition animations; deselect if you experience cosmetic or reliability issues related to video |
|
Display broken link indicators for smart markers
|
Displays a red broken link indicator on the screen for reference markers, section-elevation lines, interior elevation markers, and detail callouts that are not linked to a viewport |
|
Display Light Objects |
Controls the visibility of light objects; hide light objects to reduce screen clutter but maintain light effects Always: Light objects are always visible Only in Wireframe: Light objects are only visible in Wireframe mode; otherwise, they are hidden Never: Light objects are hidden regardless of the render mode |
|
Display 3D Loci |
Controls the visibility of 3D loci Always: 3D loci are always visible Only in Wireframe: 3D loci are only visible in Wireframe mode; otherwise, they are hidden Never: 3D loci are hidden regardless of the render mode |
|
Edit Font Mappings |
Specifies the replacement fonts for fonts that are not available. Font mappings can be changed or deleted. If mappings are deleted, the Font Mappings dialog box appears so that unavailable fonts can be mapped. |

Vectorworks preferences: Session pane
Click the Session pane to set general Vectorworks preferences.
Click to show/hide the parameters.Click to show/hide the parameters.
|
Parameter |
Description |
|
Use sound |
Supplements the visual SmartCursor cues with audible cues; move the slider bar left (to reduce) or right (to increase) the program volume relative to the system volume |
|
Log time in program |
Records in a log file the time spent in the program, as well as the time spent to open and close documents; the date format depends on the language and regional settings in the operating system. The log file is called Vectorworks Log, and it is created in the User Data and Preferences Folder (which is displayed on the User Folders pane of Vectorworks preferences). |
|
Display minor alerts on status bar |
Displays minor warnings on the Status bar instead of in a dialog box |
|
Display classes in pop-up menus hierarchically |
Displays classes hierarchically in pop-up menus including from the Object Info palette, the View bar, and dialog boxes throughout Vectorworks. Hierarchical class display in the Organization dialog box, Navigation palette, and Load Overview dialog box (Vectorworks Design Suite product required) is controlled separately, on the Classes tab of the dialog box/palette. |
|
Preserve expanded/collapsed state of classes |
When classes are displayed hierarchically, maintains the expanded/collapsed state of the class list in pop-up menus between uses; when deselected, the class list is automatically collapsed each time |
|
Run scripts in developer mode |
For plug-in development, controls the display of warning messages during script execution. This is a convenient way for advanced developers to speed up the development process. By default, the scripts of scripted plug-in objects, tools, and menus are compiled once and stored in memory. The object, tool, or menu command memory cache is executed when the script is invoked. However, in developer mode, the script is compiled each time so that script changes are executed immediately and the developer does not need to restart the application to view changes. For Python scripts, warning messages are displayed along with Python log data, and initialization code (extended properties set in the script options) are called on each run. For VectorScripts, plug-ins are compiled on each run and warning messages are displayed. Plug-ins may work more slowly when this option is enabled. |
|
Maximum Number of Undos |
This can be set as high as 100. Undo information is kept in memory, so the higher the maximum number of undos, the more memory may be required. |
|
Issue undo warnings |
Many actions that delete data or settings cannot be undone. Provides a warning when you perform an action that cannot be undone. |
|
Undo view changes |
Specifies the undo setting for drawing view changes (such as zooming and scrolling); deselect to never undo view changes, leaving the view as is. Select when to undo drawing view changes: Only restore view for object changes: when an object change is undone, restores the view to its state before that object change Group all view changes: treats all consecutive view changes as one single undoable action Group similar view changes: treats similar consecutive view changes as a single undoable action Individual view changes: treats each individual view change as an undoable action |
|
Enable palette docking (Windows only) |
Lets you dock palettes; deselect the option to disable docking and to undock all active palettes |
|
Automatically append file extensions (Mac only) |
Appends the appropriate file extension (.vwx, or .sta for template files) to a newly created drawing file on a Mac |
|
Enable Vectorworks Libraries |
Displays predefined content from Vectorworks Libraries in the list of resources available for selection in many places throughout the program, such as the Resource Manager and the Resource Selector lists for various tools, or the Text Style list on the Tool bar for the Text tool |
|
Enable online content |
When Enable Vectorworks Libraries is selected, displays predefined online content in the list of resources available for selection in many places throughout the program, such as the Resource Manager and the Resource Selector |
|
Enable Premium Libraries |
Displays predefined content available exclusively as a Vectorworks Service Select benefit in the list of resources available for selection in many places throughout the program, such as the Resource Manager and the Resource Selector |
|
Create a new document on startup |
Creates a new, untitled file when the program is launched. The new file is based on the Default.sta template file, if one exists in your user or workgroup templates folder (see Opening a template automatically). Otherwise, the new file uses the Blank template. When this option is deselected, select File > New to create a new file. The Home screen does not display on startup when this is selected. |
|
Display Home Screen on startup |
When launching Vectorworks directly from the application (not opened from a file), displays the Home screen on startup; see The Home screen. The Home screen does not display on startup when Create a new document on startup is selected. |
|
Display Home Screen on closing the last document |
Displays the Home screen after you close all files; see The Home screen |
|
Change active layer for similar object creation (Design Suite product required) |
When the Create Similar Object command is invoked, changes the active layer to be that of the source object. Select this option to create the new object on the same layer as the source object. See Creating similar objects. |
|
Use local help even when an internet connection is available |
When you are connected to the internet, the help system is obtained online. When you are not connected, the local version of the help displays. There is not normally a big difference between the online and local versions. If bandwidth or connection issues cause online help display or searching to become unacceptably slow, select this option to always use the local version of the help system. |
|
Enable Mac OS restore windows functionality for Vectorworks (Mac only) |
Enables the operating system to automatically restore previously open files when re-launching Vectorworks. Keep this option deselected when working with several different versions of Vectorworks, to prevent older versions from unsuccessfully attempting to open newer version files. |
|
Check for Updates |
Select how often the program should check for available software updates. When the specified update check interval has elapsed, an alert dialog box opens if a new Service Pack (maintenance release) or major release of the software is available. If both a Service Pack and major release are available simultaneously, the system will send notification about the Service Pack first, followed by notification about the major release in the next session. Click More Info (or Tell Me More) in the alert dialog box to open a web browser to display and download the available update. You must exit the program to successfully install the software update. If it is not convenient to update the software at this time, click Not Now (or Remind Me Later) in the alert dialog box. The alert dialog box will redisplay when the specified update check interval has elapsed. To disable notifications of a major release until the next major release is available, click Not Interested. If the program is unable to connect to the update server, it attempts to connect once a day for seven days after the original failed attempt. If a connection to the update server still cannot be established, a dialog box opens to suggest running a manual update. If the Check for Updates command is run after the automatic update check fails, the next automatic update check occurs the day after the manual check. |
|
Error Reporting |
Sends anonymous information about application crashes and other basic usage statistics to Vectorworks to help improve the software. Four levels of informational detail can be selected: Send nothing: When you check for updates or activate Vectorworks software, we always collect general data about the operating system, graphics card, monitor resolution, and Vectorworks version. Send crash details: In addition to the general information that is always collected, this allows us to receive additional information in the event of a crash, including idle time, alerts received, workspace information, and graphics card operations prior to the crash. Send crash details and light usage patterns: Selecting this option invaluably assists us with product development while maintaining user privacy. In addition to the previously listed information, we are able to duplicate actions taken before a software crash, review undo actions, determine which objects may have been selected, and view Vectorworks-related file paths. We cannot see the data in your drawings, and the reporting has no impact on your software operations. Reporting happens in the background as you work and should not affect your workflow. Send crash details and verbose usage patterns: Selecting this option invaluably assists us with product development while maintaining user privacy. In addition to the information gathered through the light usage pattern option, we are able to upload additional information such as tool and command selection. We cannot see the data in your drawings, and the reporting has no impact on your software operations. Reporting happens in the background as you work and should not affect your workflow. |
|
Serial Numbers |
Opens the Serial Numbers dialog box to add or remove serial numbers for all installed Vectorworks products (see Adding and removing serial numbers). A change to this preference setting cannot be undone with the Undo command. |
|
Reset Saved Settings |
Reverts to default settings instead of user-specified settings for tool modes, dialog box positions, and dialog box values. For palette positions and settings, reverts to the settings established when the workspace was created (in the User Data and Preferences folder). In the Reset Settings dialog box, select whether to reset settings for Always do the selected action choices in alert dialog boxes. Also select whether to reset settings for all tool modes, dialog box positions, dialog box values, and palette positions and settings. A change to this preference setting cannot be undone with the Undo command. |
|
Palette Margins (Mac only) |
Sets whether the document window leaves a space for palettes when the window is opened |
Vectorworks preferences: 3D pane
Click the 3D pane to set preferences for 3D edits.
Click to show/hide the parameters.Click to show/hide the parameters.
|
Parameter |
Description |
|
3D Conversion Resolution |
Sets the segmentation resolution used to display curved 3D objects; affects extruded and swept polylines, circles, and arcs |
|
Default 3D View Render Mode |
Sets the preferred 3D render mode to Shaded or Wireframe; this setting is applied whenever a drawing is switched from Top/Plan to a 3D view |
|
Default 3D View Projection |
Sets the preferred 3D projection to Orthogonal, Narrow Perspective, Normal Perspective, or Wide Perspective; this setting is applied whenever a drawing is switched from Top/Plan to a 3D view |
|
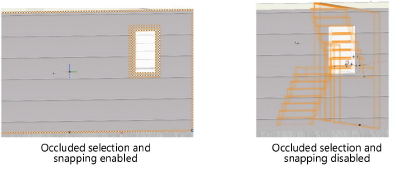
Use occluded selection and snapping |
In rendered views, solid objects “occlude,” or hide, objects behind them. Keep this option enabled to more easily select, and snap to, solid objects without interference from hidden geometry. To access hidden geometry, use the X-ray Select mode of the Selection tool, turn on the clip cube, or switch to Wireframe render mode; see X-ray Select mode.
|
Vectorworks preferences: Autosave pane
Click the Autosave pane to set preferences for automatic file saves and backups.
Click to show/hide the parameters.Click to show/hide the parameters.
|
Parameter |
Description |
|
Autosave every |
Enables the Autosave feature; also sets the number of minutes or operations between autosaves |
|
Confirm before save |
Before each save, opens a dialog box so that you can choose either to save or to continue to work without a save. The timer/counter resets regardless of which option is selected. See Automatically saving files. |
|
Overwrite original file |
Writes over the original file with the latest changes during a save |
|
Autosave a backup copy to |
Automatically saves a backup copy of the file either to a folder named VW Backup (in the same folder as the original file) or to a custom location, such as a network drive (click Choose to select a folder). The original file is not saved automatically; to save it, use one of the save commands on the File menu. Backup files have unique names that include the word “Backup” and a date and time stamp appended to the original file name. Use backup files to restore a project if something happens to the original file. |
|
Number of Backups to Save |
If Autosave a backup copy to is selected, specifies the maximum number of backup files to keep; the oldest backup file is replaced when a new backup is made |
Vectorworks preferences: Interactive pane
Click the Interactive pane to set preferences for the display of the interactive drawing features, such as the cursor, selection boxes, and selection highlighting. See Drawing with snapping for more information about snapping. See Selection and pre-selection indicators for more information about highlighting.
Click to show/hide the parameters.Click to show/hide the parameters.
|
Parameter |
Description |
|
Cursor |
|
|
Use full screen cursor |
Displays a crosshair cursor that extends to the edges of the drawing area |
|
Show selection box |
Displays a box beneath the cursor that indicates the active selection area; an object beneath the box can be selected when the mouse is clicked |
|
Show snap box |
Displays a box around the cursor that indicates the area in which to find possible snap points; when a snap point is beneath the box, it can be snapped to |
|
Show acquisition hints |
Show graphical hints near the cursor when smart points, edges, and vector locks can be acquired (see Concept: Snapping indicators) |
|
Selection Box Size |
Controls the size of the selection box, if Show selection box is selected; must be smaller than the snap box. The actual size of the selection box is shown. |
|
Snap Box Size |
Controls the size of the snap box, if Show snap box is selected; must be larger than the selection box. The actual size of the snap box is shown. |
|
Highlighting |
|
|
Enable selection highlighting |
When enabled, objects that are selected are highlighted with the specified colors and patterns, and square handles indicate points that can be used to reshape objects using the tool that is currently active. When this option is disabled, square handles indicate objects that are selected, and the handles may or may not be reshape points. |
|
Animation |
If Enable selection highlighting is selected, specify how the selection highlights will be animated when the cursor moves out of the drawing window or over a palette: Off turns off all animation of highlights On pulses the highlight continuously Burst briefly highlights with 100% opacity |
|
Enable cursor pre-selection highlighting |
Highlights any object that can be selected when the cursor is over the object |
|
Timer |
When a drawing object is beneath the cursor, specifies the number of seconds to delay before pre-selection highlighting begins |
|
Enable marquee pre-selection highlighting |
As a selection marquee is drawn over objects, highlights any object that will be selected |
|
Enable snapped object highlighting |
Highlights the geometry that generated the current snap |
|
Enable tool highlighting |
Highlights any object that can be modified or used by the current tool when the cursor is over the object |
|
Animate view transitions |
Animates the transition from the current view to the next standard view or saved view, providing a smoother experience when changing views. Enter the Duration in seconds for the transition to the next view, and select the transition's Motion. Decelerate starts fast and gradually slows Accelerate starts slow and gradually increases speed Smooth accelerates the view transition at the start and decelerates to the end Linear maintains a constant speed throughout These preferences can be overridden when creating or editing an individual saved view; see Creating saved views. View transitions can be animated only when Accelerate graphics is selected on the Display pane. |
|
Interactive Appearance Settings |
Opens a dialog box to change the appearance of the interactive elements in Vectorworks, including general elements, object highlighting, SmartCursor elements, and snap points |
Configuring interactive display
|
Command |
Path |
|
Vectorworks Preferences |
Tools > Options Quick Preferences |
You may find it helpful to customize the appearance of interactive elements in the program, including general elements, object highlighting, SmartCursor elements, and snap points.
To configure the appearance of interactive elements:
Select the command. On the Interactive pane of the Vectorworks Preferences dialog box, click Interactive Appearance Settings.
Alternatively, click Snapping Settings on the Status bar to open the General Snapping Settings popover, and click Interactive Appearance Settings.
The Interactive Appearance Settings dialog box opens.
Select either the Light Background or Dark Background tab, depending on whether the dark background display preference is enabled (see Vectorworks preferences: Display pane). The same elements can be customized for both background types.
Click to show/hide the parameters.Click to show/hide the parameters.
|
Element |
Description |
Example |
|
Clip Cube |
|
|
|
Edges |
Sets the color for edges where surfaces intersect a face of a clip cube |
|
|
Solid Fill |
Sets the color for the area where solid objects intersect a face of a clip cube |
|
|
Floating Data Bar |
|
|
|
Background |
Sets the background color and opacity of the Floating Data bar |
|
|
Outline and Text |
Sets the outline and text color of the Floating Data bar |
|
|
General |
|
|
|
Active Layer Plane |
Sets the color and opacity of the active layer plane grid |
|
|
Background - 3D Views |
Sets the background color of the drawing area for design layers in 3D views |
|
|
Background - Perspective Horizon Ground |
Sets the ground color and ground horizon color when in non-cropped perspective view; the foreground color gradually transitions to the background color as a gradient in the direction of the horizon |
|
|
Background - Perspective Horizon Sky |
Sets the sky color and sky horizon color when in non-cropped perspective view; the foreground color gradually transitions to the background color as a gradient in the direction of the horizon |
|
|
Background - Sheet Layers |
Sets the background color of sheet layers |
|
|
Background - Top/Plan |
Sets the background color of the drawing area for design layers in Top/Plan view |
|
|
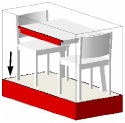
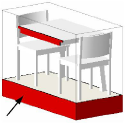
Editing Modes Border |
Sets the color, opacity, and size of the colored border when in object editing mode (see Object editing mode) |
|
|
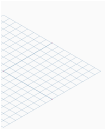
Grid |
Sets the color and opacity of the reference grid |
|
|
Page Boundary |
Sets the color and opacity of the page boundary border |
|
|
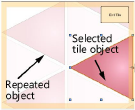
Repetition Opacity |
Sets the opacity for the repetitions of the selected line type or tile object, which are displayed when a line type or tile resource is being edited |
|
|
Reshape Handles - Active Layer |
Sets the color of the square handles that can be dragged to reshape a selected object on the active layer |
|
|
Reshape Handles - Inactive Layer |
Sets the color of the square handles that can be dragged to reshape a selected object on an inactive layer |
|
|
Working Plane |
Sets the color of the working plane and opacity of its fill and frame, as well as the opacity and size of the working plane axes |
|
|
X-ray Select Mode |
Sets the opacity of the objects in X-ray Select mode |
|
|
Object Highlighting |
|
|
|
Action |
Sets the color, opacity, and size of the highlighting for objects being modified |
|
|
Active Layer |
Sets the pattern, forecolor, backcolor, opacity, and size of the highlighting for an object that is selected on the active layer |
|
|
Automatic Plane Source |
Sets the color and opacity of the automatic working plane |
|
|
Checked Out Objects |
Sets the opacity and size of the highlighting for an object that is checked out from a shared project |
|
|
Inactive Layer |
Sets the pattern, forecolor, backcolor, opacity, and size of the highlighting for an object that is selected on an inactive layer |
|
|
Locked |
Sets the pattern, forecolor, backcolor, opacity, and size of the highlighting for an object that is locked |
|
|
Pre-Selection - Active Layer |
Sets the color, opacity, and size of the highlighting for an object that is pre-selected on the active layer; an object can be pre-selected by being either under the cursor’s selection box, or inside a selection marquee |
|
|
Pre-Selection - Inactive Layer |
Sets the color, opacity, and size of the highlighting for an object that is pre-selected on the inactive layer |
|
|
Pre-Selection - Locked |
Sets the color, opacity, and size of the highlighting for an object that is locked |
|
|
Snap Object |
Sets the color, opacity, and size of the highlighting for an object that is being snapped to; the highlighting is always a dashed line |
|
|
Tool Highlighting |
Sets the color, opacity, and size of the highlighting for an object that can be edited by the active tool |
|
|
Occluded 3D Graphics |
Sets the opacity of feedback graphics, such as highlighting, snapping, selection indication, and some preview graphics, when occluded by a rendered 3D solid |
|
|
Rulers |
|
|
|
Background |
Sets the background color and opacity of the rulers |
|
|
Cursor Position Indicators |
Sets the color, opacity, and size of the cursor position indicators on the rulers |
|
|
Marks and Text |
Sets the color of the tick marks and text on the rulers. The tick marks and text become blue in a Rotated Top/Plan view and light gray in a 3D view. |
|
|
SmartCursor |
|
|
|
Acquisition Hints |
Sets the color, opacity, and size of the graphical hints which display near the cursor to show when a smart point, smart edge, or vector lock can be acquired or released |
|
|
Cue Background |
Specifies the background color and opacity of SmartCursor cues |
|
|
Cue Text |
Sets the color and size of SmartCursor text |
|
|
Datum Indicator |
Sets the color, opacity and size of the datum indicator |
|
|
Extension Lines - Angle |
Sets the color, opacity and size of angle extension lines |
|
|
Extension Lines - Smart Point |
Sets the color, opacity and size of smart point alignment lines (the selected color may be overridden by the default X, Y, and Z axis colors) |
|
|
Planes |
Sets the color and opacity of angle and alignment planes (the selected color may be overridden by the default X, Y, and Z axis colors) |
|
|
Selection Box |
Sets the color, opacity, and size of the selection box around the SmartCursor |
|
|
Smart Edges |
Sets the color, opacity and size of smart edge lines |
|
|
Smart Points |
Sets the color, opacity, and size of smart points |
|
|
Snap Box |
Sets the color, opacity, and size of the snap box around the SmartCursor |
|
|
Vector Locks |
Sets the color, opacity, and size of vector locks |
|
|
Snap Points |
|
|
|
Available |
Sets the color, opacity, and size of snap points available near the cursor and within the snap box |
|
|
Congestion Indicator |
Sets the color, opacity, and size of the snap box when there are too many available snap points around the SmartCursor (using the snap loupe is recommended in this situation; see Using the snap loupe) |
|
|
Current |
Sets the color, opacity, and size of the current snap indicator |
|
|
Master Snap |
Sets the color, opacity, and size of the master snap point for priority snapping within the snap box |
|
|
Obtained |
Sets the color, opacity, and size of the acquired snap point |
|
|
Special |
Sets the color, opacity, and size of snap point hints such as midpoint, center, along line, and tangent snaps |
|
|
Subdivision - Crease and Hole Highlight |
Sets the color of the highlighting for a subdivision object’s creased cage mesh entities when in Crease mode and holed faces when in Face Hole mode |
|
|
Reset |
Restores the default settings for all interface elements |
|


Click the column heading to sort by interface element, if desired. Select the element to change, and then set the parameters that display to the right of the element list as needed. Different parameters display, depending on the element selected.
Click to show/hide the parameters.Click to show/hide the parameters.
|
Parameter |
Description |
|
Pattern/ForeColor/BackColor |
To use a solid color, select the color from the ForeColor menu; then from the Pattern menu, select the solid pattern for that color. To use a pattern, select the ForeColor and BackColor colors from the menus (see Applying colors); then select a Pattern. |
|
Color |
Select the color (see Applying colors) |
|
Opacity |
Drag the slider right to increase or left to decrease the opacity of the interactive element |
|
Size |
Drag the slider right to increase or left to decrease the width of the interactive element |
Vectorworks preferences: User Folders pane
Click the User Folders pane to change the location of your user data folder, and to designate workgroup folders for sharing content with other users.
User data and preferences folder
The user data and preferences folder contains the Vectorworks files that are created and used by you. The user folder is automatically created outside of the Vectorworks installation folder so that your data and preferences remain undisturbed when the Vectorworks program is updated.
Within this folder, the program creates subfolders for Libraries, Plant Database (Vectorworks Landmark required), Plug-Ins, Renderworks, Settings, VWHelp, and Workspaces. The following customizations are automatically saved to the user folder.
Vectorworks Preferences settings
Workspace Editor changes
Log files
Resource Manager Favorite files
SmartCursor/snapping settings
Saved export and import options for DXF/DWG files
Saved settings for the Eyedropper and Select Similar tools
Settings for certain plug-ins, such as the Stair and Space tools
Dialog box and palette positions
Additionally, you can manually add custom files to the Libraries folder in your user folder, to have resources such as symbols and hatches display in the Resource Manager and Resource Selector, or as default content in dialog boxes and palettes. See Creating custom resource libraries for more information.
Creating a new user data and preferences folder
The Vectorworks program automatically creates the following user data folder in the application data folder:
Mac: /Users/<Username>/Library/Application Support/Vectorworks/2023
Windows: C:\Users\<Username>\AppData\Roaming\Nemetschek\Vectorworks\2023
By default, both Mac and Windows hide the application data folder. If you use the default user folder, you might want to adjust your system settings to make hidden folders visible. Alternatively, create a new user folder in a more accessible location.
To migrate an existing custom user data folder to a new version of the Vectorworks program, do not change the Vectorworks Preferences directly, as described here. Instead, use the Vectorworks Migration Manager to point the Vectorworks program to your custom user folder.
To create a new user data folder:
From the User Folders pane, click Choose.
A confirmation dialog box opens. Click Yes to continue with the folder change.
From the dialog box that opens, navigate to the location where you want to create the new folder (for example, your Documents folder). Create a new folder there, name it whatever you like, and select it.
Another confirmation dialog box opens. Click Yes to copy the existing user data to the new location, or click No to use the Vectorworks defaults.
If you copy the data to the new location, and the destination folder already contains a file with the same name as a file in the source folder, the program displays a notice that files in the destination folder will be overridden. Click Yes to continue.
If any unsaved files are currently open, you are prompted to save them. Click Yes to continue.
The program copies the files to the new location and then closes automatically.
Restart the program.
 Workgroup folders
If Vectorworks Design Suite products are installed, you can also access custom content from shared workgroup folders. To share custom content with a workgroup, create a main workgroup folder in a shared location on either a local network or a cloud-based storage service such as Vectorworks Cloud Services or Dropbox.
Click to show/hide the parameters.Click to show/hide the parameters.
|
Parameter |
Description |
|
User Data and Preferences Folder |
Specifies the folder that contains program preferences, log files, workspaces, and any personal content you create. This might be a folder on the local computer, or on an external drive or network drive; this allows you to run Vectorworks from any computer. A change to this preference setting cannot be undone with the Undo command. |
|
Choose |
Click Choose to specify a new user data folder. The program must be restarted if you change the location of the user data. See Creating a new user data and preferences folder for details. |
|
Explore (Windows) or Reveal in Finder (Mac) |
Displays the contents of the selected folder |
|
Workgroup and Project Folders (Design Suite product required) |
Specifies the folders where Vectorworks will look for additional content, such as office standard files, shared project files, and reference files. This might be a shared folder on a network drive, a shared cloud folder, or a project-specific folder on the local computer. See Sharing custom content using workgroup folders for details. Folders are searched in order from the top of the list to bottom; if multiple files with the same name are found, only the first version of the file is shown in Vectorworks. To change the position of a folder, click on the # column and drag the folder up or down in the list. Set the Folder Location to the top-level workgroup folder, not the content type subfolder. For example, do not set the Folder Location to [Workgroup]\Libraries, but simply to [Workgroup]. A change to this preference setting cannot be undone with the Undo command. |
|
Add |
Opens a dialog box to select a workgroup folder to add to the list |
|
Remove |
Deletes the selected folder from the list |
|
Explore (Windows) or Reveal in Finder (Mac) |
Displays the contents of the selected folder |
Vectorworks preferences: Smart Options Display pane
Click the Smart Options Display pane to set Smart Options Display preferences. See Smart Options Display for information.
You can assign a keyboard shortcut to trigger Smart Options Display in the drawing area; see Modifying special shortcuts.
Click to show/hide the parameters.Click to show/hide the parameters.
|
Parameter |
Description |
|
Use Smart Options Display |
Enables Smart Options Display |
|
Trigger Settings |
Select which triggers activate Smart Options Display |
|
Show after mouse idles |
Automatically displays the contextual hints when the cursor idles in the drawing area; enter the number of seconds to wait before the hints display. Contextual hints are not triggered when the cursor rests over a dialog box, palette, Tool bar, menu, or other user interface element. |
|
Show with spacebar |
Displays the contextual hints when the spacebar is pressed while the cursor is in the drawing area |
|
Show with middle mouse button |
Displays the contextual hints when the middle mouse button is clicked while the cursor is in the drawing area |
|
Display Settings |
Customize the Smart Options Display to fit your workflow |
|
Show Initial Options as |
Select how the contextual hints display when triggered in the drawing area. Icons only displays the contextual hint icons.
Text only displays the contextual hints by name.
Icons and text displays contextual hints by both icon and name.
Fully expanded displays the full palette instead of contextual hints.
|
|
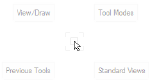
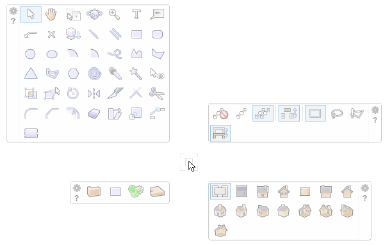
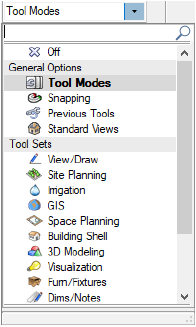
Quadrant selections |
For each of the four quadrants around the cursor location, select which options to display. Enter text in the search box to filter the list.
Under General Options, Tool Modes displays the Tool bar options, such as modes, style lists, and the Preferences button, for the currently selected tool. Previous Tools displays the four most recently selected tools, in chronological order from left to right. The Selection tool and the Pan tool, which are used so often they would displace other tools, do not display. The Tool Sets list contains only tool sets that are available in the current workspace when this preference is set. Likewise, in the drawing area, the Smart Options Display shows only tool sets that are available in the current workspace. If you set Vectorworks preferences while in the Spotlight workspace, and select the Event Design tool set to display in one of the quadrants, that quadrant will be blank (marked as Off) when Smart Options Display is triggered in a workspace that does not contain that tool set. The View/Draw tool set contains the set of basic object creation and editing tools found in the Basic palette. |


Vectorworks preferences: Quick Search pane
Click the Quick Search pane to set quick search preferences. See Quick Search for information.
Click to show/hide the parameters.Click to show/hide the parameters.
|
Parameter |
Description |
|
Show search filters |
Displays options to filter search results |
|
Show command context |
Displays the menu path for commands and the tool set for tools in the search results |
