 Setting curtain wall frame parameters
The frame settings and appearance are controlled individually for each frame category, for flexibility when setting the frame parameters. See Concept: Editing guidelines for curtain wall grids to understand how the frame definition parameters respond to custom edits of a curtain wall instance.
Unstyled curtain walls can be drawn first, and the curtain wall parameters can be set later from the Object Info palette by clicking Curtain Wall Grid. The Curtain Wall Grid dialog box opens, to edit the parameters of the unstyled curtain wall. However, editing unstyled walls by this method may clear existing frames and panels, and recreate the curtain wall grid.
If a material resource is used to define a part, the material typically provides the fill, texture, physical attributes, and construction information needed for drawings, renderings, and reports.
To set the curtain wall frame appearance:
From the Definition tab of the Wall Preferences dialog box, or from the Edit Wall Style dialog box, click Frame Settings.
Alternatively, from the Object Info palette of a selected curtain wall, click Curtain Wall Grid, and then click Frame Settings.
The Frame Settings dialog box opens.
Click to show/hide the parameters.Click to show/hide the parameters.
|
Parameter |
Description |
|
Frame category |
Select a category of frame element to define, and then set its parameters. The starting and ending frames, top and bottom frames, and the inner horizontal and vertical frames can each be defined separately, for maximum flexibility. Multiple categories can be selected at one time to quickly define common parameters. |
|
Definition |
|
|
Type |
Select the type of frame. Full-Depth: Standard, normal frame Capped Full-Depth: Standard frames with caps; specify the Cap Depth Butt-Glazed: Standard frame that is concealed behind the panels, creating the appearance that the panels are joined without a frame Brake Metal: 90° corner frame or, for curved walls and polygonal walls, a segmented frame; in a straight wall, behaves like a full-depth frame Capped Brake Metal: Combines the properties of a capped frame and brake metal frame; specify the Cap Width if different from the overall width Virtual: Hidden frame; this is useful for piecing together curtain wall units, especially when vertically stacked. A virtual top frame appears to butt up against the bottom frame of the curtain wall above it. |
|
Preview |
Displays a labeled diagram of the selected frame type; the numbers indicated on the diagram correspond to the labeled parameters below the preview, for easy identification |
|
Width |
Sets the width of the frame |
|
Depth |
Select how the frame depth is specified. If set to Use wall thickness, the frame is set to the thickness of the curtain wall as specified in the Curtain Wall Grid or Wall Preferences dialog box (the thickness is displayed). Alternatively, set a Custom depth and enter the value. |
|
Panel Inset |
Determines the overlap between the frame and the neighboring panels, for both Top/Plan and 3D views. The allowable inset distance can vary from 0, for a frame without a notch, to half the width of the frame, where the panels meet in the middle of the frame. |
|
Cap Depth (capped types only) |
Specifies the cap depth, relative to the frame depth |
|
Cap Width (capped brake metal type only) |
Sets the width of the cap for a brake metal frame, allowing the cap and the frame to have different widths |
|
Offset Reference |
Displays the offset reference that is selected in the Curtain Wall Grid or Wall Preferences dialog box |
|
Offset |
Shifts the frame position relative to the offset reference. Enter a positive value to shift the frame to the right (interior) side of the wall as drawn, or enter a negative value to shift the frame to the left (exterior) side of the wall. To center the frame on the wall, select Center Line as the Offset Reference in the Curtain Wall Grid or Wall Preferences dialog box, and use an offset of 0. |
|
Half width on wall boundary |
Creates a frame of half the width on the wall boundary. This is useful for piecing together curtain wall units, especially for end-to-end curtain wall joins. This option only applies to capped full depth, full depth, and butt-glazed frames that lie on the start, end, top, or bottom wall boundary. |
|
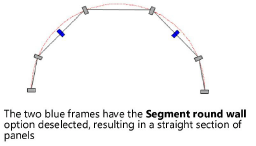
Segment round wall (curved wall only) |
This parameter only applies to curved curtain walls with full-height, vertical frames. Normally, this option should be selected, to create a wall with straight panels that follow the arc shape, for a curved effect. However, by deselecting this option for certain standard or corner frames within a curtain wall, a straight segment can be created that does not follow the arc, for a straight panel of glass that is part of the curved wall.
|
|
Frame/Cap Class |
The frame and the caps in each frame category can be placed in distinct classes to control their appearance and visibility. Select the class to use from the current list of classes, create a new class, or select <Object Class> to place the frame or cap in the same class as the curtain wall. |
|
(Architect required) |
Opens the Frame Energos Properties dialog box, for specifying the frame’s energy analysis parameters. Vectorworks Architect is required to conduct an energy analysis; however, energy-related parameters can be specified here for informational purposes. Include in Calculations: When selected, the frame is eligible to be included in energy calculations, depending on the energy analysis settings for layer/class, element inclusion, and so on. If the frame contains any valid building element objects, like doors and windows, that can also participate in energy analysis calculations, you are asked whether to include or exclude those objects when you select or deselect this option for walls. Frame: Select the thermal properties of the curtain wall frame. Sets can be created and edited; see Specifying system sets. Shading: Select the level of shade for each type of shading near the frame, or, for custom shading, select Custom from any of the lists. The Edit Shading dialog box opens, to manually enter a percentage for when the frame is in the shade. |
|
Materials |
Uses a material for the frame and/or cap; select materials from the Resource Selector. The associated fill, and texture settings are set to the material’s settings, and the fill parameters are disabled. |
|
Frame/Cap Fill |
Specifies the part appearance in section views. If the part uses a material, the fill is set to the material’s fill, and the controls are disabled. Otherwise, select a fill style, or Class Style to set the fill attributes by class. Depending on the Style selected, select a fill color, pattern, or resource (hatch, image, gradient, tile). |
|
Frame/Cap Pen |
Select Class Style to use the class style for the pen attribute, or choose a solid/dash or pattern style. Depending on the Style selected, select a color, pattern, or line type resource) for the wall. |
|
Frame/Cap Texture |
Applies the selected texture to the frame/cap. If the part uses a material, the texture is initially set to the material’s texture, but this can be overridden. Class Texture sets the part to use the texture specified by the part’s class; see Concept: Applying textures by class. If Texture is chosen, this setting overrides the object material and/or class texture; select a texture from the Resource Selector. |
|
Make All Attributes By Class |
Sets all fill, pen, and texture attributes by class, except those that come from a material |
|
Remove By Class Settings |
Removes all class settings for fill, pen, and texture attributes; does not affect material definitions with attributes set by class |
|
IFC |
Attaches IFC data to the curtain wall frames for exporting to IFC format |
The parameters can be edited from the Object Info palette; see Wall properties. The Cut Plane parameter determines the height for displaying the curtain wall in Top/Plan view.
