 Creating a fence
|
Tool |
Workspace: Tool set |
|
Fence
|
Landmark: Site Planning Architect: Building Shell Spotlight: Event |

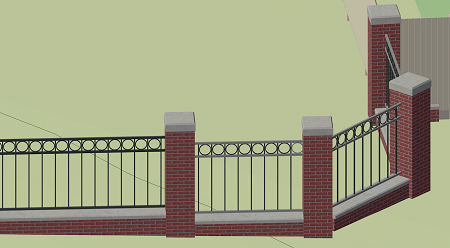
The Fence tool creates various types of raked and stepped fences, including post and rail, picket, wrought iron, tongue and groove, mesh/grid, lattice, chain link, and more. Draw the fence along a specified path using standard polyline creation modes; gates can be added. You can create large runs of fence and display the fence with a lower level of detail during development and then a high level of detail when the design is complete. The fence follows the slope of the surface underneath it.
Alternatively, create a 2D shape and then select the Create Objects from Shapes command (see Creating objects from shapes).
|
Mode |
Description |
|
Fence Style |
Opens the Resource Selector to select a resource |
|
Polyline creation options |
Selects the method for drawing the polyline upon which the fence is based; see Creating polylines |
|
Preferences
|
Opens the Fence Preferences dialog box to set default parameters |

To create a fence:
Click the tool and mode.
Do one of the following:
Click Fence Style on the Tool bar to select a resource from the Resource Selector.
Click Preferences to open the Fence Preferences dialog box and specify the tool’s default parameters.
The parameters can be edited later from the Object Info palette.
Click to set the start point; each subsequent click ends the current segment and begins the next. To complete the object, click the start point again (for a closed object), or double-click (for an open object).
The created fence is segmented according to the post spacing settings, reflecting how the fence is actually built, with corner posts at vertices. By default, fence sections drawn along a curved portion of the path are faceted, with straight fence sections between posts that follow the curve. This can be changed in the Edit Fence Elevation dialog box (see Editing fence elevation). Posts are spaced along the segments according to the fence type and distance.
Raked fence posts are spaced according to the projected area distance.
Stepped fences with panels space the posts based on the panel size.
If Send to Surface is selected, the fence posts follow the terrain of any underlying site model, or they are sent to the surface of any 3D object underneath the fence, including walls. Any "above grade" settings are respected. If over a site model, the fence updates when the site updates; if over a 3D object that has been moved, a reset is required using the Gravity mode of the Reshape tool.
Edit the fence settings from the Object Info palette. Edit the fence geometry as described in Editing a fence.
Optionally, create a style resource from the object (see Custom plug-in object styles without catalog options).
Fence settings
To apply consistent settings to fences, it's recommended to use a fence style. The Vectorworks resource libraries provide several styles, or you can create a custom style.
These settings are available in the following locations:
Fence Preferences dialog box (creating an object)
Object Info palette (editing an object)
Fence Style dialog box (creating or editing a style)
If a fence style is selected, only parameters set by instance can be edited (see Concept: Plug-in object styles). Parameters available only on the Object Info palette are listed at the bottom of the table.
Click to show/hide the parameters.Click to show/hide the parameters.
|
Parameter |
Description |
|
Fence Style |
To create a custom fence, leave the Unstyled setting. To use an existing fence style from the resource libraries, click Fence Style and select a resource from the Resource Selector. |
|
Convert to Unstyled |
If a Fence Style is currently set, select this option to convert the object to unstyled; the current values are retained, but all parameters on all panes are set to By Instance to allow editing |
|
By Style/Instance |
A graphic indicates whether each parameter is set to By Style and given a fixed value or set to By Instance and editable in the dialog box. An object style may have a combination of both settings, to balance the need for consistency and flexibility. By Style/Instance settings are established by the style and cannot be changed from the settings dialog box.
To edit the object style, see Editing plug-in object styles; editing the style modifies all plug-in objects in the file that use the style. |
|
Preview |
The right pane of the dialog box displays a preview of the fence in the selected View and Render mode; the fence previews in full detail, regardless of the level of detail selected in the General pane |
|
Object Info palette options only |
|
|
Style |
Replace, edit, or remove the current style, or (for unstyled objects only) create a new plug-in style (see Custom plug-in object styles without catalog options). Editing a style changes all instances in the file that use the style. |
|
Hide style parameters |
Hides the parameters that are set by style; these cannot be edited from the Object Info palette |
|
Settings |
Opens the Fence Settings dialog box |
|
Attributes |
Opens the Fence Settings dialog box to the Attributes pane |
Fence settings: General pane
Click to show/hide the parameters.Click to show/hide the parameters.
|
Parameter |
Description |
|
Class |
To control appearance and visibility, select a class from the list of classes present in the drawing, or create a new class |
|
Draw 2D |
Select the level of detail for representing the fence in Top/Plan views. Draw the fence as a simple line, line with square or round posts, or with full detail. |
|
Draw 3D |
Select the level of detail for representing the fence in 3D views. Hide the fence in 3D, draw it in a simplified view, or with full detail. A long set of fences drawn in full detail can impact performance; use a simplified view during the design phase. |
|
Fence Height |
When drawing the fence with a Simple 3D view, enter the height to the top of the fence. This parameter is linked to the Infill top line above grade parameter on the Infill pane; a change to either parameter affects the other. |
|
Configuration |
Select a fence configuration: Raked: The fence smoothly follows any sloped surfaces Stepped: The fence follows any sloped surfaces in steps according to the Slope selection. The top of the fence line is always horizontal. |
|
Slope (Stepped Configuration) |
Determines how the stepped fence follows any sloped surfaces: Follow grade: The fence follows the site model surface (or other 3D geometry) as closely as possible Even steps: An even slope is calculated along the fence section, based on the start and end elevation of the section; the fence follows that even slope |
|
Infill Type |
Select the type of infill to create between the posts. More infill parameters are set on the Infill pane, and the selections here affect the parameters available there. Rails Only: Does not draw any infill between the posts; only places rails. Select this option for a fence with fabric infill, such as a chain link fence, snow fence, etc. Panel, Pre-Constructed (Stepped Configuration only): Places a panel between the posts. The panel determines the post spacing. Vertical Boards: Places vertical objects between the posts Horizontal Boards: Places horizontal objects between the posts |
|
Offset from Path |
Sets an offset distance for the fence from the drawn polyline. A positive value offsets the fence to the right side of the path based on its drawing direction; a negative value offsets it to the left. |
|
Fence Face |
Specifies which side of the drawn polyline is considered the front side of the fence; infill is placed on this side of the rails |
|
Send to surface |
The fence follows the site model terrain, or is sent to the surface of any 3D object underneath it |
|
Opens the Select Classes dialog box, to determine which classes of objects to include for sending the fence to the surface of objects. Classes with a check mark in the Use column are included, and objects in those classes are valid when the fence is sent to the surface. Fences are never sent to the surface of site modifiers or plants. |
Fence settings: Posts pane
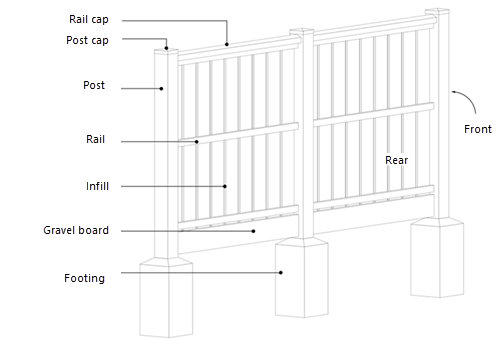
Each fence style can have up to three different types of fence posts: run, corner, and gate. Run posts are in line with the previous segment's post, while corner posts represent a change in direction for the fence segment, or a start/end post. Gate posts are specified by the gate configuration.
For reporting and calculations, the post height is based on its bounding box. Added symbols such as post caps, spikes, shoes, etc. are not considered as part of the post height.
You can create a custom hybrid symbol to use as a post (if you use a 3D symbol, it will not be visible in Top/Plan view). Save the symbol in the current document or your user folder. You can also scale a selected post profile and save it as a resource with the Add as Custom Resource option.
Click to show/hide the parameters.Click to show/hide the parameters.
|
Parameter |
Description |
|
Placement |
|
|
Use post at start/ Use post at end |
Places a post at the start and/or end of the fence |
|
Corner Post Alignment |
For corner posts, select how to align the post of each segment: to the previous or next segment edge, or to an angle that divides the two segments |
|
Post Spacing |
Fixed Distance: Places posts at the specified Distance between posts Equal Spacing: Places posts at the specified Optimal Spacing value; posts will be spaced as closely as possible to the value. The optimal distance is calculated for each fence segment. This avoids uneven end segments. Panel Width: When panels are selected as the Infill Type on the General pane, the posts are automatically spaced according to the Panel Width; this value cannot be changed here The Panel Width may be modified by the selected profile resource and any scaling changes made to it from the Infill Profile on the Infill pane. |
|
Profile and Height |
|
|
Same settings for run posts and corner posts |
Settings for run and corner posts can be determined collectively or individually. When this option is selected, parameters apply to both types of posts. |
|
Select Post to Edit |
If you are specifying different settings for run and corner posts, select the type of post; set each type's parameters individually |
|
Run post |
Specify the run post parameters, or all post parameters when Same settings for run posts and corner posts is selected |
|
Corner post |
Specify the corner post parameters, or all post parameters when Same settings for run posts and corner posts is selected |
|
Profile resource selector |
Opens a Resource Selector to select a post profile or post symbol |
|
Allow profile scaling |
Scales the selected profile; enter the Width and Depth. The height of 3D profiles is scaled automatically. If the Post Height is set to Height Above Fence Line, each post might have a different height. |
|
Opens the Save Resource dialog box to save the selected, scaled post profile as a custom symbol definition. Provide a name for the resource and select the destination folder; create a new folder for the resource by clicking New Folder and entering a name. |
|
|
Post Height |
Select how to specify the post height, and then enter the Height value. Height Above Grade: Uses the specified height value Height Above Fence Line: Uses the specified height value, but ensures that the posts are always long enough, even for stepped fences where the post length may vary. This is helpful when placing a fence on a sloped surface; it ensures that the fence post will always be tall enough, even on steep slopes. You can change the post height of individual posts with the Reshape tool. |
|
Depth Below Grade |
Specifies the depth below grade for the bottom of the post |
|
Add footer |
Adds a footer to the fence; select a shape for the footer |
|
Square |
Enter the Width and Depth value, plus an optional Drainage Layer thickness |
|
Round |
Enter the Diameter value, plus an optional Drainage Layer thickness |
Fence settings: Rails and Fabric Infill pane
A fence can have as many rails as needed, with a variety of configurations.
Unless they are used as a panel with a stepped fence, "fabric" types of infill such as chain link, snow fence, vinyl mesh, etc. are considered as fabric infill—a type of rail—and are specified from this pane; this allows a fabric infill to follow a raked fence over elevation changes.
If you are creating your own hybrid railing symbol definitions, the rail assembly can consist of several parts. For example, you could have barbed wire at the top of a rail. While all rails have the same offset by default, custom rails can include a locus to allow for a different offset for one of the parts in an assembly.
Click to show/hide the parameters.Click to show/hide the parameters.
|
Parameter |
Description |
|
Continuous rail (Raked Configuration) |
Creates a continuous railing along the length of the fence, with no breaks for the posts |
|
Number of Rails Vertically |
Displays the number of rails from the Rails list |
|
All rails identical |
Rail settings can be determined collectively or individually. When this option is selected, parameters apply all of the rails except for Height Above Grade. |
|
Rail Offset to Post |
Select how the rail should meet the posts: Centered on Post: The rails meet at the center of the post, equally between the front and back of the post Flush with Front of Post: The rails meet flush with the front of the post Flush with Rear of Post: The rails meet flush with the rear of the post Placed on Front of Post: The rails are placed on the front of the post Custom Offset from Center: Offsets the rails from the center; enter a positive (towards the front of the fence) or negative Offset distance |
|
Switch side for the offset every other segment |
Alternates the offset side between the front and the back of the post along the fence; applies to all rails except centered |
|
Rail extends beyond post side |
Extends the end of the rail past the post, which is common for fence types like split rail or mortice posts. Enter the distance to extend the rail. |
|
Rails |
To add rails to the fence, click to select the <New Rail> row; select a rail profile and enter its parameters. Edit selected rows by editing the values in the row or below the Rails list. Delete rails by selecting one or more rows and clicking Delete. |
|
Selected Rail |
Displays the parameters of the currently selected row in the Rails list |
|
Profile resource selector |
Opens a Resource Selector to select a rail profile symbol |
|
Allow scaling |
Scales the selected profile; enter the Width and Height. |
|
Add as Custom Resource |
Saves the selected, scaled rail profile as a custom symbol definition |
|
Height Above Grade |
Specifies the rail's height |
|
Delete |
Deletes the selected row in the Rails list |
Fence settings: Infill pane
Infill coverage can be continuous or broken up by posts, and can consist of panels or boards, pickets, etc. as selected on the General pane. Infill can be based on a profile, as in boards, or 3D symbol such as a picket fence. If Rails only is selected as the Infill Type on the General pane, no infill settings are available.
Infill is automatically placed on the front surface of the rails, unless an offset distance is specified in Set offset.
Click to show/hide the parameters.Click to show/hide the parameters.
|
Parameter |
Description |
|
Infill |
|
|
Infill Top Line Above Grade/ Infill Bottom Line Above Grade |
Sets the infill size by specifying the height above grade at the top (adjusts the Fence Height on the General pane) and the bottom of the infill |
|
Components |
|
|
Continuous coverage |
Creates continuous infill along the length of the fence, with no breaks for the posts |
|
Infill Type |
Displays the infill selected on the General pane |
|
Set offset |
Offsets the infill from the posts; enter the offset Distance. Negative values move the infill towards the rear of the fence. |
|
Infill Profile |
Opens a Resource Selector to select an infill profile or 3D infill symbol. For a panel infill type, the selected resource and any scaling affects the Panel Width on the Posts pane. |
|
Allow scaling |
Scales the selected profile: For panels, enter the X,Y,Z Factor for Symmetric scaling, or the X Scaling, Y Scaling, and/or Z Scaling for Asymmetric scaling For other types of infill, enter the Width and Thickness |
|
Add as Custom Resource |
Saves the selected, scaled infill profile as a custom symbol definition |
|
Optimal Spacing (non-panel infill) |
Enter the desired spacing between the centers of the boards, pickets, or other infill elements |
|
Rotate vertical infill diagonally by (vertical infill) |
Enter the rotation value, in degrees, to rotate vertical boards to create a diagonal effect |
|
Add gravel board |
Adds a gravel board to the bottom of the infill. Gravel boards are always centered on the post. |
|
Board Profile |
Specify the dimensions of the gravel board (Height and Thickness) |
Fence settings: Gate Configurations pane
A gate configuration consists of one or more gates, with a gate post on either side of the gate. Create the gate configurations needed for the fence, and then insert them in the desired location with the Reshape tool as described in Editing a fence. Gates are always inserted horizontally.
Click to show/hide the parameters.Click to show/hide the parameters.
|
Parameter |
Description |
|
Gate Configurations |
|
|
Configuration list |
To add a gate configuration to the fence, click to select the <New Gate Configuration> row; select a gate and enter its parameters. Edit selected rows by editing the values in the row or below the Rails list. Delete a gate configuration by selecting one or more rows and clicking Delete. |
|
Selected Gate Configuration |
|
|
Gate tab |
|
|
Gate Resource Selector |
Opens a Resource Selector to select a gate symbol |
|
Allow scaling |
Scales the selected gate; enter the X,Y,Z Factor for Symmetric scaling, or the X Scaling, Y Scaling, and/or Z Scaling for Asymmetric scaling |
|
Add as Custom Resource |
Opens the Save Resource dialog box to save the selected, scaled gate as a custom symbol definition |
|
Post tab |
|
|
Profile Resource Selector |
Opens a Resource Selector to select a gate post profile or 3D post symbol |
|
Allow profile scaling |
Scales the selected profile; enter the Width and Depth |
|
Add as Custom Resource |
Opens the Save Resource dialog box to save the selected, scaled post profile as a custom symbol definition |
|
Post Height |
Select how to specify the post height, and then enter the Height value. Height Above Grade: Uses the specified height value Height Above Fence Line: Uses the specified height value, but extends the taller post of the two gate posts along a stepped fence line You can change the post height of individual posts with the Reshape tool. |
|
Depth Below Grade |
Specifies the depth below grade for the bottom of the post |
|
Add footer |
Adds a footer to the fence; footer volume is calculated based on the post volume minus the footer volume. Select a shape for the footer. |
|
Square |
Enter the Width and Depth value, plus an optional Drainage Layer thickness |
|
Round |
Enter the Diameter value, plus an optional Drainage Layer thickness |
|
Extra Gate tab |
|
|
Add second gate |
Places two gates sequentially; select a gate resource and specify any scaling parameters, as for the original gate |
|
Total Width |
Displays the total width of the gate configuration |
|
Gate Position Above Grade |
Specify the height of the gate configuration above grade, measured at the center of the gate |
|
Delete |
Deletes the selected row in the Gate Configurations list |
Fence settings: Attributes pane
Click to show/hide the parameters.Click to show/hide the parameters.
|
Parameter |
Description |
|
Graphic Attributes |
Lists all geometry that has graphic attributes settings. The class and graphic attributes of each part of the object are displayed. |
|
Edit |
Click, or double-click a line in the list browser, to set attributes for the part, and do any of the following: To control appearance and visibility, select a class from the list of classes present in the drawing, or create a new class. Select <Fence Class> to place the part in the same class as the fence object. To specify a material for a 3D part, select one from the Resource Selector; the material provides the fill and texture, though the texture can be overridden. Set the attributes; see The Attributes palette. To specify a texture for a 3D part, select a texture from the Resource Selector, or click one of the buttons to use no texture, to use the class texture, or if the material's texture was previously overridden, to revert to the material's texture. Set the mapping rotation, and so on as needed; see Concept: Texture projection and orientation. |
|
Make All Attributes By Class |
Sets all material, fill, pen, line style, line thickness, and texture attributes by class |
|
Remove All Class Settings |
Removes all class settings for material, fill, pen, line style, line thickness, and texture attributes |
