 Editing a fence
Editing fence parameters
Once fences have been created, the Object Info palette parameters can edit the properties of individual fences, if the style allows editing. To access the full set of fence properties, click the Settings button to open the Fence Settings dialog box. See Fence settings. Quickly access the fence attributes by clicking Attributes.
Editing fence geometry
|
Tool |
Tool set |
Shortcut |
|
Reshape
|
Basic |
- (hyphen) |

Edit the fence geometry by selecting the Reshape tool in either Top/Plan or a 3D view. The regular 2D reshape modes are available, along with several special 3D modes. The available modes depend on the view. See Reshaping objects for general information about the tool.
To move control points precisely while editing, enter values in the Data bar.
|
Mode |
Description |
|
Path
(Top/Plan view) |
Edits the polyline path; infill and posts are automatically added or removed if you change the path length |
|
Post
|
Moves, adds, and removes posts, depending on the selected submode. This is not available for panel infill with pre-constructed panels. |
|
Gate
|
Moves, adds, and removes gates, depending on the selected submode |
|
Elevation/Edit
|
Depending where you click, opens the Edit Fence Elevation dialog box, Edit Post dialog box, or Edit Gate dialog box, for changing the elevation and orientation of fence panels, posts, or gates; joins two fences in Join mode |
|
2D Reshape modes (Top/Plan view) |
In Path mode, selects/adds/removes/changes vertices in Top/Plan view as described in 2D reshape modes |
|
Move Post/Gate Along Path
|
In Post mode, moves posts along the fence line, depending on spacing and style settings. The position of posts with panels is determined by the panel.
In Gate mode, moves gates along the fence line. You can't move a gate or post past a corner post. |
|
Move Post/Gate/Panel Vertically
(3D views) |
In Post mode, moves posts vertically. In Gate mode, moves gates vertically. In Panel mode, moves panels vertically.
|
|
Add Post/Gate
|
In Post mode, adds a post to the fence (fences with panels have limitations). In Gate mode, adds the gate selected in Gate Configuration to the fence. |
|
Remove Post/Gate
|
In Post mode, removes the post from the fence (fences with panels have limitations). In Gate mode, removes the gate from the fence. |
|
Join
(3D views) |
In Elevation/Edit mode, joins two fences with an L join or T join |
|
Gate Configuration |
When adding a gate to the fence, selects a gate configuration from the Resource Selector |
|
Gravity
|
Re-aligns the fence with the 3D object underneath it. Gravity mode works in a "down" direction. If the bottom of a post is below the surface of a site model, for example, Gravity mode will not move it up. First you would have to change the elevation (Z value) of the fence so that it is above the site model. |


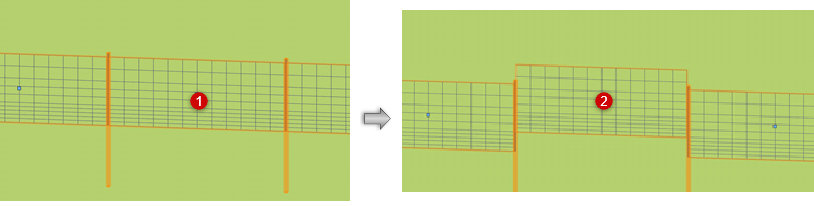


Adding a fence gate
Use any of the default gates, or create a custom gate configuration in the Fence Settings (see Fence settings: Gate Configurations pane). Gates can be inserted in any view.
To add a gate to an existing fence:
Select the fence.
Click the Reshape tool in Gate mode with Add Gate submode.
Click Gate Configuration on the Tool bar to select a resource from the Resource Selector.
Click to add the gate to the fence.

Editing posts or gates
You can edit individual posts or gates with the Reshape tool, or with specific values.
To edit a post or a gate:
Click the Reshape tool in Elevation/Edit mode.
Click on the post or gate to edit.
The Edit Post or Edit Gate dialog box opens.
Click to show/hide the parameters.Click to show/hide the parameters.
|
Parameter |
Description |
|
Gate Configuration (Gates only) |
Selects a different gate configuration from the Resource Selector; double-click a resource to activate it |
|
Insertion Point |
Sets the X, Y, Z values of the gate or post |
|
Height Above Grade (Posts only) |
Sets the post height above grade |
|
Depth Below Grade (Posts only) |
Specifies the post measurement below grade |
|
Align Corner Post to (Posts only) |
For corner posts, select how to align the post of each segment: to the previous or next segment edge, or to a combination of the two |
|
Flip Across Fence (Gates only) |
Flips the gate across the fence, so that it opens to the other direction |
|
Flip Along Fence (Gates only) |
Flips the gate along the fence, so that the gate opening switches to the left or right |
Editing fence elevation
Edit the elevation of fence sections by entering specific elevation values. This method is convenient for editing an entire fence from post to post; you can adjust long fences in section view, relative to the site model surface.
To edit the elevation of a fence section:
Click the Reshape tool in Elevation/Edit mode.
Click on the segment to edit.
The Edit Fence Elevation dialog box opens.
The preview indicates the posts in the relevant section, showing the relative heights of the posts and any terrain. Posts are numbered, corresponding with the posts listed below. For long sections of fence, a scroll bar under the preview allows you to adjust the section of interest.
Clicking on a post either in the preview or the list selects the post.
For paneled fences, clicking on a panel in either the preview or the list selects the panel.
Do one of the following, depending on whether the fence includes panels:
Select one or more posts and enter the Z height to change the elevation.
Select one or more panels and enter the elevation of the Top Line Above Grade.
If needed, control the location of an overflow section at the end of the fence line by selecting Flip. If there is an uneven overflow section, this flips the section to the other end of the fence, avoiding the need to adjust every section along the fence line.
If needed, remove the faceting for a curved fence section by deselecting Faceted fence line. For curved fence sections, this creates a curved fence rather than a segmented fence. This setting does not apply to fences with panels.
Joining fences
You can only join fences at a post, not along an infill segment. The posts of the two fences to join must be aligned. T joins can connect only posts; one of the posts is automatically deleted, and the remaining post is converted to a corner post.
The joined fences remain as individual objects.
To join two fences:
Click the Reshape tool in Elevation/Edit mode with Join submode.
Click on the post of the fence to join.
Drag the post to the joining post.

Re-aligning the fence to a surface
When placed over a site model, the fence adjusts automatically to changes in site model elevation, when Send to surface is selected in the settings. When placed over a 3D object, with the exception of plants and site modifiers, the fence must be re-aligned if the object changes its elevation, or if you've flipped a fence.
To realign a fence with the object underneath it:
Click on the fence.
Click the Reshape tool in Gravity mode.
The fence is reset to fit to the object underneath it.
Editing the post or gate bounding box
In some situations, advanced users may need to edit the bounding box of a post or gate to ensure correct connections between fence parts. For example, you may want the gate to be flush with the front of the fence line, or to allow for a sliding track for a driveway gate.
To edit the bounding box of a post or gate:
Edit the 3D component of the object in object editing mode. See Object editing mode.
In Top/Plan view, draw a shape to represent the new bounding box.
Extrude the object. See Extruding objects.
In the Attributes palette, set the fill and pen of the object to None.
Exit object editing mode. The fence connects to the new bounding box shape.
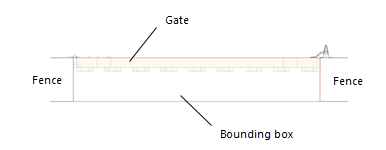
The gate is thinner than the fence. To make the gate sit correctly (flush with the front of the fence), extend the bounding box as wide as the fence.
