 Adding data tags and labels
|
Tool |
Tool set |
|
Data Tag
|
Dims/Notes |

Use the Data Tag tool to add tags that show data associated with drawing objects, or to add simple labels, such as a date stamp.
There are several modes that control which objects are tagged and how tags are placed.
|
Mode |
Description |
|
Subpart
|
When selected, subparts of objects can be recognized and tagged; select a data tag style that includes subparts in its selection criteria. When deselected, only main objects can be tagged; select a data tag style that does not include subparts in its selection criteria. |
|
Label
|
Places a tag that is not linked to any drawing object |
|
Single Eligible Object
|
When you click on an eligible object, places a tag that is linked to the object |
|
All Eligible Objects
|
Highlights all eligible objects that are selectable in the current layer or in the current viewport's annotations; click one object to tag them all |
|
Selected Eligible Objects
|
Click to apply tags to all eligible objects that are selected |
|
Single Point
|
If the active tag has no leader, places a tag with one click |
|
Two Points
|
If the active tag has no leader, places the tag with two clicks |
|
Towards Target Object
|
If the active tag has a leader, or if Two Points mode is selected, the first click places the tag, and the second click specifies the target object |
|
Towards Data Tag
|
If the active tag has a leader, or if Two Points mode is selected, the first click specifies the target object, and the second click places the tag |
|
Data Tag Style |
Opens the Resource Selector to select a resource for tagging; double-click a resource to activate it |
|
Preferences
|
Sets the default parameters for each new data tag object; see Creating data tag styles |


To add tags:
To tag multiple objects of one type (such as walls) but exclude others of that type, select the objects to be tagged first.
Click the tool.
Click Data Tag Style on the Tool bar to select a resource from the Resource Selector. A green tag name indicates the tag units are page-based; red indicates world-based units.
When you double-click to activate a Vectorworks library tag, the program creates a resource folder named Data Tag Styles in your file and places the resource there.
To create a custom tag style, see Creating data tag styles.
From the Tool bar, click the desired modes for placing the tag and leader, if applicable.
If a simple label tag (such as a date stamp) is active, select either Label or Single Eligible Object mode.
If an object-specific tag (such as a wall tag) is active, select Single Eligible Object, All Eligible Objects, or Selected Eligible Objects mode.
To tag subparts of objects (such as the components that make up a wall), select Subpart mode.
If the active tag is not appropriate for the selected mode or for the available drawing objects, an alert opens (for example, if you selected a door tag, but there are no doors in the current view or layer). Select a different tag or mode, or adjust what can be seen and selected in the current view.
Place the tag as follows:
Label mode: If the tag has no leader, simply click to place the tag. Otherwise, click twice, to place the tag and the end of the leader line separately.
Single Eligible Object mode: An eligible object is highlighted when the cursor is over it. If the tag has no leader, and Single Point mode is selected, highlight the object to be tagged, and click to place the tag. Otherwise, click twice, to place the tag and leader line separately.
All Eligible Objects mode: All eligible objects are highlighted automatically. Click any one of the objects to tag all of them. If some eligible objects already have the active tag, they're not highlighted and tagged again.
Selected Eligible Objects mode: All selected objects are highlighted. Click one of the objects to tag all of them.
Placing data tags with a leader line, using the modes Single Eligible Object and Towards Target Object
The data tag is placed in the appropriate plane, depending on where the tool is used.
Viewport in an annotation context: annotation plane
Design layer in Top/Plan view: layer plane
Design layer in a 3D view: active plane
If the tagged object doesn't have the appropriate data attached, the tag displays differently, depending on the situation:
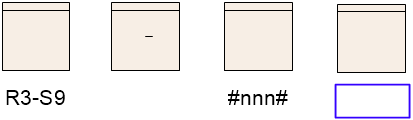
Object 1: Symbol has data in the required field—tag displays the data
Object 2: Symbol has no data in the required field—tag displays as a dash
Object 3: Symbol doesn't have the required record attached—tag displays as defined in its layout
Object 4: Symbol has no data in the required field, but the tag includes a blue rectangle as well as data—tag displays the rectangle only
