 Adding a survey point
|
Tool |
Tool set |
|
Survey Point
|
GIS |

The Survey Point tool can set up a file for georeferencing in a different way from the Georeferencing command. While the Georeferencing command aligns a file's internal origin, and its geometry, with a specific location on Earth, the Survey Point tool indicates the location of a known point, and optionally, two reference points, and allows you to define how the geometry should relate to the georeferencing coordinates. A survey point is a project's reference point, and it doesn't have to align with the internal origin. This allows you to set up georeferencing as easily as it is to establish the user origin.
A survey point can be inserted at the beginning of a project, in an empty file, which is the preferred method. Alternatively, insert the survey point into an already georeferenced project.
Inserting a survey point into a new file
To insert a survey point in a new file:
Click the tool. From the Tool bar, click Preferences.
The Survey Point Preferences dialog box opens.
Click to show/hide the parameters.Click to show/hide the parameters.
|
Parameter |
Description |
|
Graphics |
|
|
Survey Point |
Click the Survey Point selector to select a resource from the Resource Selector |
|
Reference Points |
Click the Reference Points selector to select a resource from the Resource Selector for the triangulation reference point indicators |
|
Text Style |
Select a text style for the stake label from a library or the current file. See Using text styles. |
|
Font/Font Size |
Specify the font and font size for the label |
|
2D Scale Factor / 3D Scale Factor |
Determines the size of the label display in Top/Plan and 3D views |
|
Coordinates |
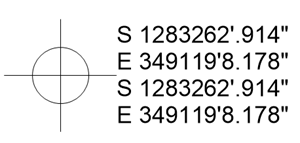
The stake label can display the main and, optionally, secondary coordinates; these parameters affect the display of the label information |
|
Show Main Coordinates |
Select the format for the main coordinates |
|
Units |
Specifies the units to use for the coordinates. Select Document Units to use the same units that were set for the file. Select an imperial or metric unit. Select Decimal Degrees or Degrees/Minutes/Seconds to show the stake’s geographic position. |
|
Decimal Precision |
Specifies the precision for the measurements, or uses the document settings for the precision |
|
Show unit mark |
Displays the unit mark next to the coordinates |
|
Show secondary coordinates |
Select the format for the secondary coordinates (if selected for display); choose the units |
|
Project Elevation |
|
|
Use project elevation |
Displays the Project Elevation value from the Document Setup dialog box; see Document setup. This does not affect the elevation of the stake object. |
Click in the drawing to place the survey point object. Placing the survey point on the internal origin is preferable.
Since you started from a new file, you'll be prompted to select a coordinate system for the file.
The Document Georeferencing dialog box opens. See Specifying document georeferencing and Coordinate systems. Since the survey point is not necessarily aligned with the internal origin, the Location and orientation of the internal origin parameters do not display. Select a coordinate system and click Close.
Next, specify the coordinates of the survey point and the Angle to True North. If you are including reference points for triangulation, set the coordinates for each one.
The Survey Point Coordinates Setup dialog box opens.
Click to show/hide the parameters.Click to show/hide the parameters.
|
Parameter |
Description |
|
Coordinate System |
|
|
Selected Coordinate System |
Displays the coordinate system selected in the Document Georeferencing dialog box; click Edit to select a different coordinate system |
|
Coordinates and Angle |
Specify the geographical point represented by the survey point by choosing one of the coordinate methods |
|
Specify geographical coordinates |
Select this option and enter the latitude and longitude coordinates. Enter decimal degrees, or degrees/minutes/seconds (for example, 39.18, 39° 10’ 32”, or 39d 10m 32s) preceded by a minus (-) sign when appropriate. |
|
Specify geographical (WGS-84) coordinates |
Select this option and enter the WGS-84 latitude/longitude coordinates |
|
Specify Cartesian coordinates |
Select this option and enter Easting and Northing coordinates. Enter the coordinates in meters or feet, according to the selected units. |
|
Angle to True North |
Specify the angle to true north if you prefer to work in Project North; this indicates the difference between Project North and true north. Use an azimuth degree measurement (0° is along the Y axis, 90° is along the positive X axis). This rotates the geographical coordinate grid through the survey point (rather than through the internal origin). The survey point is always rotated to indicate true North. If you’re working in, and sharing a file that is set up in, Project North, it’s important to specify the angle to true north. This allows the receiver to adjust the file to its surrounding site. By setting up georeferencing in the background with the correct angle to true north, you can still work in Project North while providing context for the project. You can use the GIS map in the background for the project, but also easily export the file to IFC in True North rotation. The Geographic Transformation Mode dialog box opens. Normally, choose the Do not transform the objects option. See Specifying document georeferencing. |
|
Internal and User Origins |
Specify whether to align the survey point and the internal origin and/or user origin |
|
Align the survey point with the internal origin |
Aligns the survey point with the location of the the internal origin; you can also click on the internal origin while placing the stake to align them. If you have already centered the drawing on the internal origin, this option is not available. Display a marker for the internal origin from the Display pane of the Vectorworks preferences. |
|
Align the user origin grid (X/Y) with the Easting and Northing grid |
Aligns the user origin with the georeference grid, so that X, Y coordinates of the user origin match the Easting and Northing coordinates. Deselect the option if you prefer to use the user origin as a base point or specify different X, Y coordinates. If an Angle to True North was specified, the user origin cannot be aligned to the georeference grid. |
|
Reference Points |
|
|
Set triangulation reference points |
Adds two triangulation reference points in addition to the survey point; these reference points use the same coordinate system that was selected for the survey point |
|
Point A / Point B |
Specifies the coordinates for the reference points; also, provide a Name for each point |
|
Object Info palette only |
|
|
Survey Point Settings |
Click Survey Point Settings from the Object Info palette to make changes. The Survey Point Coordinates Setup dialog box opens. Grayed out stake parameters only display information unless you click Unlock Survey Point. This allows the coordinates of the survey point, the Angle to True North, and the reference points to be edited. Normally, the survey point never moves and the relevant parameters are display only; only unlock the parameters if you have made an error when specifying the coordinates or angle. Once changes are made, the survey point is locked again. The stake remains in the same location in the drawing; what has changed is the georeferencing that it represents. |
|
Coordinates |
These parameters affect only the display of information on the survey point label. Only the parameters which are different on the Object Info palette are described here; the other parameters are described above. |
|
Show Coordinates |
Select the type of information to display for the main coordinates |
|
Use secondary coordinates |
Displays secondary coordinates |
|
Show Second Coordinates |
Select the format for the secondary coordinates, if displayed |
|
Show angle to true north |
Displays the angle next to the survey point |
Click to place the survey point and, optionally, the reference points for triangulation.
There can only be one survey point per file, so if there is already a survey point in the file, an alert displays that it will be deleted.
Once the survey point has been placed, it cannot be moved; it is locked to its geographical coordinates. Georeferencing changes are not permitted from the Document Georeferencing dialog box or the Geolocate tool.
The internal origin cannot be changed. However, the user origin can be freely changed, so you can switch between using the user origin for displaying Northing/Easting and using it as a project grid. Deselect the option to Align the user origin (X,Y) with Easting and Northing.
If you delete the survey point, georeferencing changes can be made through the Document Georeferencing dialog box or with the Geolocate tool.
Inserting a survey point into an existing project
A survey point can be inserted into an existing georeferenced project; by default, an existing coordinate system is selected, or you'll be prompted to select one. At placement, the distance between the stake and the internal origin is evaluated. If it is too far, they will be automatically aligned. A circle with a radius of 5 km (3.1 miles) from the stake location indicates the recommended working area to avoid issues, and you can decide how you wish to proceed with existing geometry.
To insert a survey point into an existing project:
Click the tool. From the Tool bar, click Preferences. Set the stake preferences as described above.
Click in the drawing to place the survey point object, in a location on the drawing where you know what the coordinates are.
The Survey Point Coordinates Setup dialog box opens. By default, the existing coordinate system is selected. Specify the parameters as described above.
If the distance between the survey point and the internal origin is too large, an alert opens, informing you that the survey point and nearby geometry will be centered about the internal origin.
Once the alignment has occurred, the survey point is placed. Around it, a circle indicates the recommended working area. You may need to manually move stray geometry into this area to avoid problems with the project, and then you can delete the indicator circle. For more information on a similar operation, see Centering the drawing on the internal origin.
