 The Classification Standard Setup palette
|
Command |
Path |
|
Classification Standard Setup |
File > Document Settings Window > Palettes > Web Palettes |
Classification of drawing objects is important to the BIM and construction workflow, to organize and share information about construction projects among all stakeholders. Different classification standards may be required during a project's life cycle. For example, you might use one standard for material take-offs and cost estimates during the project design phase, and a different one for planning and tracking the project's progress during construction.
The classification system in Vectorworks allows you to set up rules to automatically apply the correct classification IDs to drawing objects. Sample classification standards and rule sets are available in the Vectorworks libraries. However, it's recommended that you download the latest official classification standards required for your locality and import those into your project.
When setting up classification rules, you can assign an object only one primary, secondary, and tertiary classification ID. If an object matches more than one classification criteria set, or matches more than one rule within a criteria set, an error displays. This allows you to find and correct problems quickly and easily.
In addition to automatic classification, you can manually assign classification IDs to symbol definitions, materials, and selected objects; see Assigning classifications manually.
Sample reports using classification data are available, and you can create your own reports as needed. Classification data is automatically mapped appropriately for IFC export.
Importing classification rule sets
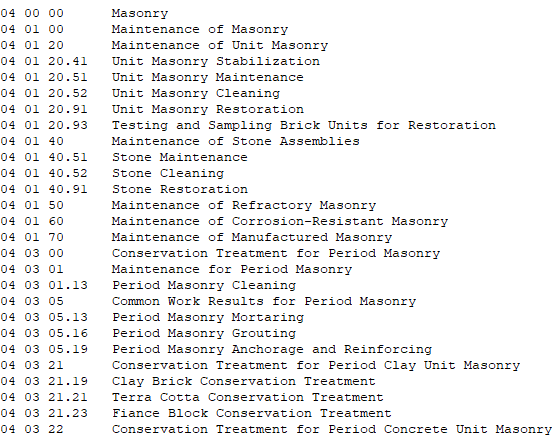
The first step for automatic classification is to import the classification standards required for your project, such as MasterFormat or Uniclass. These files should be tab delineated text (.txt), Excel sheet (.xls), or .xml format, with two columns. The file should be sorted by classification code (the first column). The second column contains a short description of the code. Below is a sample excerpt from a MasterFormat text file. Spaces are shown as orange dots, and tabs are orange arrows.
To import a classification rule set:
Place a classification standard file required for your project in your user or workgroup folder. This makes the standard available for quick import each time you create a new Vectorworks file.
[User]\Libraries\Defaults\Classifications
[Workgroup]\Libraries\Defaults\Classifications
Select the command to open the Classification Setup palette.
Do one of the following:
If no default classification standard has been selected yet, a list of standard files available in the user, workgroup, and application folders displays. Select a file and click Select Standard.
If at least one classification standard has already been imported, the criteria list displays. Click Manage Classification Standard Rule Sets to open the dialog box of the same name, and then click New to open the New Rule Set dialog box. Select Import default set to import a classification standard from the user, workgroup, or application folder. Alternatively, select Import from file to import a file from another location.
If you selected an Excel document with multiple sheets, select the appropriate sheet when prompted.
For text or spreadsheet file import, the Hierarchy Setup dialog box opens. Specify how to parse the classification codes in the file into hierarchy levels.
Click to show/hide the parameters.Click to show/hide the parameters.
|
Parameter |
Description |
|
Number of Levels |
Select the number of levels you want to have in the hierarchy (1–7) |
|
Characters |
For each level, enter the number of characters from the code that make up that level |
|
Separator |
For each level, enter the separator text used between this level and the next level in the code; leave this field blank if there is no text separating levels in the code |
|
Upper levels using paddings |
Select this option if codes for the top level in the hierarchy have padding characters; if enabled, also enter the Padding Character used. In the example above, zeroes are used as padding characters in the first line (04 00 00) to indicate the highest level in the hierarchy. |
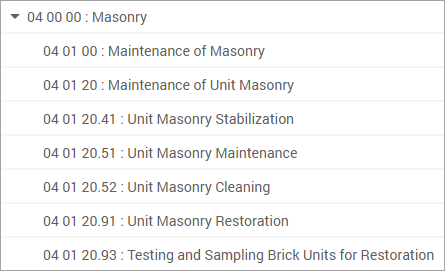
The imported classification standard is available on the Manage Classification Standard Rule Set dialog box.
Hierarchy setup examples
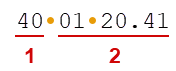
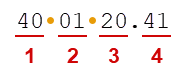
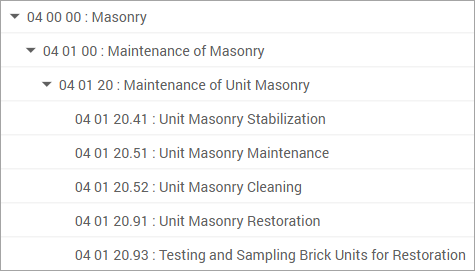
When you import a classification standard in text or Excel format, you can specify what the hierarchy of the codes in the Classification Standard Reference dialog box will be. A hierarchy with two levels would be sufficient for a small set of codes, but you might want more levels for an extensive standard with hundreds of codes. The examples below illustrate how to parse the MasterFormat classification standard shown above into two or four levels. Spaces in the sample code are shown as orange dots.
Two levels
Level 1 Characters: 2, Separator: space
Level 2 Characters: 8
Four levels
Level 1 Characters: 2, Separator: space
Level 2 Characters: 2, Separator: space
Level 3 Characters: 2, Separator: . (period)
Creating classification criteria sets
Once your classification standard files are in place, create one or more criteria sets. A set defines a group of drawing objects to be classified using the same primary, secondary, and tertiary classification standards. You can set up multiple criteria sets with different standards, if needed.
To create classification criteria sets:
Select the command to open the Classification Setup palette.
From the list of criteria sets, specify a set of objects to be assigned classification IDs.
Click to show/hide the parameters.Click to show/hide the parameters.
|
Parameter |
Description |
|
Name |
Enter a name for the criteria set |
|
Criteria |
Displays the criteria for which drawing objects to classify, as well as the number of objects that meet the criteria |
|
Edit |
Changes the criteria setting; select All to include all objects, or select a specific type of object (such as symbols). To include multiple object types (such as walls and slabs), select Custom criteria. Then click Edit to open the Criteria dialog box and enter criteria as described in The Criteria dialog box. |
|
Show |
Lists all objects that meet the specified criteria; click Select in Drawing to select an object |
|
Primary (abbreviated as 1° on smaller palettes) |
Select the primary classification standard for the set from the list of those available in the document. The number of objects in the set that currently have a classification ID displays to the right, along with the number of errors, if any. Click Show to display a list of all classified objects and error descriptions. Click Select in Drawing to select an object. |
|
Secondary / Tertiary (abbreviated as 2° and 3° on smaller palettes) |
Select a secondary and/or tertiary classification standard for the set, or select <Use Material Classification> to use the ID specified for materials applied to objects. The number of objects in the set that currently have a classification ID displays to the right, along with the number of errors, if any. Click Show to display a list of all classified objects and error descriptions. Click Select in Drawing to select an object. |
|
Add |
Adds a criteria set to the list |
|
Delete |
Deletes the criteria set from the list |
|
Manage Standard Classification Rule Sets |
Opens the Manage Classification Standard Rule Sets dialog box; see Managing classification rule sets |
Once the criteria sets have been defined, set up the classification rules for the specified objects as described in Creating and editing classification rules.
Creating and editing classification rules
Once a criteria set has been defined, create rules to assign classification IDs to the objects in the set.
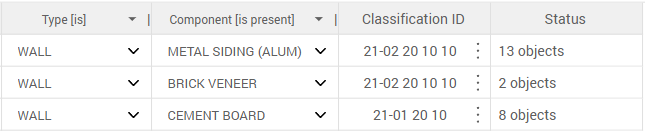
The classification rule set displays as a table, where each row is a rule that specifies a set of objects and assigns a classification ID to them. Adjust the criteria in the columns of the table to filter the objects as needed. You can use more than one column in a rule, if necessary. For example, you might have one column to specify wall objects, and another column to specify a type of component in the walls.
Add classification IDs for as many objects as desired. An object can have one primary, one secondary, and one tertiary ID.
To create classification rules:
From the Classification Setup dialog box, click Manage Classification Standard Rule Sets. Select the desired rule set from the list of those in the document, and click Edit Rules.
The Classification Standard Rule Set dialog box opens.
Click to show/hide the controls.Click to show/hide the controls.
|
Control |
Description |
|
Heading in a criteria column |
Click to open a pop-up where you can select the type of Column (such as layer or wall style) and an Operator (such as is or is not). Select Expression as the column type to use more advanced criteria (such as functions or record data), similar to worksheets. The controls at the bottom of the pop-up add a column to the left or right |
|
Cell in a criteria column |
Depending on the Column type selected in the heading, either enter a value returned by the specified Expression, or click to open a pop-up that lists possible values for the column. Use the * (asterisk) to indicate that this column doesn't apply to the rule on this row. |
|
Row number |
Click to open a pop-up where you can select controls to add a row above or below |
|
Cell in the Classification ID column |
Click to open the list of possible classification IDs for this rule set; select the desired ID and click OK to add it to the rule; see Looking up classification standard IDs |
|
Status |
Displays the number of objects in the criteria set that match this rule; if an object matches more than one rule within a criteria set, an error displays. Click the cell to open the list of all classified objects and error descriptions. Click View to select an object in the drawing. If the palette is too narrow to display the entire table, a floating status column displays on the right side of the palette, so that you can still identify and correct errors. |
|
Unclassified |
Displays the number of objects in the criteria set that don't match any of the rules. Click the number to open the list of unclassified objects. Click View to select an object in the drawing. |
|
Overridden classification |
Displays the number of objects in the criteria set for which a classification was entered manually; see Assigning classifications manually. Click the number to open the list of objects with overrides. Click View to select an object in the drawing. |
|
Resolve errors by |
Select a method to use when resolving errors. First Match applies the first matching rule it finds to each object Best Match highlights errors when an object can be identified by another rule All Matches highlights errors when an object can be identified by multiple rules |
|
Check Classification |
Click to update the Status column with the latest changes |
 , or delete the current column
  .
.Create as many rules as needed to assign IDs to objects in this criteria set, and correct any errors.
If this criteria set has secondary or tertiary rule sets specified, click Close to return to the Manage Classification Rule Sets dialog box, and select the appropriate rule set. Then click Edit Rules to return to the Classification Standard Rule Set dialog box, and create rules for the set as described above.
To see the classification information for a selected object, open the Data pane of the Object Info palette. From the Record Formats list, select the <Classification Default> option to display the settings at the bottom of the pane.
Managing classification rule sets
From the Manage Classification Standard Rule Sets dialog box, you can manage the rule sets in the file, refer to the standard, and access the rules for each rule set.
To manage classification rule sets:
From the Classification Setup dialog box, click Manage Classification Standard Rule Sets to open the dialog box.
Click to show/hide the options.Click to show/hide the options.
|
Option |
Description |
|
Rule Sets |
Lists the rule sets that have been imported into this file |
|
New |
Opens the New Rule Set dialog box, to add a new rule set. Import default set: Select a set from the list, which contains classification sets from the Vectorworks libraries, and from your user and workgroup folders Import from file: Browse to select a file to import; see Importing classification rule sets |
|
Duplicate |
Duplicates the selected rule set |
|
Delete |
Deletes the selected rule set |
|
Classification standard information |
The right side of the dialog box provides information about the selected rule set |
|
Classification Reference |
Opens the Classification Standard Reference dialog box; see Looking up classification standard IDs |
|
Edit Rules |
Opens the Classification Standard Rule Set dialog box, to edit the rules for the selected rule set; see Creating and editing classification rules |
|
Replace Reference |
Opens the Replace Classification Reference dialog box, to replace the selected rule set with another one. Import default set: Select a set from the list, which contains classification sets from the Vectorworks libraries, and from your user and workgroup folders (\Libraries\Defaults\Classifications folder) Import from file: Browse to select a file to import; see Importing classification rule sets |
|
Export |
Opens a dialog box to export the selected rule set; the location defaults to your user folder, but you can change it |
Assigning classifications manually
Besides automatically assigning classification IDs to objects using rule sets, you can manually assign IDs using the Assign Classifications dialog box. This allows you to create or override a classification for a specific drawing object, to apply a classification to all existing and future instances of a black symbol, and to classify the individual material components of walls, slabs, and roofs.
To assign classification IDs to selected objects, black symbol definitions, or materials:
Do one of the following:
Selected object: From the Data tab of the Object Info palette, click Assign Classifications
Black symbol definition: From the Resource Manager, right-click the symbol definition and select Assign Classifications
Material resource: From the Resource Manager, right-click the material and select Assign Classifications; alternatively, while editing the material, click Assign Classifications from the Construction tab
From the Assign Classifications dialog box, you can assign primary, secondary, and tertiary IDs for the selected item. For each ID, click Look up to open the Classification Standard Reference dialog box. Select a standard from the Classifications list, and then select the desired ID.
For materials, only the primary classification is available.
A Classification Override record is added to the object. To see the override settings for a selected object, open the Data pane of the Object Info palette. From the Record Formats list, select the Classification Override option to display the settings at the bottom of the pane.
To remove a classification override from an object, click Detach from the Data pane of the Object Info palette, or click Re-apply Defaults from the Assign Classifications dialog box.
Looking up classification standard IDs
Use the Classification Standard Reference dialog box to search for and retrieve IDs when setting up classification rule sets or manually assigning IDs from the Assign Classifications dialog box. It's also available for reference when you're managing the classification rule sets in the document.
If you opened the dialog box from the Assign Classifications dialog box, select the desired standard from the Classifications list at the top.
The following navigation aids are available:
Enter a string in the search box to open the hierarchy items that contain that string.
Buttons on the right side of the search box expand or collapse all items in the hierarchy.
If you're setting up a classification rule or manual classification, click OK to select the highlighted ID.