 Quick Start: Let's create landscape areas
Difficulty level: Beginner
With a few clicks, you can create landscape areas in Vectorworks; place plants or a mix of plants over a large area, without needing to place plants individually. Landscape areas are particularly helpful early in a project for illustrating general planting areas. Use this topic to help you understand how to draw in Vectorworks, place objects, view objects, add textures to objects, and to get used to the interface. We'll use a couple of different ways to create conceptual landscape areas to help you get going!
The location of commands and tools varies, depending on the workspace. You can learn to use the Quick Search feature to quickly find commands or tools; see Quick Search. You can also look at the Commands and tools PDF here in the Vectorworks help system.
Create a water garden
Let's add a landscape area of water-loving plants, using one of the ways to create a landscape area.
Make sure that you are either in the Design Suite or Landmark workspace by checking for the selected workspace under the Tools > Workspaces command. The Landscape Area tool isn't available in other products.
Switch to Top/Plan view by selecting it from the Current View/Standard Views list on the View bar, or by pressing 0 on the numeric keypad or using the Onscreen View Control cube.
Let's set a layer scale other than 1:1. Right-click in the drawing area and select the Active Layer Scale context command. Select a layer scale of 1"=10' for imperial, or 1:100 for metric.
We're going to add a wetland area. Click the Polyline tool  in Cubic Vertex mode, and draw an oval shape in the drawing window. When you get close to completing the oval, press the k shortcut key to create a closed shape. This will become our water garden landscape area.
On the View bar, select Right Isometric from the Current View/Standard Views list, or just press 3 on your numeric keypad or use the Onscreen View Control cube to switch to a 3D view.
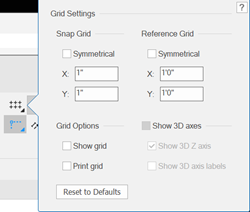
For now, the 3D axes are distracting. Let's hide them. Double-click on Snap to Grid in the Snapping tools area of the View bar. In the Grid Settings popover, deselect Show 3D axes.
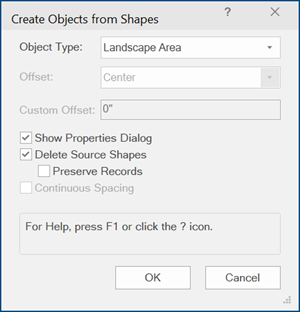
Select the polyline if it's not already selected. Select the Create Objects from Shapes command. In the Create Objects from Shapes dialog box, choose Landscape Area as the Object Type. Select the options for Show properties dialog and Delete source shapes.
The Landscape Area Preferences dialog box opens.
For the Landscape Area Style, select Perennial Water Garden LA.
On the Graphics pane, select Plant Symbols for Show Plants in 2D, and Individual Plants for Show Plants in 3D.
Click OK.
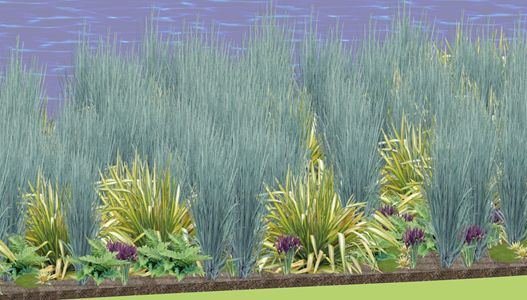
We now have a wetland landscape area, containing a predefined mix of water-loving plants.
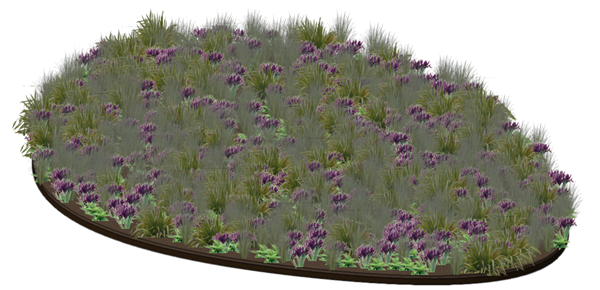
Do I hear a frog?
Add a prairie area
Now we're going to learn another way of creating a landscape area.
Switch to Top/Plan view by selecting it from the Current View/Standard Views list on the View bar, or by pressing 0 on the numeric keypad or using the Onscreen View Control cube.
Use the Pan tool  to move the drawing area with the wetland a bit to the left.
Click the Rectangle tool  to draw a rectangle to the right of the wetland. (You could also use the Polyline tool to create a more fluid shape.)
Placing a prairie next to the wetland area
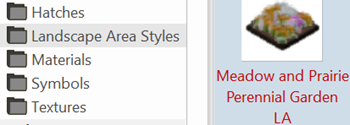
Click the Landscape Area tool ![]() . From the Landscape Area Style Resource Selector on the Tool bar, choose the Meadow and Prairie Perennial Garden LA from the Perennial Gardens folder.
. From the Landscape Area Style Resource Selector on the Tool bar, choose the Meadow and Prairie Perennial Garden LA from the Perennial Gardens folder.
We're going to convert the rectangle into a landscape area. Click Convert mode  from the Tool bar; hover over the rectangle until it highlights, and then click. We just applied the landscape area style to the rectangle, converting the shape into a landscape area. In the Object Info palette, select Plant Symbols for Show Plants 2D.
You can also use the polyline modes of the Landscape Area tool in Landscape Area mode  to draw a rectangular-shaped landscape area.
Adding a meadow prairie to the drawing
On the View bar, select Right Isometric from the Current View/Standard Views list, or just press 3 on your numeric keypad or use the Onscreen View Control cube to switch to a 3D view.
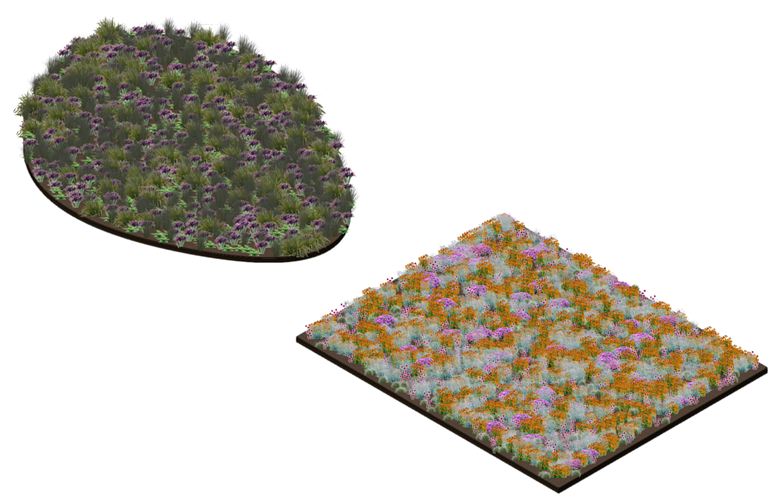
Prairie flowers contrast with the wetland area
Change a landscape area style
We have a lot of orange flowers in the prairie. Let's change the balance of plants in the prairie landscape area by editing the style in the file.
From the Resource Manager, browsing the resources of the current file, locate the style to change. Right-click on the syle and select Edit.
The Landscape Area Style dialog box opens.
Click on the Plant Information pane.
Click Percentage (Fixed rate/Custom percentage) for the method of calculating plant quantities. Change the Rate to 1.
Click on the orange Echinacea (coneflower) row, click Edit, and change its percentage to 6.7.
Click on the purple Echinacea row, click Edit, and change its percentage to 34.7.
For good horticultural practice, the total percentage normally equals 100%; however, in some cases, such as planting bulbs, it makes sense to pack the plants in tighter.
If you like, click Add Plant to place a new plant in the landscape area. Select a plant from the Resource Selector.
Click OK to change the style. Any landscape areas in the file with that style applied now change as well. If you don't want to change the existing style, you can always make a duplicate of it in the Resource Manager first before editing it.
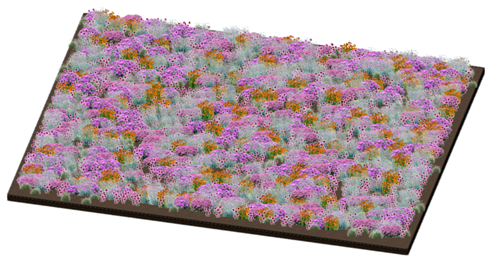
Less orange, more purple!
Less detail, please
Your client isn't ready to commit to the prairie area, and wants more of a concept design from you. You can easily switch to displaying the landscape area as a plant block instead, while still retaining the plant information for the future. Plant blocks are also useful for understanding the volumes in a concept design, without getting bogged down in the details.
With the prairie landscape area selected, scroll to the Graphics area of the Object Info palette.
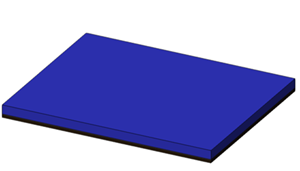
Select Plant Cloud for Show Plants 2D, and select Plant Block for Show Plants 3D. Enter a Height of 2' (61 cm) for the block.
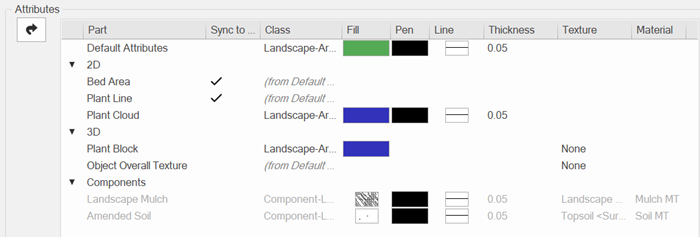
Edit the landscape area style again from the Resource Manager. From the Attributes pane, deselect the check mark in the Sync column for both the Plant Cloud and the Plant Block. Then select a purple Fill color (Solid Fill Style) for each by clicking on the color box.
You can see that the details are hidden and now we have a conceptual, purple-colored plant block.
To see the plant cloud, switch to Top/Plan view by selecting it from the Current View/Standard Views list on the View bar, or by pressing 0 on the numeric keypad or using the Onscreen View Control cube.

The client's needs always come first - but we've also preserved the details for later
Additional benefits of landscape areas include:
Associate a curb (Curb tool) with the landscape area. The curb acts as a border and adjusts with changes to the landscape area.
Determine the level of plant variation and detail; a highly realistic 3D view is achieved by showing individual plants with image prop representations, while a conceptual view provides an idea of the plants to include in an area.
Create a landscape area on a site model. The landscape area drapes over the uneven surfaces of a site model and calculates needed plants accurately; the landscape area can cut into the site model.
Specify sustainability and permeability metrics.
Add components to be specific about not just the plants in the mix, but also the sections of fill that make up the area like gravel, mulch, and so on.
Display the landscape area as a texture bed on the surface of a site model; get creative with the type of texture by creating a custom image texture.
Use the Landscape Area tool in Hedgerow mode to create a hedgerow of generic or specific plants.
