 Seating section settings
These settings are available in the following locations:
Seating Section Preferences dialog box (creating an object)
Seating Section Settings dialog box (creating or editing an object)
Object Info palette (editing an object)
Seating Section Style dialog box (creating or editing a style)
The settings are grouped into several panes of related parameters, which are listed on the left side of the dialog box. These parameters vary depending on whether a standard or curved seating type is selected. Select each pane and specify the parameters.
Every pane of the dialog box displays a preview of the seating section with the current settings; the preview updates dynamically as the settings are edited. If multiple seating sections are selected, the preview displays the first one in the stacking order.
You can create plug-in objects, such as the seating section, with a combination of parameters that are determined by the style or by instance, and then optionally save them as a plug-in object style. Style parameters have a fixed value established by the style; instance parameters can be set independently for each instance of the object in the drawing.
Seating section settings: Overall
Click to show/hide the parameters.Click to show/hide the parameters.
|
Parameter |
Description |
|
(Seating Type) |
Select whether to create a Standard (straight) or Curved seating section; depending on the settings, curved seating sections can curve into a complete 360° circle |
|
Use Style |
To create a custom seating section, leave the Unstyled setting. To use an existing seating section from the resource libraries, click Use Style; from the Resource Selector, double-click a resource to select it. |
|
Convert to Unstyled |
If Use Style is currently set to a style, select this option to convert the object to unstyled; the current values are retained, but all parameters on all panes are set to By Instance to allow editing |
|
By Style/Instance |
A graphic indicates whether each parameter is set to By Style and given a fixed value or set to By Instance and editable in the dialog box. By Style/Instance settings are established by the style and cannot be changed from the settings dialog box.
To edit the object style, see Editing plug-in object styles; editing the style modifies all plug-in objects in the file that use the style. |
|
Top/Plan Preview |
Dynamically displays a Top/Plan preview of the seating section with the currently selected parameters |
|
Use actual symbols |
Displays the selected Seating Symbol in the preview; if deselected, the preview displays the symbol’s bounding box and center point |
Seating section settings: Arrangement pane
Click to show/hide the parameters.Click to show/hide the parameters.
|
Parameter |
Description |
|
Alignment Type (Standard seating type only) |
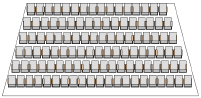
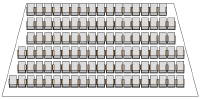
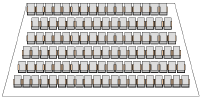
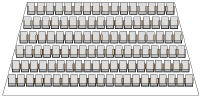
Select the seating alignment with reference to the Primary Fill Direction and Secondary Fill Direction; in the examples below, the fill direction settings are Left to Right and Top to Bottom Shift Rows: seats are aligned with the boundary
Align Rows: seats in each row are aligned directly behind one another
Offset Rows: every other row is offset by half the width of the first seat
Distribute Rows: seats fill the boundary edge-to-edge; spacing is adjusted to distribute seats evenly in each row, with Seat Spacing treated as the minimum value
|
|
Placement |
|
|
Seat Spacing |
Specify how far apart to space the seats in a row; spacing is based on the symbol’s bounding box and insertion point |
|
Row Spacing |
Specify how far apart to space the rows; spacing is based on the symbol’s bounding box and insertion point |
|
Distance Measurement |
Select whether to measure the Row Spacing from the back leg of one row to the front leg of the next, or from the front leg of one row to the front leg of the next |
|
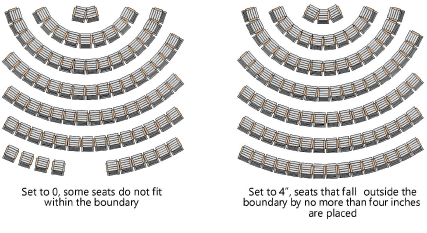
Allowable Distance Past Boundary |
If the seating is permitted to go past the seating section boundary, specify by how much
|
|
Primary Fill Direction |
Select whether to fill the seating section from Left to Right, Right to Left or Center Out for straight sections, and Clockwise or Counter Clockwise for curved sections |
|
Secondary Fill Direction |
Select whether to fill the seating section from Top to Bottom, Bottom to Top, or Center Out for straight sections, and from Inside to Outside or Outside to Inside for curved sections |
|
Start Angle |
For curved seating sections, specify where the seats start to be placed |
|
Rise |
If the seating section is to rise from the front to the back, select how to calculate the rise, and specify the height |
|
(Symbol list) |
You can specify more than one symbol in the section
|
|
# |
Displays the symbols in the fill order for the seating section, with reference to the Primary Fill Direction and Secondary Fill Direction. This is a static field that displays the order. To change the order, you must click each row and then select a different symbol for the row. |
|
Symbol |
Displays the current symbol name; to change the symbol, click on the row and then select a new symbol from the Resource Selector |
|
Alignment in Row |
Select whether to align the symbols by the top, center, bottom, or insertion point |
|
Add |
Click to add a row to the bottom of the list. The active symbol is used by default; select a new symbol from the Resource Selector. |
|
Remove |
Click the row with the symbol to remove, and then click to remove the selected symbol from the seating section |
|
Seating Symbol |
Displays the currently selected resource; to change it, locate the desired resource, and double-click to activate it. Alternatively, select a symbol to use as the basis for a new seating symbol with customized attributes, or create your own seating symbol, as described in Seating symbol specifications. |
|
Customize |
Customizes the selected seating’s default attributes, creating a new hybrid seating symbol; see Customizing seating symbols |
Seating section settings: Section Information pane
Click to show/hide the parameters.Click to show/hide the parameters.
|
Parameter |
Description |
|
Name |
Name the seating section; Vectorworks automatically assigns each seating section a unique ID, so this name does not have to be unique in the document |
|
Number seats |
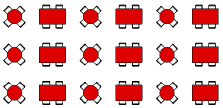
Numbers the seats; for a table-and-chair symbol, the table is numbered |
|
Numbering Direction |
Select the direction in which to number the seats |
|
Restart on next row |
Starts each row with the Start at value; if deselected, the numbering is continuous throughout the section
|
|
Start at |
Specify the first seat number; alphanumeric values are allowed |
|
Increment |
Specify the seat numbering increment |
|
Number rows |
Numbers the rows; for a table-and-chair symbol, the table is numbered |
|
Numbering Direction |
Select the direction in which to number the rows |
|
Start at |
Specify the first row number; alphanumeric values are allowed |
|
Increment |
Specify the row numbering increment |
|
Separator |
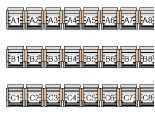
Select the separator between the row number and seat number in the display |
|
Display Row Number |
Select whether to display the row number on every seat, or on one or both ends of the row |
Seating section settings: Limits pane
Click to show/hide the parameters.Click to show/hide the parameters.
|
Parameter |
Description |
|
Seats per row |
Select if there is a maximum number of seats allowed per row, and specify the limit |
|
Rows per section |
Select if there is a maximum number of rows allowed per section, and specify the limit |
|
Total seats |
Select if there is a maximum total number of seats allowed per section, and specify the limit |
|
Minimum seats per row |
For curved seating sections, select if there is a minimum number of seats allowed per row, and specify the limit |
|
Draw loci |
Draws loci where seats could have been placed within the boundary but were not placed due to numerical limits |
Seating section settings: Angle pane
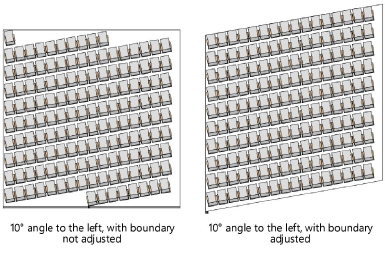
If the seating section object is four-sided and all four corners are 90°, you can specify an angle for the seating within the boundary.
Click to show/hide the parameters.Click to show/hide the parameters.
|
Parameter |
Description |
|
Angle seating |
Angles the seating within the boundary. Enter a value in the Angle of Seating field or drag the slider to specify an angle between 0 and 180°. For a Curved seating type, each seat turns individually, rather than angling the entire row. The seating angle is connected to the seating section’s focus point. As the Angle of Seating value is changed, the focus point automatically moves to maintain the logical link. Likewise, if the focus point is moved, the Angle of Seating value automatically updates. |
|
Angle Based on |
Specify whether the angle is based on the left or right side of the boundary |
|
Adjust boundary with angle |
Reshapes the boundary to conform to angled seating; deselecting this option may result in the loss of seats
|
Seating section settings: Classes pane
Click to show/hide the parameters.Click to show/hide the parameters.
|
Parameter |
Description |
|
Class Prefix |
Specifies an optional default root class naming standard for all seating section parts |
|
Assign Default Classes With Prefix |
Sets the class names for all seating section elements to the standard, using the Class Prefix if there is one, so that they are sorted together |
|
Seating section parts |
To control appearance and visibility, select a class from the list of classes present in the drawing, or create a new class. Select <Seating Section Class> to place the part attributes in the same class as the seating section object.v |
Seating section settings: Object Info palette
Some, but not all, parameters can be edited from both the Seating Section Settings dialog box and the Object Info palette. The fields in the Object Info palette are named similarly (but not always identically) to those in the Seating Section Settings dialog box, and roughly reflect the order in which settings are entered in the dialog box. The seating section parameters are described above. Only the parameters that are different are described here.
Some parameter changes require the seating section to refill, removing any custom seating edits. An alert displays to confirm the parameter change.
Click to show/hide the parameters.Click to show/hide the parameters.
|
Parameter |
Description |
|
Seating Type |
Displays the selected seating type |
|
Always Redraw Section |
Redraws the seating section for each change made in the Object Info palette; selecting this option may use significant computer resources and slow down operations. If this option is not selected, you can click Update to redraw the section as desired. |
|
Display Boundary |
Displays the seating section’s bounding box |
|
Display Section Info |
Select for a static display of the number of chairs/tables, the maximum/minimum tables/chairs per row, and the maximum number of rows; if deselected, the data do not show |
|
Display Focus Line |
Display the seating section’s focus line with three control points that make it easier to visualize and control the seating orientation, the angle/radius. The end point with no arrow controls the angle of straight seats or the radius of curved seats. The end point with an arrow controls the focus point of the seats. The center point is used to move the line. |
|
Update |
If Always Redraw Section is not selected, click to redraw the seating section |
|
Settings |
Opens the Seating Section Settings dialog box to edit and redraw the seating section (see Creating seating sections) |
|
Edit Seating |
Click for Custom editing individual seats |
|
Classes |
Opens the Classes pane to edit the class assignments for the seating section elements; other panes of the dialog box are not available and the entire seating section is not redrawn |
|
Vertex Parameters |
Edits the vertices of the path object that the seating section is based upon; see Editing vertex-based objects |
|
Equipment Subparts |
Lists the subparts that make up the object. These subparts are counted and reported separately in equipment and inventory lists. The parameters must be selected for display for this type of object in Spotlight preferences: Inventory pane. |
|
Equipment Virtual Parts |
Virtual parts are associated with an object and are reported in equipment and inventory lists, but do not display in the drawing. After adding virtual parts, they are listed in the Object Info palette. |
|
Edit Virtual Parts |
Opens the Virtual Parts dialog box to add virtual parts to the object; see Managing virtual parts and independent virtual parts |
|
Assign Sources |
Opens the Assign Sources dialog box to assign the object and its subparts and virtual parts to an inventory source; see Assigning equipment to an inventory |
