 Adding a geolocated image
|
Tool |
Workspace: Tool set |
|
Geoimage
|
Design Suite, Architect, Landmark: GIS Spotlight: Event |

The Geoimage tool places a portion of a map or other raster-based georeferenced image into the drawing. The image becomes a drawing object that persists after the tool is deselected, for reference or for incorporation into the final drawing. The map displays as an overlaid object, rather than behind the design layers as the basemap does. It can be included in sheet layers, unlike the basemap.
Due to licensing restrictions, the image displays while working in the file, but it cannot be saved with the file for offline use unless you are logged in with an ESRI account. Update the geoimage from the Object Info palette to download the image again, after saving the file.
The tool’s modes allow you to draw an area to create an image based on a service that may be different from the basemap’s service. For example, you might need to include a soil map or hydrological map as a geoimage in the drawing. To navigate to the right location and determine where to draw the bounds of the geoimage, you can use a different service for the background imagery, one that provides context such as streets, labels, or lot lines.
The Geolocation dialog box opens if the document is not yet georeferenced, to select a coordinate reference system. See Specifying georeferencing and geolocation. It's very important to have the correct CRS selected for the area, even if you just want to add a geoimage in a non-georeferenced workflow. (The easiest way to select the correct CRS is to use the Geolocation Setup Wizard; click the Survey Point tool to access it. You can specify that you only want to set up the basemap, and select the CRS with the wizard's help.)
While specifying the geoimage, the background imagery is scaled appropriately, and it updates when panning, zooming, and rotating the view; it displays as long as the tool is selected.
|
Mode |
Description |
|
Rectangle
|
Draws a rectangular shape for the area |
|
Vertex
|
Draws a polyline for the area |
|
Service |
Select a service provider for the image |
|
Polyline Creation Options |
For Vertex mode, selects the method for drawing the object's path polyline; see Creating polylines |
|
Document Georeferencing Options |
Opens the Geolocation dialog box, to set the georeferencing/geolocation options; see Specifying georeferencing and geolocation |
|
Preferences
|
Sets the default detail preferences for the image |


To draw an area and create a geoimage object:
Before using the Geoimage tool, first georeference the drawing.
Select the correct CRS, with the project location close to the internal origin. This is easiest to accomplish with the Geolocation Setup Wizard, or click Document Georeferencing Options from the Tool bar and select the CRS as described in Specifying georeferencing and geolocation.
Click the tool.
Select either Rectangle or Vertex mode, depending on the geoimage shape required.
Select the Service. See Using a map service.
The geoimage is created.
When you select a different tool, the background image no longer displays, but the geoimage remains in the drawing.
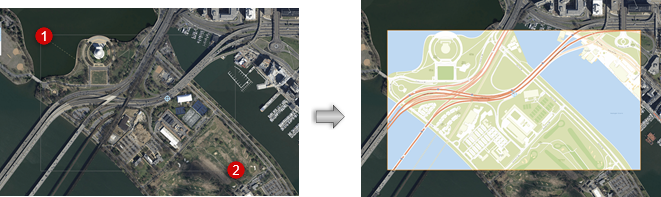
The geoimage object can be cropped, clipped, reshaped, and moved. If it is moved, the object updates to display the correct portion of the map or image. If the geoimage object needs updating, it displays with a red and white striped border, and a message displays on the top of the object.
The geoimage parameters can be edited from the Object Info palette.
Click to show/hide the parameters.Click to show/hide the parameters.
|
Parameter |
Description |
|
Update Geoimage |
Updates the geoimage object when a login is required or if the service changes. If a login is required, an alert opens so you can select whether to proceed with the login or switch to a different service. When a geoimage object needs updating, the button displays with red text. |
|
Update All Geoimages |
Due to licensing restrictions, a geoimage displays while working in the file, but it cannot be saved with the file for offline use. After saving the file, click Update All to download and display geoimages. |
|
Service Info |
|
|
Type |
Displays the current server and service for the object; click Edit Service to edit the server and type of service (see Using a map service). Certain services have additional rendering options which display in a Render list. |
|
Request map tiles |
Certain ArcGIS image servers use tiled maps for download; if you are unable to obtain an image as expected, select this option |
|
Auto detail level |
Select the level of detail for the map, which is downloaded in "tiles." Select Auto detail level, which calculates the best level of detail for the requested area, or deselect that option and choose a Detail Level for the image tiles. The best detail level depends on the image area; higher detail may take longer to download and update since there are more tiles, so select a detail level that matches the requirements of the image area. Some servers may not have image tiles available at the level of detail you requested. If the service provides it, the Max Detail Level available from the service displays. |
|
Georeferencing Info |
Displays the file's current georeferencing information |
|
Edit Document Georeferencing |
Opens the Geolocation dialog box to set the georeferencing/geolocation options; see Specifying georeferencing and geolocation |
|
Vertex parameters |
Edits the vertices of the path object that the geoimage is based upon; see The Object Info palette: Shape tab |
