 Marionette Wrapper NodesMarionette Wrapper Nodes
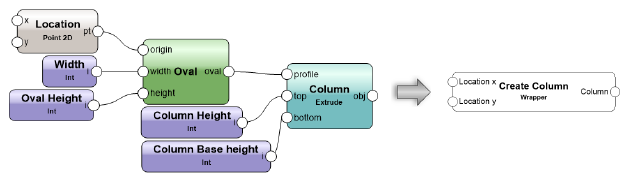
Wrapper nodes consolidate an entire network into a single executable node. To create a wrapper node, right-click (Windows) or Ctrl-click (Mac) on any node in the network and select Wrap Marionette Network from the context menu.
The inputs of the network within a wrapper node can be edited from the Object Info palette if they are named in the network; for more information, see Naming Nodes.
Unused inputs and outputs display on the wrapper node if the nodes to which they belong are named; this is useful for quickly incorporating wrapper nodes into larger Marionette scripts or complex networks.
The display of unused ports on the wrapper node can be controlled. Unwrap or edit the wrapper node, and then use the 2D Locus tool to place a locus on each unused port intended to be hidden.
Unwrap a wrapper node back into the unconsolidated network by right-clicking (Windows) or Ctrl-clicking (Mac) on the node and selecting Unwrap Marionette Network from the context menu.
To edit a network within a wrapper node:
Select the wrapper or object node.
Click Edit from the Object Info palette.
Alternatively, right-click (Windows) or Ctrl-click (Mac) on the object or wrapper node and select Edit Script from the context menu.
A colored border around the drawing window indicates that you are in an editing mode. The Exit Marionette Script button is visible in the top right corner of the drawing window.
Make the desired changes to the network; see Editing a Network for more information.
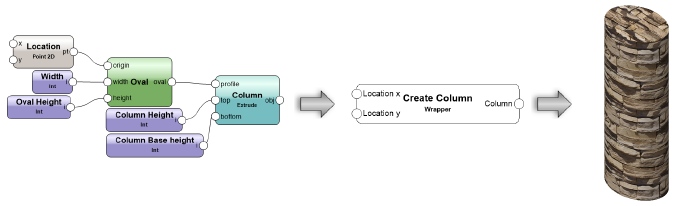
Object nodes are wrapper nodes that take the form of the product of their executed script. The benefits of an object node include being able to immediately see the effects of modifying a network without having to execute the script. A wrapper node can be turned into an object node by right-clicking (Windows) or Ctrl-clicking (Mac) on the wrapper node and selecting Convert to Object Node from the context menu.
When converting a wrapper node to an object node, you can select a single additional object to convert with the wrapper node to be used as a control geometry. The control geometry enables the creation of custom path objects with Marionette. For example, if the object node requires a Duplicate Along Path object, you can include a polyline as the path object. To edit the control geometry, right-click (Windows) or Ctrl-click (Mac) on the object node and select Edit Control Geometry from the context menu. An object node can be turned back into a wrapper node by right-clicking (Windows) or Ctrl-clicking (Mac) on the object and selecting Convert to Wrapper Node from the context menu.
~~~~~~~~~~~~~~~~~~~~~~~~~
![]()