 Associating Load Objects with a Hanging PositionAssociating Load Objects with a Hanging Position
Load objects can be associated with a hanging position. If a load object has multiple components, each can be attached to a different hanging position; see Inserting a Video Screen Object for details. An associated, or attached, load is automatically set to the hanging position height and moves with the hanging position. Load objects include:
● Lighting instruments (see Inserting Instruments)
● Video screen objects, speakers and speaker arrays, soft goods, cables, and point and distributed loads
Load objects can be automatically associated with a hanging position, both at insertion and when an existing load is moved in the drawing. At insertion, a load is automatically associated with a hanging position if one is found within the Pick radius specified in the Spotlight preferences. When moving an existing load, auto positioning must be enabled for the load to automatically associate with a hanging position. See Spotlight Setup for details.
If instruments are moved to a different hanging position, the hanging position name is automatically updated for the instruments, and the Z height of the instruments is calculated automatically based on the hanging position Z height.
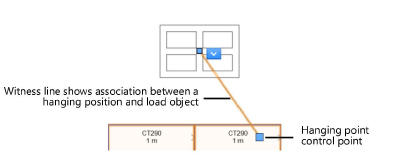
Associated loads factor into Braceworks calculations. For calculation purposes (Braceworks required), a load that is displayed at an offset from its hanging position retains its association with the hanging position’s truss system. A witness line is automatically created to indicate the hanging point, where the associated load is calculated on the system.
Witness lines are classed separately; set the class by clicking Classes from the Object Info palette of a selected hanging position. Witness lines can be shown or hidden for a selected hanging position with the Show Witness Lines parameter on the Object Info palette.
To remove a selected witness line, move the hanging point control point onto the load object.
When Enable Auto Positioning when moved is selected in the Spotlight preferences, an existing load can be moved to a hanging position.
To move a load to a hanging position, do one of the following:
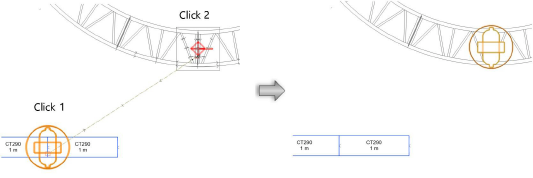
● Click and drag the load to the desired location within the Pick radius specified in the Spotlight preferences. The load attaches to the nearest hanging position within the radius, if one is found.
● Click and drag the load directly onto a hanging position. Using Auto Connect technology from Braceworks, truss and lighting pipe objects are highlighted as the cursor moves over them.
If the load has multiple components, click and drag the component that you wish to move; only the clicked component will be associated with the hanging position.
When a load is dragged directly onto a truss object, the load attaches to the bottom of the truss by default. While dragging, press the Alt key (Windows) or Option key (Mac) to attach the load to the top of the truss.
The load is moved to the hanging position and is automatically associated with it.
|
Command |
Path |
|
Attach to a Hanging Position |
Context menu |
To select a hanging position and attach one or more loads without drawing witness lines:
Select the desired load object(s).
Right-click on a selected load, and select the command.
If a selected load has multiple components, the component closest to the click point will be attached.
Click a hanging position to attach the loads.
Valid hanging position objects are highlighted as the cursor moves over them.
|
Command |
Path |
|
Attach Loads |
Context menu |
To attach one or more existing loads to a hanging position:
Right-click on the hanging position, and select the command.
Valid load objects are highlighted as the cursor moves over them.
If a load object has multiple components, select which component to attach. Hover the cursor over the desired component.
The selected component displays a cross, indicating that it is the component to attach.
Do one of the following:
● For hanging positions that contain truss or lighting pipe objects: to draw a witness line, click to attach the load to the hanging position, and set the hanging point.
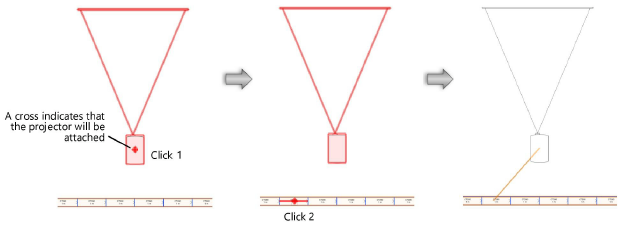
● For any hanging position: to associate the load without drawing a witness line, either double-click on the load or click the check mark button on the Tool bar.
Continue to associate loads with the hanging position.
Press the Esc key or click the Selection tool to stop associating loads.
~~~~~~~~~~~~~~~~~~~~~~~~~