 Concept: Hanging Positions and Associated LoadsConcept: Hanging Positions and Associated Loads
Hanging positions represent the hanging points for lighting instruments as well as stage equipment like curtains, video screens, speakers, cables, and other loads. Hanging positions should be placed on the light plot before the load objects are added. Once the event space has been modeled, with the stage and hanging positions defined, the file can be used as a template for future light plots in that space (see Creating Templates).

|
|
Click here for a video tip about this topic (internet access required). |
Creating a hanging position is generally a two-step process. First, insert or draw the geometry of the hanging position. Then, convert the geometry into a hanging position object, ready for equipment placement.
Several types of objects can be used as the basis for a hanging position object:
● Lighting pipes
● Lighting pipe ladders
● Straight trusses
● Curved trusses
● Trusses inserted with the Insert Truss tool
● Custom 2D, 3D, or hybrid geometry
The Braceworks product has additional tools and commands, and creating the rigging structure is a more involved process. See Concept: Braceworks Structural Analysis.
While a hanging position cannot directly participate in Braceworks calculations, the trusses or lighting pipes that make up the position can. By converting trusses and lighting pipes to intelligent hanging position objects, you can take advantage of both Braceworks and Spotlight functionality when Working with Associated Loads.
When multiple objects are selected for conversion, you have the option to create a hanging position for each selected object, or to create a single hanging position from all selected objects. Use one of the following methods to create the hanging position(s):
● For any selected geometry, use the Convert to Hanging Position command.
● For a selected truss or lighting pipe object, click the Convert to Hanging Position button on the Object Info palette. This method selects the entire connected system for conversion to one or more hanging positions.
Choose whether to create a symbol from the geometry, or to embed the geometry in the hanging position object. If this is a uniquely shaped hanging position, or if you want to edit the geometry more easily, choose to keep the geometry. If you choose to create a symbol instead, you can use it to insert multiple positions with the Hanging Position tool. You can insert symbols from the current file, the symbol libraries, or a Favorites file.
When a load object is attached to a hanging position, it assumes the height of the hanging position and becomes “associated” with it. This association has several advantages:
● A hanging position and its associated loads can be moved and rotated as a unit.
● Lighting instruments can be auto-numbered according to their hanging position.
● Instrument summaries and other reports can be created for each hanging position.
● Braceworks calculations include the associated loads (Braceworks required).
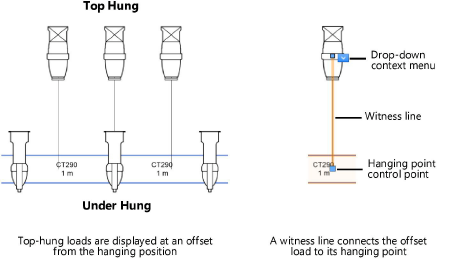
Associated loads can be placed at an offset to avoid overcrowding the light plot. For example, if instruments are attached to the top and bottom of a truss, you can display the top-hung instruments above the truss system. Witness lines can be drawn to indicate the instruments’ hanging points on the truss, for display and calculation purposes. The hanging points define where the associated loads are calculated (Braceworks required).
There are several ways to associate loads with a hanging position. The association can be automatically created when the load is inserted or when it is moved in the drawing. For details, see Associating Load Objects with a Hanging Position. In addition, various commands allow you to associate, edit, and disassociate loads from a hanging position.
|
Action |
Method |
Description |
|
Associating Loads |
|
|
|
Insert a load on a hanging position |
Symbol insertion |
|
|
Move a load to a hanging position |
Click-drag operation |
|
|
Attach one or more loads to a hanging position, with or without drawing witness lines |
Hanging position context menu command |
|
|
Attach multiple loads to a hanging position without drawing witness lines |
Object context menu command |
|
|
Editing Associated Loads |
|
|
|
Set the hanging point of a single load and draw a witness line |
Drop-down context menu command |
|
|
Move a single load to its hanging point |
Drop-down context menu command |
|
|
Move all loads on a hanging position to their hanging points |
Hanging position context menu command |
|
|
Disassociating Loads |
|
|
|
Disassociate a single load from its hanging position |
Drop-down context menu command |
|
|
Disassociate multiple loads from a hanging position |
Hanging position context menu command |
If a hanging position is copied, it is automatically renamed; any attached loads that are copied are associated with the new hanging position. Deleting a hanging position does not delete the attached loads.
~~~~~~~~~~~~~~~~~~~~~~~~~
