 Inserting a Curved TrussInserting a Curved Truss
Mode |
Tool |
Workspace: Tool set |
Modes for The Symbol Insertion Tool |
Curved Truss
|
● Designer: Detailing ● Spotlight: Rigging |
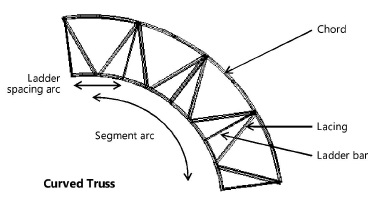
Curved truss parameters are illustrated by the following diagram.
To add a curved truss to the light plot:
Click the tool and modes.
Click to define the truss insertion point. Click again to set the rotation of the curved truss.
The first time you use the tool in a file, a properties dialog box opens. Set the default properties. The properties can be edited from the Object Info palette.
Trusses are 2D/3D hybrid objects. Complex trusses can increase the time required to render the model in 3D.
![]() Click
to show/hide the parameters.
Click
to show/hide the parameters.
If the final segment of a truss is shorter than the defined interval length, it is displayed in red when Highlight is selected.
A curved truss can be rotated with the Rotate tool.
To rotate a curved truss:
Select the truss. In the Object Info palette, select Draw 3D Only.
Click the Rotate tool from the Basic palette.
Click to set a fulcrum line; click to end. Move the cursor to rotate the truss, and then click to set the rotation.

|
Click here for a video tip about this topic (internet access required). |
~~~~~~~~~~~~~~~~~~~~~~~~~

