Inserting
a heliodon objectInserting
a heliodon object
Inserting
a heliodon objectInserting
a heliodon objectTool |
Tool set |
Heliodon
|
Visualization |
To insert a heliodon:
1. Click the tool.
2. Click to place the object in the drawing, and click again to set the rotation.
The first time you use the tool in a file, the Settings dialog box opens; set the default properties.
![]() Click
to show/hide the parameters.
Click
to show/hide the parameters.
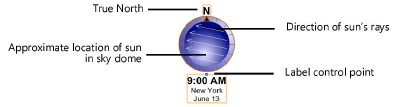
3. The heliodon graphic displays true North at the top of the heliodon. Normally, the drawing is oriented to page North (true North, not magnetic North), and true North matches the top of the page, with no compensation required for proper sun position. If the drawing was not created with this orientation, use the Object Info palette to specify a Rotation in degrees from page North. North set here should match true North in the drawing.
The white arrows represent the sunlight direction at the current time of day and the designated location. The gradient highlight shows the approximate position of the sun in the sky dome.
4. Once placed, a heliodon symbol is added to the drawing file and is listed in the Resource Manager in the Heliodon Symbols folder. Edit the 2D component of the symbol as described in Editing symbol definitions to change the appearance or the font style or size.
5. Heliodon objects display in, and can be controlled from, the Visualization palette. They can be identified by their location and time data.
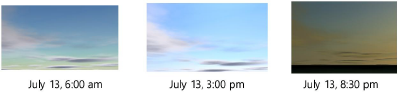
Place several heliodon objects in the drawing, set to different times of day, to conduct a solar study. Turn the heliodon objects on and off in the Visualization palette to study the effects of the sun’s light and shadows cast at different times of day.
The properties can be edited from the Object Info palette.
![]() Click
to show/hide the parameters.
Click
to show/hide the parameters.
~~~~~~~~~~~~~~~~~~~~~~~~~