Command |
Path |
Document Preferences |
File |
Document preferences only apply to the current drawing, and they remain in effect until they are changed. The settings can be saved and managed from any tab in the Document Preferences dialog box; see Using saved sets. When a .esc or .mvr file is opened in Vision, the most recent settings are applied.
Document preferences can also be set from The Properties palette.
To change the preference settings in the document:
1. Select the command.
The Document Preferences dialog box opens.
2.Click each tab to set the preferences. Click Apply to apply the settings while keeping the Document Preferences dialog box open.
Click the General tab to set various display preferences.
![]()
![]() Click
to show/hide the parameters.
Click
to show/hide the parameters.
Parameter |
Description |
Ambient Intensity |
Sets the amount of light in the entire scene when fixtures are off. No shadows are created by ambient lighting. To adjust the ambient light level using keyboard shortcuts, see Ambient light in the Scene window. To modify the color and brightness of ambient light, set the Ambient Color from the Document preferences: Environment tab. |
Exposure |
Controls how much light enters the virtual camera lens. Values above 1.00 increase the exposure and values below 1.00 decrease it. The default setting of 1.00 is best for most scenes, but you may want to adjust for final rendering. Check the target lux values on the Document preferences: Heat Map tab, then modify the exposure as needed. |
Haze Intensity |
Controls the amount of haze, making light beams more or less intense. For faster rendering, disable light beams by setting the Haze Intensity to 0%. |
Contrast |
Controls the difference between light and dark areas in the scene. Increasing this value makes the difference more intense, while decreasing it can add a washed-out effect. |
Brightness |
Controls brightness in the scene by adjusting the comparative luminance of each pixel. The default setting of 0 (zero) is best for most scenes. To modify the overall scene lighting, first adjust the Ambient Intensity, then the Exposure, and finally the Contrast or Brightness if needed. |
Camera FOV |
Sets the horizontal field of view in the scene. Increase the value to widen the field of view, and decrease the value to narrow it. |
Click the Rendering tab to set the rendering preferences.
![]()
![]() Click
to show/hide the parameters.
Click
to show/hide the parameters.
Parameter |
Description |
Use Normals |
Enables advanced lighting when valid normals are present. Normals indicate which direction the scene geometry is facing, to troubleshoot rendering issues. Select Render Normals to view the normals in the drawing. When .3ds and .obj files are opened, this setting is enabled by default. |
Use Face Culling |
For better performance, renders only the camera-facing geometry. If geometry displays incorrectly, try Adjusting the winding order. |
Diffuse Strength |
Multiplies the intensity of diffuse lighting, which has the same brightness no matter the camera view. Use this setting primarily for testing. To adjust the amount of diffuse lighting, modify the Ambient Intensity or Exposure instead. |
Specular Strength |
Makes objects appear shinier by brightening their highlights. Use this setting primarily for testing. To increase or decrease the amount of specular highlighting, adjust the Exposure instead. |
Bump Strength |
Multiplies the intensity of the bump effect for all textures. To finely adjust the bump strength, modify the grayscale shades in the bump texture image. |
Render Normals |
Indicates the normals of the scene geometry by rendering them as RGB colors. The colors adjust to the camera view. ● Red indicates left-facing normals. ● Green indicates top-facing normals. ● Blue indicates front-facing normals. If an object is reflecting light incorrectly, its normals might be inverted; try Adjusting the normals. |
Render Specular |
Uses color coding to indicate the specular reflectivity of objects (metallic objects should use the metal’s color). ● White indicates high reflectivity. ● Black indicates no reflectivity. ● Gray indicates low reflectivity. An overall gray or muted appearance is expected if the Texture Quality is low or if a reflective texture image is not applied. ● Color indicates metal reflectivity. Select the check box to test the specular lighting. For example, test whether a highly reflective texture is applied correctly when the Texture Quality is high. |
Render Shadows |
Controls the display of shadows for all objects and layers. To decrease rendering time for large files or DMX transforms, deselect the check box. You can override the Render Shadows preference for specific items in the scene; set the Cast Shadows parameter on The Properties palette to toggle shadows on or off for selected objects and layers. |
Send NDI Stream |
Outputs a live NDI stream of Vision. Select this option to send an NDI stream of Vision to Disguise EVO, a media server, a video-sharing platform, and so on. |
Render Video |
Controls how video screens are rendered. ● On: Enables video playback. ● Screen Test Image: Displays the screen images specified by Vectorworks when the .mvr file was exported. If no images were specified, the screens appear gray. ● Render Video with Disguise: Blacks out the video screens, so Disguise can render video. ● Off: Blacks out the video screens. The options Render Video with Disguise and Off perform the same function; select either option to stop rendering video screens in Vision. |
Far Clip Plane Distance |
Sets the distance (in inches) to the far clip plane, which is the boundary of the visible scene. All items within the Far Clip Plane Distance are visible, while items beyond this distance are “clipped” out of view. Lower distance values can improve shadow quality, so extremely high values are not recommended. To set the optimal distance for your scene, zoom out to the furthest extent required for previz. Decrease the Far Clip Plane Distance until some geometry is clipped from view, and then gradually increase the distance until no clipping occurs. |
Click the Environment tab to set preferences for the environment lighting.
![]()
![]() Click
to show/hide the parameters.
Click
to show/hide the parameters.
Parameter |
Description |
Ambient Color |
Sets the color of ambient lighting—for example, to mimic sunrise or moonlighting. Click the button next to the color definition. The Color Picker dialog box opens. Choose a color from the color picker. The Preview displays the selected color. The Hue, Saturation, and Luminance values display, as well as the Red, Green, and Blue values. |
Background Color |
Sets the background color, if no Panoramic Background is specified. Click the button next to the color definition. The Color Picker dialog box opens. Choose a color from the color picker. The Preview displays the selected color. The Hue, Saturation, and Luminance values display, as well as the Red, Green, and Blue values. |
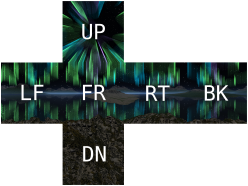
Panoramic Background |
The panoramic background is a composite of six images. These images are saved individually but together form a “cube map.” When the component images are properly named and aligned, as shown below, Vision renders them as a seamless background image.
The component images may need to be inverted or rotated for proper alignment. Each image must have the same name but with a special suffix denoting which side of the cube it represents. All images must be saved in the same format, such as .png or .jpg. ● Front: Name_ft ● Back: Name_bk ● Left: Name_lf ● Right: Name_rt ● Up: Name_up ● Down: Name_dn Select one of the component images of your desired panoramic background; Vision will locate the other images to form the cube map. Click the button to select an image file; click X to remove the file. Some panoramic backgrounds are provided with the Vision application; see the “lo” .jpg files and “midnight-silence” .png files in the textures/App folder. |
Sun Azimuth |
Sets the azimuth for ambient lighting, when orbiting the ambient lighting around the scene. South is at 0 degrees, West is at 90 degrees, North is at 180 degrees, and East is at 270 degrees. |
Sun Elevation |
Sets the elevation (degrees above the horizon) for ambient lighting |
Click the Haze tab to set the haze preferences.
![]()
![]() Click
to show/hide the parameters.
Click
to show/hide the parameters.
Parameter |
Description |
Haze Style |
Select the type of haze for the light beams. The 4D haze options use a procedurally-generated haze texture that can move in 3D space and time. ● None: No haze texture is applied. ● Low-Quality Haze Texture: The specified Haze Texture is applied with low quality. The texture image does not adjust to camera movement. ● Low-Quality 4D Haze: A 4D haze texture is applied with low quality. ● High-Quality 4D Haze - Half Resolution: A 4D haze texture is applied with high quality and rendered at half resolution. ● High-Quality 4D Haze - Full Resolution: A 4D haze texture is applied with high quality and rendered at full resolution; performance may decrease. |
Haze Texture |
For a Haze Style with Low-Quality Haze Texture, select a haze image. The image is applied where a light beam projects in the scene. |
Haze Texture Intensity |
Controls the intensity of the haze texture for all haze styles. At 0%, no texture is applied; at 100%, white areas of the texture have haze and black areas have none. |
Haze Horizontal/Vertical Speed |
Controls the speed of the haze as it moves horizontally and vertically |
Haze Depth Speed (4D Haze only) |
Controls the speed of the haze as it moves forwards and backwards, relative to a front view |
Haze Turbulence (4D Haze Only) |
Controls how fast the haze texture varies |
Haze Horizontal/Vertical Offset (Low-Quality Haze Texture only) |
Sets a horizontal or vertical offset for the haze image. The offset corresponds to screen percentage; for example, an offset of 10% shifts the haze image by 10% of the screen or Scene window. |
Haze Contrast (Low-Quality Haze Texture only) |
Controls the difference between light and dark pixels in the haze image |
Haze Scale (4D Haze only) |
Controls the size of the haze features. At large scale, the haze appears cloudy; at small scale, many small wisps display in the light beam. |
Click the Bloom tab to set the bloom preferences.
![]()
![]() Click
to show/hide the parameters.
Click
to show/hide the parameters.
Parameter |
Description |
Bloom Percentage |
Sets the intensity of the bloom effect. This adds a glow to the brightest areas of the scene, like a bright light overwhelming the camera or eye. A value of 0 (zero) disables the bloom. |
Bloom Threshold |
Sets the lighting level where bloom occurs |
Bloom Lens Strength |
Modifies the intensity of the bloom effect for fixture lenses; at 0 (zero), lenses are not rendered |
Click the Heat Map tab to set the heat map preferences.
![]()
![]() Click
to show/hide the parameters.
Click
to show/hide the parameters.
Parameter |
Description |
Heat Map Style |
Select the type of heat map to display. ● None: Displays the normally rendered scene with no heat map. ● Black and White: Displays a black and white heat map. This option sets the Heat Map Min/Max Lux to the same threshold value. Black areas in the scene have less illumination than this value. White areas have the same or more illumination than this value. From the Properties palette, you can identify the lux value in a part of the scene by scrolling to increase and decrease the threshold value; when a part of the scene switches between black and white, its illumination matches the threshold value. ● Color Gradient: Displays a color heat map. Illumination is represented by a blend of colors ranging from black as the Heat Map Min Lux to white as the Heat Map Max Lux.
|
Heat Map Min Lux |
Set the minimum lux value for the heat map |
Heat Map Max Lux |
Set the maximum lux value for the heat map |
|
Click here for a video tip about this topic (internet access required). |
~~~~~~~~~~~~~~~~~~~~~~~~~