 Concept: Lighting accessories
 Concept: Lighting accessories
Lighting accessories can be inserted from the many symbols provided in the Vectorworks libraries, or created as custom symbols. The Lighting Accessory tool attaches accessories to existing lighting devices in the model and in schematic views. The tool can be used in the drawing area, where it places accessories in the default position, or it can be used in the accessory edit mode, where it also allows custom placement and rotation of accessories in 2D and 3D views. Use this special edit mode to modify the accessories on a single lighting device or modify the same accessories on multiple devices.
As an alternative to this workflow, you can embed an accessory symbol within a lighting device symbol definition. This allows you to insert lighting devices with the desired accessories already attached. See Workflow: Creating lighting device symbol definitions for more information.
The accessory symbols from the Vectorworks libraries already contain the required manufacturer values and have the correct accessory type assigned. To create or use your own accessory symbols, see Workflow: Creating accessory symbol definitions.
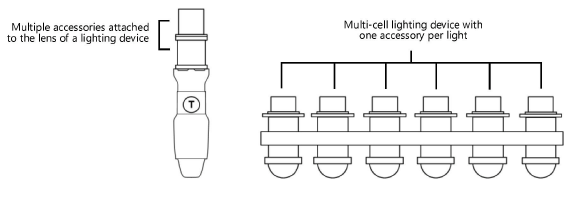
A single lighting device can have accessories in different locations. It can also have multiple accessories in the same location, usually at the front of the device.

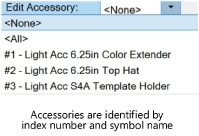
Each accessory has an index number determined by the stacking order, starting from back to front (or starting with the first created accessory in the default stacking order). This number is used to identify the accessory in the Object Info palette, the Lighting Device dialog box, and the Patch dialog box.

Once an accessory is attached to a lighting device, it behaves like part of the device geometry. As you move and focus the lighting device, its accessories move and rotate with it.
When inserted with the Lighting Accessory tool, accessories can attach to the lens, body, or base of a lighting device; this depends on the Parts record definition. (See Attaching the Parts record to the accessory for more information.)
● Lens accessories attach to the front of the lighting device; this is the default location.
● Body accessories attach to the middle of the lighting device at the center of rotation.
● Base accessories attach to the base of the lighting device and alter its insertion point.
When a clamp—or any base accessory—is attached to a lighting device, the device insertion point automatically adjusts to match the accessory's insertion point. This enables proper auto positioning and load calculations (Braceworks required). If there are multiple base accessories, the insertion point of the first accessory is used. When the base accessory is removed, the lighting device assumes its original insertion point.
When creating a clamp symbol, or embedding a clamp within a lighting device symbol, you must attach the Parts record to define the clamp as a Base part of the device; see Attaching the Parts record to the accessory.
When a lighting device is deleted, its accessories are deleted too.
The lighting device and accessory share many of the same parameters, but the values are set independently. You can access the accessory parameters in two ways: from the Object Info palette of the associated lighting device or in accessory edit mode, where additional parameters display for fine-tuning the accessory position. Editing the accessory parameters does not change the lighting device parameters, except for the Total Weight of the lighting device; this value includes the weight of the attached accessories.
Accessories such as color frames, barn doors, and top hats have a Device Type of Static Accessory. Accessories that require a control channel, such as color scrollers, have a Device Type of Accessory.
There are several ways to manage accessories, depending on the their positioning and the number of lighting devices you are working with. The following table describes different methods for inserting, editing, and deleting accessories—on one lighting device or many devices at once.
|
Action |
Method |
Description |
|
Inserting accessories |
|
|
|
Insert an accessory in the default position on one lighting device at a time |
● Lighting Accessory tool in the drawing area ● Lighting Accessory tool in accessory edit mode |
|
|
Insert an accessory in the default position on multiple lighting devices |
Lighting Accessory tool in accessory edit mode |
|
|
Insert an accessory in a custom position on one or more lighting devices |
Lighting Accessory tool in accessory edit mode
|
|
|
Changing the accessory data |
|
|
|
Edit the device parameters of one or more accessories |
● Edit Accessory parameter on the Object Info palette of the associated lighting device ● Accessory Object Info palette |
|
|
Adjusting the accessory location and rotation |
|
|
|
Edit the 2D location of an accessory on one or more lighting devices |
● X/Y Offset (2D View) parameters on the accessory Object Info palette ● Click-drag operation |
|
|
Edit the angle of plan rotation for an accessory on one or more lighting devices |
Plan Rotation parameter on the accessory Object Info palette |
|
|
Edit the 3D location of an accessory on one or more lighting devices |
● X/Y/Z parameters on the accessory Object Info palette ● Click-drag operation |
|
|
Edit the 3D orientation of an accessory on one or more lighting devices |
X/Y/Z Rotation parameters on the accessory Object Info palette |
|
|
Remove accessories |
|
|
|
Delete an accessory from one lighting device at a time |
Lighting Accessory tool in the drawing area |
|
|
Delete an accessory from one or more lighting devices |
Delete key in accessory edit mode |
~~~~~~~~~~~~~~~~~~~~~~~~~