 Accessory edit modeAccessory edit mode
A special accessory edit mode lets you modify the accessories on a single lighting device or a selection of lighting devices. In accessory edit mode, you can:
● Attach and remove accessories.
● Customize the accessory position and orientation independently for 2D and 3D views.
● View and edit the accessory properties.
It is recommended that you use this workflow for a multiple selection of lighting devices only when you want to insert or edit the same accessory on multiple devices. Accessories display in this mode only if they are present on all selected lighting devices. Attaching a new accessory or editing an existing one (by moving it, changing its parameter data, or deleting it) applies the same change to each lighting device in the selection.
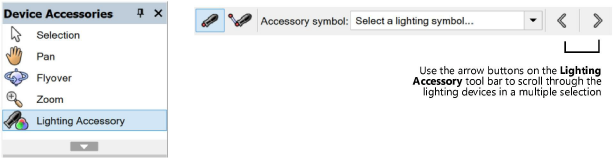
In accessory edit mode, the view and visibility settings change temporarily to help you edit the accessories. The available tools display in a special Device Accessories palette. This includes the Lighting Accessory tool, which behaves differently from the same tool in the drawing area. The tool uses different modes and provides arrow buttons for traversing a selection of lighting devices, so you can display one device at a time. The document origin and the working plane center match the insertion point of the displayed lighting device.
Follow this workflow to attach, edit, or remove accessories on a single lighting device or a selection of lighting devices. When multiple lighting devices are selected, any changes made in accessory edit mode apply to the same accessory on each lighting device.
1. Select one or more lighting devices to attach new accessories or edit the existing ones. For a multiple selection of lighting devices, the accessories to edit must be present on each lighting device.
2.On the Object Info palette, select which accessory or accessories to edit from the Edit Accessory list.
If a multi-cell lighting device is selected, the available options depend on the Edit Cell selection; see Lighting device properties.
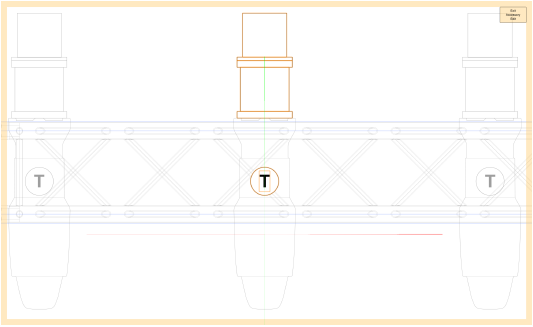
3.Click Edit Accessories to open accessory edit mode. The view zooms to the lighting device (or the first selected lighting device in a multiple selection), shown in default orientation. The display of other model objects depends on the edit mode settings on the Vectorworks preferences: Display pane.
4.All default menu commands and tool palettes are disabled except for the special Device Accessories palette. Use the available tools to insert accessories and change the view as needed.
● Use the Lighting Accessory tool to insert accessories in default or custom positions. If multiple lighting devices were selected, click the arrow buttons on the Lighting Accessory Tool bar to navigate to the desired lighting device. See Inserting accessories in accessory edit mode.
● Use the Pan, Flyover, and Zoom tools to adjust the view.
Only the 2D component of each accessory is visible in Top/Plan view. Only the 3D component is visible in 3D views.
5.Adjust the accessory location and rotation for 2D and 3D views.
As you make adjustments, use the arrow buttons on the Lighting Accessory Tool bar to view different lighting devices in a multiple selection.
● Select one or more accessories; the parameters display on the Object Info palette.
● Specify the X/Y Offset (2D View) coordinates and Plan Rotation angle to position the accessories in 2D views.
● Specify the X/Y/Z and X/Y/Z Rotation coordinates to position the accessories in 3D views.
6.Edit the accessory parameter data as needed. <Multiple values> displays for parameters that are not identical for all selected accessories.
7.Delete an accessory to remove it from both 2D and 3D views.
8.When the accessory edits are complete, click Exit Accessory Edit (or select the identical command from the Modify menu) to apply the changes and return to the drawing. Your previous view and visibility settings are restored.
~~~~~~~~~~~~~~~~~~~~~~~~~