Title block border settings
Click Title Block Border Settings from the Object Info palette of a selected title block border to open the Title Block Border Settings dialog box.
Creating plug-in object styles allows you to create plug-in objects, such as the title block border, with a combination of parameters that are determined by the style or by instance. Style parameters have a fixed value established by the style; instance parameters can be set independently for each instance of the object in the drawing.
The selected object’s settings are grouped into several panes of related parameters, which are listed on the left side of the Title Block Border Settings dialog box. Select each pane and specify the parameters.
Click to show/hide the parameters.Click to show/hide the parameters.
|
Parameter |
Description |
|
Use Style |
To create a custom title block border, leave the Unstyled setting. To use an existing title block border from the resource libraries, click Use Style; from the Resource Selector, double-click a resource to select it. |
|
Convert to Unstyled |
If Use Style is currently set to a style, select this option to convert the object to unstyled; the current values are retained, but all parameters on all panes are set to By Instance to allow editing |
|
By Style/Instance |
A graphic indicates whether each parameter is set to By Style and given a fixed value or set to By Instance and editable in the dialog box. By Style/Instance settings are established by the style and cannot be changed from the settings dialog box.
To edit the object style, see Editing plug-in object styles; editing the style modifies all plug-in objects in the file that use the style. |
|
Preview |
Dynamically displays a preview of the title block border with the currently selected parameters |
|
Zoom in on the Title Block |
Displays a close-up of the title block in the preview area |
Title block border settings: Sheet Border pane
Click to show/hide the parameters.Click to show/hide the parameters.
|
Parameter |
Description |
|
Drawing Size |
|
|
Sheet Size |
Select a standard size and format for the sheet border, or select Fit to Page or Fit to Printable Area. Select Custom to use custom sheet border dimensions, and specify the Width and Height dimensions. If the Sheet Size is changed from this pane or from the Object Info palette to one of the standard values, the Sheet Fit Mode, Margins, and grid settings are automatically updated to match those of the standard format selected. |
|
Orientation |
Select Portrait or Landscape orientation |
|
Sheet Fit Mode |
Select whether to fit the sheet to the outer or inner border dimensions |
|
Lock to Page Center |
Locks the title block border center position to the page center; deselect to position the title block border manually. If the plan has been rotated (Vectorworks Design Suite required), select Lock to Page Center to position the title block border correctly when in a non-rotated view. |
|
Margins |
|
|
Left/Right/Top/Bottom |
Specify the sheet border margin widths |
|
Border |
|
|
Hide Border |
When the title block border includes a title block, hides the sheet border and displays only the title block; although the sheet border does not display, the title block remains oriented relative to the sheet border. This field is selected and grayed if Use as a Title Block Only is selected on the Title Block pane. |
|
Use Line Weight of Object for Border |
Sets the sheet border line weight the same as the title block border object’s line weight |
|
Border Line Weight |
If Hide Border and Use Line Weight of Object for Border are deselected, select the sheet border line weight |
|
Fill Border |
Fills the area between the outer and inner border lines with a fill selected from the Attributes palette |
Title block border settings: Sheet Zones/Grids pane
Click to show/hide the parameters.Click to show/hide the parameters.
|
Parameter |
Description |
|
Vertical Zones |
Specifies the number of vertical zones to include |
|
Grid Text Order |
Indicates whether vertical grid text starts at the top or bottom of the border, if shown |
|
Horizontal Zones |
Specifies the number of horizontal zones to include |
|
Grid Number Order |
Indicates whether horizontal grid numbers start at the left or right of the border, if shown |
|
Grid Label Size |
Specifies the text size for both grid text and numbers |
|
Grid Marker Line Length |
Specify the length of the grid marker lines and grid line extensions; lines cannot extend past the margin area |
|
Use Line Weight of Object for Grid Marker |
Sets the grid marker line weight the same as the title block border object’s line weight |
|
Grid Marker Line Weight |
If Use Line Weight of Object for Grid Marker is deselected, select the line weight of the grid marker lines and extensions |
|
Displays grid text and lines in the border margin. This setting can also be accessed from the object context menu: right-click on the title block border, and select Show Grids. |
|
|
Show Grid Lines |
Displays grid lines on the drawing |
|
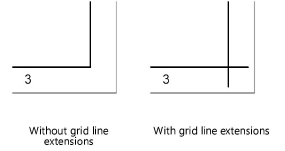
Show Grid Line Extensions |
Displays lines that extend past the border into the margin area
|
|
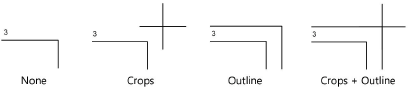
Crop Marks |
Select whether to display crop marks and/or an outline around the border
|
|
Use Line Weight of Object for Crop Marks |
Sets the crop mark line weight the same as the title block border object’s line weight |
|
Crop Marks Line Weight |
If Use Line Weight of Object for Crop Marks is deselected, select the line weight of the crop marks |
|
Fold Marks |
Select the fold mark measurements when adding fold marks to the title block border. For options listed numerically, the first measurement specifies the drawing fold width and the second measurement indicates the margin fold width. Select Custom to specify custom fold mark distances. If the Sheet Size is changed from this pane or from the Object Info palette to one of the standard values, the Sheet Fit Mode, Margins, and grid settings are automatically updated to match those of the standard format selected. |
|
Margin Width |
When custom fold marks are selected, enter the margin fold width |
|
Folded Width |
When custom fold marks are selected, enter the drawing fold width |
|
Folded Height |
When custom fold marks are selected, enter the drawing fold height |
Title block border settings: Title Block pane
Click to show/hide the parameters.Click to show/hide the parameters.
|
Parameter |
Description |
|
Use as Title Block Only |
Displays only the title block and hides all other border elements. The title block is not oriented relative to the page or the border. To hide the border but maintain the title block’s orientation relative to the border, select Hide Border on the Sheet Border pane. |
|
Constrain Title Block |
If Use as Title Block Only is deselected, specifies the title block location relative to the sheet border. Edits that change the title block’s bounding box may shift the position of the title block relative to the sheet border. Select No Constraint to prevent this shift or to allow custom placement of the title block by dragging. |
|
Title Block Margin |
Creates space to accommodate a horizontal, vertical, or block title block outside the sheet grid; the size of the sheet grid adjusts as needed |
|
Countersignature |
Select whether to include a countersignature area in the sheet border margin area, and, if included, where to place it. Vertical places the countersignature vertically in the upper left corner of the sheet border. Horizontal places the countersignature horizontally in the upper right corner of the sheet border. Sheet border margins may need adjustments to allow enough space for the countersignature. |
|
Scale Factor |
Sets the scale factor for the title block; a factor of less than one decreases the size of the symbol, while a factor of more than one increases its size |
|
Always Use Layout Graphics Attributes |
Defines all fonts in the title block by the selected title block border symbol. When deselected, typefaces and styles can be applied directly to the text in the title block border object. |
|
Use Automatic Drawing Coordination |
Includes the title block in the file’s automatic numbering and naming system |
|
Title Block Graphics |
Indicates if the current title block layout is controlled by style or set by instance |
|
Import Title Block Graphics |
If title block graphics are set by instance, opens the Import Title Block Graphics dialog box; double-click a title block graphic from the Resource Selector to select it |
|
Edit Title Block Layout |
If title block graphics are set by instance, saves the current settings and closes the Title Block Border Settings dialog box, and then enters object editing mode for Editing a title block layout and/or Linking title block text to data records. The Title Block Border Settings dialog box reopens after the layout edits are completed. |
|
Save Title Block Graphics |
If title block graphics are set by instance, saves the current title block layout as a 2D symbol in the current file |
Title block border settings: Project Data pane
Project-wide data shared by all title block borders are managed from this pane; changes made to the Project Data pane of any title block border in the file are made to all title block borders in the file.
Click to show/hide the parameters.Click to show/hide the parameters.
|
Parameter |
Description |
|
Project data fields |
Displays fields that are part of the Title Block Project Data record and their values. Some fields are added and completed automatically. Fields can be re-ordered and fields can be added in the Manage Project Data dialog box. If there are too many fields to fit on one page, click <Prev and Next> to scroll through the list. Only the fields that are included in the list automatically and the additional fields that are linked to text objects in the title block border layout display in the Project Data Pane. Other fields can be viewed in the Manage Project Data dialog box. Choose whether to include the file path in the File Name. For Total Num Sheets, select Use Total number of Active Title Block Borders to automatically calculate the number of layers in the file with Activate title block selected in the Object Info palette; otherwise, enter the number. |
|
Manage Project Data |
Opens the Manage Project Data dialog box to specify and order the available fields |
Managing project data
The Manage Project Data dialog box allows you to specify and order the fields on the Project Data pane.
Click to show/hide the parameters.Click to show/hide the parameters.
|
Parameter |
Description |
|
# (field order) |
Orders the fields listed on the Project Data pane. Click the # column of the field to be moved, and drag it up or down the list. When a title block border style is imported from one file to another, the field order for the style may change and need to be reset. Field visibility should remain as set. |
|
Display |
Fields with a check mark display in the Title Block Border Settings dialog box and the Title Block Manager. If a title block border style’s graphics are set by style, the setting is the same for all title block borders using the style. Otherwise, the setting is set individually for each title block border in the file. |
|
Project data fields list |
Displays the existing project data fields and their values. Some fields are added and completed automatically. Custom fields can be added; these display in italics. |
|
Is Multiline Text |
Text fields with a check mark wrap onto multiple lines as needed in the Title Block Border Settings dialog box and the Title Block Manager; text fields with no check mark display on a single line only |
|
Add |
Opens the Edit Field dialog box to add a field to the Title Block Project Data record; see Creating record formats |
|
Edit |
Opens the Edit Field dialog box to edit the selected user-added field in the Title Block Project Data record; see Creating record formats |
|
Delete |
Deletes the selected user-added field from the Title Block Project Data record |
Title block border settings: Sheet Data pane
Sheet-specific data are managed from this pane.
Click to show/hide the parameters.Click to show/hide the parameters.
Managing sheet data
The Manage Sheet Data dialog box allows you to specify and order the fields on the Sheet Data pane.
Click to show/hide the parameters.Click to show/hide the parameters.
|
Parameter |
Description |
|
# (field order) |
Orders the fields listed on the Sheet Data pane. Click the # column of the field to be moved, and drag it up or down the list. When a title block border style is imported from one file to another, the field order for the style may change and need to be reset. Field visibility should remain as set. |
|
Display |
Fields with a check mark display in the Title Block Border Settings dialog box and the Title Block Manager. If a title block border style’s graphics are set by style, the setting is the same for all title block borders using the style. Otherwise, the setting is set individually for each title block border in the file. |
|
Sheet data fields list |
Displays the existing sheet-specific data fields and their values. Some fields are added and completed automatically. Custom fields can be added; these display in italics. |
|
Is Multiline Text |
Text fields with a check mark wrap onto multiple lines as needed in the Title Block Border Settings dialog box and the Title Block Manager; text fields with no check mark display on a single line only |
|
Add |
Opens the Edit Field dialog box to add a field to the Title Block Sheet Data record; see Creating record formats |
|
Edit |
Opens the Edit Field dialog box to edit the selected field in the Title Block Sheet Data record; see Creating record formats |
|
Delete |
Deletes the selected field from the Title Block Sheet Data record |
 Title block border settings: Revision Data pane
Click to show/hide the parameters.Click to show/hide the parameters.
|
Parameter |
Description |
|
Revisions list |
Lists the revision history for the current layer. The revision information is stored in a series of record formats named Title Block Revision Data-x, where x denotes the revision number. For reporting purposes, the most recent revision always has the x value of 1. The x values of earlier revisions are incremented up one number each time a revision is added. The record formats are attached to the title block border objects that are revised with each number. The record format is not visible in the Resource Manager but it is available in the worksheet formulas (see Project revision and issue history worksheets) and when Creating reports. |
|
Add/Edit |
Opens the Add New Revision/Edit Existing Revision dialog box, for Adding and editing drawing revisions. See the Document Options pane to set the Revision Number type and numbering options. |
|
Delete |
Deletes the selected revisions, and resets the Current Revision Number if Numbering is set to Auto-Increment on the Document Options pane |
|
Delete All |
Deletes all revisions from the list |
|
Current Revision Number |
Displays the number of the most recent revision |
|
Show the _ Most Current Revision on the Drawing |
Specifies how many revisions to list in the revision block and revision reports (see Project revision and issue history worksheets) |
|
Direction |
Specifies in which order to list the revisions. Up Sheet lists the most recent revision on top, and Down Sheet lists the oldest revision on top. |
|
Revision Note Spacing Factor |
Specifies how much space to put between revisions in the revision block |
Depending on the length of the revision entries, they may need to be top-aligned in the revision section of the title block border; see Top-aligning revision and issue text in the title block layout.
Title block border settings: Issue Data pane
Click to show/hide the parameters.Click to show/hide the parameters.
|
Parameter |
Description |
|
Issues list |
Lists the issue history for the current layer. The issue information is stored in a series of record formats named Title Block Issue Data-x, where x denotes the issue number. For reporting purposes, the most recent issue always has the x value of 1. The x values of earlier issues are incremented up one number each time an issue is added. The record formats are attached to the title block border objects that are issued with each number. The record format is not visible in the Resource Manager but it is available in the worksheet formulas (see Project revision and issue history worksheets) and when Creating reports. |
|
Add/Edit |
Opens the Add New Issue/Edit Existing Issue dialog box, for Adding and editing drawing issues. See the Document Options pane to set the Issue Number type and numbering options. |
|
Delete |
Deletes the selected issues, and resets the Current Issue Number if Numbering is set to Auto-Increment on the Document Options pane |
|
Delete All |
Deletes all issues from the list |
|
Current Issue Number |
Displays the number of the most recent issue |
|
Show the _ Most Current issues on the Drawing |
Specifies how many issues to list in the issue block and issue reports (see Project revision and issue history worksheets) |
|
Direction |
Specifies in which order to list the issues. Up Sheet lists the most recent issue on top, and Down Sheet lists the oldest issue on top. |
|
Issue Note Spacing Factor |
Specifies how much space to put between issues in the issue block |
Depending on the length of the issue entries, they may need to be top-aligned in the revision section of the title block border; see Top-aligning revision and issue text in the title block layout.
Title block border settings: North Point pane
Click to show/hide the parameters.Click to show/hide the parameters.
Title block border settings: Drawing Stamp pane
To display a drawing stamp, you must insert a text block in the appropriate location (see Editing a title block layout) and then assign that text block the Data Type Drawing Stamp (see Linking title block text to data records).
Click to show/hide the parameters.Click to show/hide the parameters.
|
Parameter |
Description |
|
Display Drawing Stamp |
Displays a text-based drawing stamp in the title block border |
|
Stamp Text |
Select the desired text; if Custom is selected, enter the Custom Text |
|
Text Style |
Select the text style resource to apply to the drawing stamp; if there are no available text style resources, the current text settings are applied. <Object Text Attributes> allows you to apply text attributes directly to the stamp text; <Class Text Style> uses the text style of the text block object’s class. |
|
Text Size |
Displays the text size; if Text Style is set to <Object Text Attributes> enter a value and unit |
|
Use ALL CAPS |
Uses all upper case letters in the drawing stamp; if deselected, the text will be in Title Case |
|
Append Date |
Adds a date to the stamp; enter the Date, which appears as a suffix to the Stamp Text |
|
Stamp Angle |
Specifies the stamp angle |
|
Position |
Enter the X and Y coordinates for the drawing stamp; the stamp can also be positioned using the 2D control point at its insertion point |
Title block border settings: Document Options pane
The revision and issue number options apply to all layers in the file.
Click to show/hide the parameters.Click to show/hide the parameters.
|
Parameter |
Description |
|
Numbering |
For the revision number and issue number, choose whether to enter numbers manually or have them automatically increment with each addition |
|
Type of Numbering |
If Numbering is set to Auto-Increment, choose whether to use numbers or letters |
