 Landscape area preferences
Landscape area preferences are set from the Landscape Area Preferences dialog box (see Creating landscape areas). The parameters can be edited later from the Object Info palette.
Click to show/hide the parameters.Click to show/hide the parameters.
|
Parameter |
Description |
|
Use Style |
From the Resource Selector, double-click a style to apply it, or leave the landscape area unstyled. See Concept: Plug-in object styles. |
|
Convert to Unstyled |
Converts a styled landscape area to unstyled for editing; the current values are retained, but all parameters on all panes are set to By Instance to allow editing |
|
General |
|
|
Name |
Enter a landscape area name, which can be displayed in the tag |
|
Tag Display |
Displays a tag to the right or left of the leader line |
|
Tag Class |
To control appearance and visibility of the landscape area tag, select a class from the list of classes present in the drawing, or create a new class. Select <Landscape Area Class> to place the tag in the same class as the landscape area object. |
|
Tag Line Angle |
Specifies the angle of the leader line. Range: 0–360°. |
|
Tag Text Angle |
Sets the text angle. Range: 0–360°. To display the tag to the left, specify an angle greater than 90° and less than 270°. To display the tag to the right, specify an angle less than 90° or greater than 270°. |
|
Tag Header |
Select the information to display in the first line of the tag; select Set Custom Tag to define a custom tag (see Creating a custom landscape area tag) |
|
Tag Body |
Select the information to display in the main portion of the landscape tag; select Set Custom Tag to define a custom landscape area tag (see Creating a custom landscape area tag) |
|
Area Units |
Select the units for calculating the landscape area; this is set to the file units by default (see Units), but can be changed |
|
Display tag line marker |
Displays a marker at the end of the leader line; specify the marker to use by editing the tag class properties (see Setting class properties) |
|
Edit Components |
Opens the Landscape Components dialog box for determining the structure that makes up the landscape area, as described in Creating landscape area components |
|
Plant Information |
Specifies the species makeup of the landscape area, as well as how to calculate the plant quantities for tag display and planting plan worksheets; select a Distribution rate or by Percentage |
|
Distribution rate (Custom rate/Fixed percentage) |
Calculates plant quantity based on plant distribution rate. As each plant is added to the list of plants in the landscape area, its rate per area or from the center is specified; the percentage of each plant in the landscape area is calculated automatically. Coverage is always set to 100%. |
|
Distribution rate (Custom rate/Custom percentage) |
Calculates plant quantity based on plant distribution rate as well as percentage. As each plant is added to the list of plants in the landscape area, its rate per area or from the center is specified, as well as the percentage of each plant in the landscape area. This option allows plants to be merged within the landscape area. |
|
Percentage (Fixed rate/Custom percentage) |
Calculates plant quantity based on plant percentage of the total. As each plant is added to the list of plants in the landscape area, its percentage is specified. The plant distribution rate must be the same for all plants in the landscape area; specify the rate and units to use. |
|
Rate (Percentage) |
For plant quantities based on percentage, enter the fixed distribution rate of the plants and select the calculation method for the rate. The percentage of each plant species is set when specifying the plants. |
|
Area Increase Factor |
If there is no site model under the landscape area, specify the area increase factor to determine the area value. |
|
Plant list |
Lists the plants in the landscape area, including each plant’s distribution rate and percentage of the plant total. The plant order can be changed by click-dragging an item in the # column to a new position; this affects the 2D plant stacking order (plants at the top of the list are drawn over the plants lower in the list) as well as the plant list order in the plant tag. |
|
Add Plant |
Opens the Edit Plant Information dialog box, to add a plant to the list of plants in the landscape area and specify its distribution rate or percentage |
|
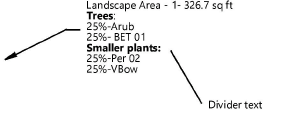
Opens the Edit Divider dialog box, to include divider text in the landscape area tag. If desired, the divider text can have different formatting from the rest of the tag text. Data tags can also display divider text.
Click-drag in the plant list # column to create the proper order of divider text within the plant list. The Plant/Tag ID of a divider consists of dashed lines, so that it is easy to find in the list. |
|
|
Edit |
Opens the Edit Plant Information dialog box, to edit the selected plant or plants |
|
Delete |
Deletes the selected plant or plants from the list of plants in the landscape area |
|
Total % |
For a Distribution rate with a fixed percentage or a Percentage calculation, displays the total percentage of plant distribution. The total must equal 100. |
|
Graphics |
|
|
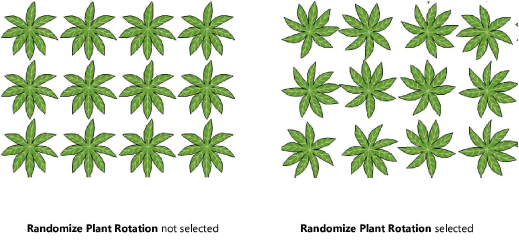
Randomize plant rotation |
Rotates individual plants randomly for a more natural appearance
|
|
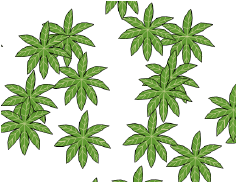
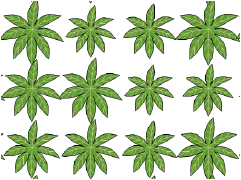
Randomize plant position |
Places plants in random locations rather than in a grid-like array
|
|
Plant Diameter Variation |
Specify whether to vary the plant diameters randomly, and by what percentage
|
|
Plant Diameter Visual Scale |
Visually scales the plant diameter by the factor entered, making plants look wider on the drawing without changing the actual plant diameter value |
|
Plant Height Variation |
Specify whether to vary the plant heights randomly, and by what percentage |
|
Plant Height Visual Scale |
Visually scales the plant height by the factor entered, making plants look taller on the drawing without changing the actual plant height value |
|
2D Display |
|
|
Border Style |
Specifies the type of border for the edge of the landscape area |
|
Standard |
Sets the border to a single line |
|
Plant Cloud |
Draws the border with a convex or concave cloud shape; specify the cloud billow type and the billow parameters. In addition to selecting the billow size and height, the billow variability sets the variation between the smallest and largest billows. |
|
Plant Line |
Creates a freehand plant line border; for a rougher plant line border, specify a short segment length with high segment thickness |
|
Show plants in 2D |
Displays individual plant symbols in Top/Plan view. Deselect the option to create a landscape area that reports plants and area with a more generalized appearance that can take on attributes like a gradient or image fill. |
|
3D Display |
Select a 3D display option for the landscape area; in 3D views, plants conform to the surface of the site model if one exists |
|
Display the components in 3D |
When components have been specified on the General pane, displays the components in 3D section views |
|
Display as 3D polygon |
Creates a 3D polygon at a default elevation of 0, which can display a fill color when rendered. Alternatively, assign the landscape area a texture from the Render tab of the Object Info palette. When the landscape area is to be associated with a site model, select the layer with the site model from the Site Model Layer list on the Object Info palette. The 3D polygon is set to the site model surface; the polygon has no fill in this case, and the plants, if any, are on the site model surface. |
|
Display as a texture bed on: |
Creates a texture bed for the 3D representation of the landscape area; select whether to display the texture bed on the existing site model or the proposed site model. If there is more than one site model in the file, the texture bed conforms to the site model that is in the same layer as the landscape area. Apply a texture to the landscape area from the Render tab of the Object Info palette. The texture set for the Datum component, when components exist and are set to display, supersedes this texture selection. The texture can be edited with the Attribute Mapping tool; see Direct texture mapping. Select the site model and click Update from the Object Info palette; the landscape area displays as a texture bed on the site model. |
|
Show plants in 3D |
When the landscape area contains plant symbols with an image prop 3D component, switching to a 3D view displays the image props, for a realistic 3D view. Plant density is determined by the distribution or percentage specified for the landscape area. 3D loci are placed when the plant styles do not have a 3D component. |
The Plant Information pane specifies the plants to include in the landscape area and their distribution. Click Add Plant, or select a plant from the list and click Edit, to open the Edit Plant Information dialog box. Alternatively, double-click an existing row of plants to edit it.
Click to show/hide the parameters.Click to show/hide the parameters.
|
Parameter |
Description |
|
Plant selector |
Opens the Resource Selector to select a plant style for placement; double-click a resource to activate it |
|
Latin Name/Common Name/Plant/Tag ID |
Displays the selected plant’s style information |
|
Rate |
If Distribution Rate is selected in the Landscape Area Preferences dialog box, indicate the plant distribution value and units. This distribution value is used to calculate the plant quantity for each plant type in the landscape area. |
|
Percentage |
If Percentage is selected in the Landscape Area Preferences dialog box, indicate the percentage of this plant in the landscape area. Using a fixed distribution rate for all plants, the percentage is used to calculate the plant quantity for each plant type in the landscape area. The total value of all plants must add up to 100%. |
To save the landscape area preferences as a style, select New Plug-in Style from Unstyled Plug-in from the Style list on the Object Info palette. The landscape are style is saved as a resource in the file, and displays in the Resource Manager and in the Landscape Area list on the Tool bar.
